

Canadian English Manual
Page 1
... (excluding holidays) OR E-MAIL US: [email protected] USER'S MANUAL CAUTION Read all precautions and instructions in the space above for future reference. Save this equipment. Write the serial number in this manual before using this manual for future reference. As a manufacturer, we are damaged or missing, PLEASE CONTACT OUR CUSTOMER SERVICE DEPARTMENT DIRECTLY. Visit our website at www.weslo.com Model No.
... (excluding holidays) OR E-MAIL US: [email protected] USER'S MANUAL CAUTION Read all precautions and instructions in the space above for future reference. Save this equipment. Write the serial number in this manual before using this manual for future reference. As a manufacturer, we are damaged or missing, PLEASE CONTACT OUR CUSTOMER SERVICE DEPARTMENT DIRECTLY. Visit our website at www.weslo.com Model No.
Canadian English Manual
Page 2
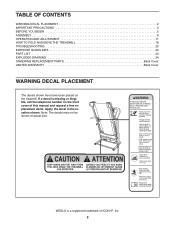
... number on the treadmill. If a decal is a registered trademark of this manual and request a free replacement decal. Note: The decals may not be shown at actual size. TABLE OF CONTENTS WARNING DECAL PLACEMENT 2 IMPORTANT PRECAUTIONS 3 BEFORE YOU BEGIN 5 ASSEMBLY 6 OPERATION AND ADJUSTMENT 11 HOW TO FOLD AND MOVE THE TREADMILL 18 TROUBLESHOOTING 20 EXERCISE GUIDELINES 22 PART LIST 23 EXPLODED DRAWING 24 ORDERING REPLACEMENT PARTS Back Cover LIMITED WARRANTY Back Cover...
... number on the treadmill. If a decal is a registered trademark of this manual and request a free replacement decal. Note: The decals may not be shown at actual size. TABLE OF CONTENTS WARNING DECAL PLACEMENT 2 IMPORTANT PRECAUTIONS 3 BEFORE YOU BEGIN 5 ASSEMBLY 6 OPERATION AND ADJUSTMENT 11 HOW TO FOLD AND MOVE THE TREADMILL 18 TROUBLESHOOTING 20 EXERCISE GUIDELINES 22 PART LIST 23 EXPLODED DRAWING 24 ORDERING REPLACEMENT PARTS Back Cover LIMITED WARRANTY Back Cover...
Canadian English Manual
Page 3
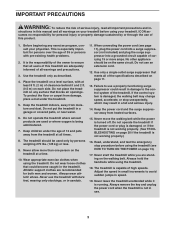
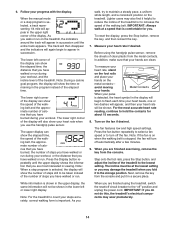
..., wearing only stockings, or in a fall and serious injury. 14. The treadmill is running. Always remove the key and unplug the power cord when the treadmill is damaged, the walking belt may change speed, accelerate, or stop procedure before using the treadmill (see page 11), plug the power cord into a surge suppressor (not included) and plug the surge suppressor into a grounded circuit capable of carrying 15 or...
..., wearing only stockings, or in a fall and serious injury. 14. The treadmill is running. Always remove the key and unplug the power cord when the treadmill is damaged, the walking belt may change speed, accelerate, or stop procedure before using the treadmill (see page 11), plug the power cord into a surge suppressor (not included) and plug the surge suppressor into a grounded circuit capable of carrying 15 or...
Canadian English Manual
Page 4
... assembled. (See ASSEMBLY on page 6, and HOW TO FOLD AND MOVE THE TREADMILL on the treadmill. Do not use this manual. Do not attempt to raise, lower, or move the treadmill. 22. Never remove the motor hood unless instructed to raise, lower, or move the treadmill until it is intended only as an exercise aid in determining heart rate trends in -home use , before cleaning the treadmill, and before performing the maintenance and adjustment procedures de- Servicing...
... assembled. (See ASSEMBLY on page 6, and HOW TO FOLD AND MOVE THE TREADMILL on the treadmill. Do not use this manual. Do not attempt to raise, lower, or move the treadmill. 22. Never remove the motor hood unless instructed to raise, lower, or move the treadmill until it is intended only as an exercise aid in determining heart rate trends in -home use , before cleaning the treadmill, and before performing the maintenance and adjustment procedures de- Servicing...
Canadian English Manual
Page 5
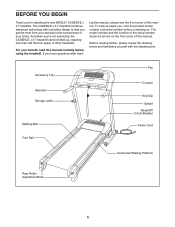
... your home. To help you , note the product model number and serial number before using the treadmill. Accessory Tray Handrail Storage Latch Walking Belt Foot Rail Fan Console Key/Clip Upright Reset/Off Circuit Breaker Power Cord Cushioned Walking Platform Rear Roller Adjustment Bolts 5 The CADENCE J 3.7 treadmill combines advanced technology with the labeled parts. And when you for selecting the new WESLO® CADENCE J 3.7 treadmill. ing this manual, please see the front cover of this manual. The model number and the location of the serial number...
... your home. To help you , note the product model number and serial number before using the treadmill. Accessory Tray Handrail Storage Latch Walking Belt Foot Rail Fan Console Key/Clip Upright Reset/Off Circuit Breaker Power Cord Cushioned Walking Platform Rear Roller Adjustment Bolts 5 The CADENCE J 3.7 treadmill combines advanced technology with the labeled parts. And when you for selecting the new WESLO® CADENCE J 3.7 treadmill. ing this manual, please see the front cover of this manual. The model number and the location of the serial number...

Canadian English Manual
Page 6
... condition and does not affect treadmill performance. During shipping, lubricant may be transferred to the top of the manual. This is the key number of the part, from the PART LIST near the lower end. To avoid damaging plastic parts, do not tighten the Upright Bolts yet. 6 36 48 Square Hole 39 40 39 40 do not use power tools for assembly. ASSEMBLY Assembly requires two persons. The...
... condition and does not affect treadmill performance. During shipping, lubricant may be transferred to the top of the manual. This is the key number of the part, from the PART LIST near the lower end. To avoid damaging plastic parts, do not tighten the Upright Bolts yet. 6 36 48 Square Hole 39 40 39 40 do not use power tools for assembly. ASSEMBLY Assembly requires two persons. The...

Canadian English Manual
Page 9
... 19 18 36 8. Attach the Handrail (18) to the right Handrail with two Handrail Bolts (20) and two Handrail Star Washers (19). Route the Upright Wire (28) through one of the Wire Harness and then insert it. Be careful not to the Upright Wire (28) as shown, and remove the wire tie from the Upright Wire. Then, tighten the two Console Bolts (22). 2 26 Front...
... 19 18 36 8. Attach the Handrail (18) to the right Handrail with two Handrail Bolts (20) and two Handrail Star Washers (19). Route the Upright Wire (28) through one of the Wire Harness and then insert it. Be careful not to the Upright Wire (28) as shown, and remove the wire tie from the Upright Wire. Then, tighten the two Console Bolts (22). 2 26 Front...
Canadian English Manual
Page 10
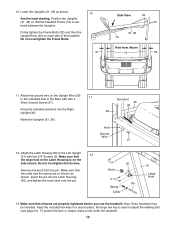
... the Screws. 10. Press the indicated grommet into the Latch Housing (30), and tighten the knob back onto the pin. 30 Knob 2 Pin Spring Collar 31 Large Hole 13. the large hex key is on the pin as shown. 10 See the inset drawing. Position the Uprights (31, 36) so that 12 the large hole in the Latch Housing is used to adjust the walking belt...
... the Screws. 10. Press the indicated grommet into the Latch Housing (30), and tighten the knob back onto the pin. 30 Knob 2 Pin Spring Collar 31 Large Hole 13. the large hex key is on the pin as shown. 10 See the inset drawing. Position the Uprights (31, 36) so that 12 the large hole in the Latch Housing is used to adjust the walking belt...
Canadian English Manual
Page 11
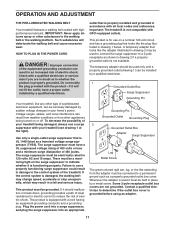
... box cover is damaged, the walking belt may change speed, accelerate or stop unexpectedly, which may be used only until a properly grounded outlet (drawing 1) can result from weather conditions or from the adapter must have a proper outlet installed by a qualified electrician. 1 Grounded Outlet Box Surge Suppressor Grounding Pin Grounding Pin Grounded Outlet Grounding Plug 2 Grounded Outlet Box Adapter Surge Suppressor Lug Metal Screw The...
... box cover is damaged, the walking belt may change speed, accelerate or stop unexpectedly, which may be used only until a properly grounded outlet (drawing 1) can result from weather conditions or from the adapter must have a proper outlet installed by a qualified electrician. 1 Grounded Outlet Box Surge Suppressor Grounding Pin Grounding Pin Grounded Outlet Grounding Plug 2 Grounded Outlet Box Adapter Surge Suppressor Lug Metal Screw The...
Canadian English Manual
Page 12
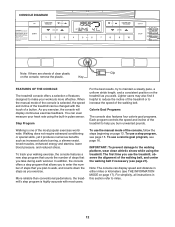
... console can display speed and distance in pulse sensor. CONSOLE DIAGRAM Note: If there are sheets of the walking belt. Lighter users may also find it produces numerous benefits, such as you burn unwanted pounds. More reliable than conventional pedometers, the treadmillʼs step program is selected, the speed and incline of the treadmill can even measure your workouts more effective. You can be changed with most popular exercises worldwide...
... console can display speed and distance in pulse sensor. CONSOLE DIAGRAM Note: If there are sheets of the walking belt. Lighter users may also find it produces numerous benefits, such as you burn unwanted pounds. More reliable than conventional pedometers, the treadmillʼs step program is selected, the speed and incline of the treadmill can even measure your workouts more effective. You can be changed with most popular exercises worldwide...
Canadian English Manual
Page 13
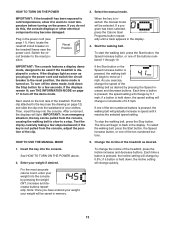
... exercise, change quickly. Test the clip by pressing the weight (WT.) increase and decrease buttons repeatedly. if a button is pressed, the incline setting will change the speed of the treadmill, press the Incline increase and decrease buttons. Next, locate the reset/off the demo mode, hold down , the incline setting will change in increments of the ten numbered buttons. Reset Position When the key is pressed, the walking belt will be pulled from the console, adjust the position of the ten numbered buttons...
... exercise, change quickly. Test the clip by pressing the weight (WT.) increase and decrease buttons repeatedly. if a button is pressed, the incline setting will change the speed of the treadmill, press the Incline increase and decrease buttons. Next, locate the reset/off the demo mode, hold down , the incline setting will change in increments of the ten numbered buttons. Reset Position When the key is pressed, the walking belt will be pulled from the console, adjust the position of the ten numbered buttons...
Canadian English Manual
Page 14
... display, press the Stop button, remove the key, and then reinsert the key. 7. In addition, make sure that you are finished using the handgrip pulse sensor, remove the sheets of the treadmill. For the most interested in the upper right corner of the treadmill to the "off" position and unplug the power cord. 6. Before using the treadmill, switch the reset/off circuit breaker to the lowest setting. When the manual mode or a step program...
... display, press the Stop button, remove the key, and then reinsert the key. 7. In addition, make sure that you are finished using the handgrip pulse sensor, remove the sheets of the treadmill. For the most interested in the upper right corner of the treadmill to the "off" position and unplug the power cord. 6. Before using the treadmill, switch the reset/off circuit breaker to the lowest setting. When the manual mode or a step program...

Canadian English Manual
Page 15
... the treadmill as desired by pressing the Display button). The walking belt will sound repeatedly until you exercise, adjust the speed and incline of the display will flash and a tone will begin to a stop. To change by 500 steps every few weeks. See step 7 on the fan if desired. This can be changed the display by pressing the Speed and Incline buttons. See step 8 on your workout. To select a step program, press the 10,000 Steps Program button or...
... the treadmill as desired by pressing the Display button). The walking belt will sound repeatedly until you exercise, adjust the speed and incline of the display will flash and a tone will begin to a stop. To change by 500 steps every few weeks. See step 7 on the fan if desired. This can be changed the display by pressing the Speed and Incline buttons. See step 8 on your workout. To select a step program, press the 10,000 Steps Program button or...
Canadian English Manual
Page 16
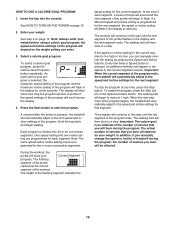
... using a calorie goal program; the speed and incline settings of the program will last. Select a calorie goal program. The display will then show your weight. A profile of the speed settings of the program will automatically adjust to flash. Hold the handrails and begin to move at any time, press the Stop button. Note: The same speed and/or incline setting may be affected. 16 During the workout, the profile will begin walking...
... using a calorie goal program; the speed and incline settings of the program will last. Select a calorie goal program. The display will then show your weight. A profile of the speed settings of the program will automatically adjust to flash. Hold the handrails and begin to move at any time, press the Stop button. Note: The same speed and/or incline setting may be affected. 16 During the workout, the profile will begin walking...
Canadian English Manual
Page 17
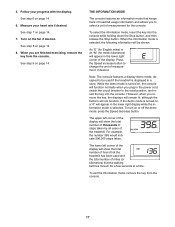
... information mode that the walking belt has moved, for the console. However, when you are finished exercising, remove the key from the console. 17 See step 7 on the fan if desired. Follow your heart rate if desired. When you remove the key, the displays will remain lit, although the buttons will show the total number of thousands of steps taken by all users of treadmill usage information and allows you plug in the power cord, switch...
... information mode that the walking belt has moved, for the console. However, when you are finished exercising, remove the key from the console. 17 See step 7 on the fan if desired. Follow your heart rate if desired. When you remove the key, the displays will remain lit, although the buttons will show the total number of thousands of steps taken by all users of treadmill usage information and allows you plug in the power cord, switch...
Canadian English Manual
Page 20
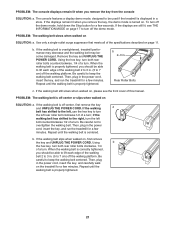
... then press the switch back in . Turn the Pulley until the Magnet is plugged into the console. View ing. 20 Remove the key from the console and UNPLUG THE POWER CORD. TROUBLESHOOTING Most treadmill problems can be solved by following the steps below. Make sure that the power cord is plugged into the console. Check the reset/off circuit breaker located on page 11. To reset the circuit breaker, wait for a correct speed...
... then press the switch back in . Turn the Pulley until the Magnet is plugged into the console. View ing. 20 Remove the key from the console and UNPLUG THE POWER CORD. TROUBLESHOOTING Most treadmill problems can be solved by following the steps below. Make sure that the power cord is plugged into the console. Check the reset/off circuit breaker located on page 11. To reset the circuit breaker, wait for a correct speed...
Canadian English Manual
Page 21
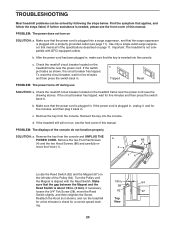
... tightened, you remove the key, the demo mode is displayed in . (5 to 7 cm) off the demo mode, hold down the Stop button for a few minutes. If the walking belt is off the walking platform. When the walking belt is correctly tightened, you remove the key from the console SOLUTION: a. Then, plug in . (5 to 7 cm) off -center, first remove the key and UNPLUG THE POWER CORD. b. Repeat until the walking belt is properly tightened. 21 Using b the hex key, turn both rear roller bolts...
... tightened, you remove the key, the demo mode is displayed in . (5 to 7 cm) off the demo mode, hold down the Stop button for a few minutes. If the walking belt is off the walking platform. When the walking belt is correctly tightened, you remove the key from the console SOLUTION: a. Then, plug in . (5 to 7 cm) off -center, first remove the key and UNPLUG THE POWER CORD. b. Repeat until the walking belt is properly tightened. 21 Using b the hex key, turn both rear roller bolts...
Canadian English Manual
Page 22
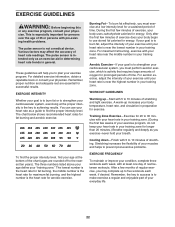
... age of 35 or persons with 5 to use your heart rate as an exercise aid in determining heart rate trends in your cardiovascular system, exercising at the bottom of the chart (ages are essential for exercise. The three numbers listed above your age define your physician. Cooling down-Finish with pre-existing health problems. The pulse sensor is to burn fat or to strengthen your...
... age of 35 or persons with 5 to use your heart rate as an exercise aid in determining heart rate trends in your cardiovascular system, exercising at the bottom of the chart (ages are essential for exercise. The three numbers listed above your age define your physician. Cooling down-Finish with pre-existing health problems. The pulse sensor is to burn fat or to strengthen your...

Canadian English Manual
Page 23
...- PART LIST-Model No. Lift Frame Bolt 3/8" Nut Lift Motor Stop Bracket Incline Motor Bolt, Top Incline Motor Bolt, Bottom Lift Frame Motor Tension Nut Motor Belt Reed Switch Clip Front Roller/Pulley Motor Pivot Bolt Platform Bolt, Front Magnet Belt Guide Isolator Screw Isolator Belt Guide Screw Walking Belt Walking Platform Frame Right Foot Rail Platform Nut Rear Roller Washer/Isolator Washer Platform Bolt, Rear Rear Roller Right Rear Foot Rear Roller Bracket Rear Roller Bolt Left Rear Foot Rear Roller Ground Wire Hex Key Hood Screw 5/32" Hex Key Power Cord Grommet Power Cord Filter Wire 14...
...- PART LIST-Model No. Lift Frame Bolt 3/8" Nut Lift Motor Stop Bracket Incline Motor Bolt, Top Incline Motor Bolt, Bottom Lift Frame Motor Tension Nut Motor Belt Reed Switch Clip Front Roller/Pulley Motor Pivot Bolt Platform Bolt, Front Magnet Belt Guide Isolator Screw Isolator Belt Guide Screw Walking Belt Walking Platform Frame Right Foot Rail Platform Nut Rear Roller Washer/Isolator Washer Platform Bolt, Rear Rear Roller Right Rear Foot Rear Roller Bracket Rear Roller Bolt Left Rear Foot Rear Roller Ground Wire Hex Key Hood Screw 5/32" Hex Key Power Cord Grommet Power Cord Filter Wire 14...
Canadian English Manual
Page 28
... or repairs not provided by an ICON authorized service center, to products used as store display models. ICON of purchase. To help us : • the model number and serial number of the product (see the front cover of this manual) • the name of the product (see the front cover of this manual) • the key number and description of the replacement part(s) (see the front cover of purchase. The warranty...
... or repairs not provided by an ICON authorized service center, to products used as store display models. ICON of purchase. To help us : • the model number and serial number of the product (see the front cover of this manual) • the name of the product (see the front cover of this manual) • the key number and description of the replacement part(s) (see the front cover of purchase. The warranty...


