

Canadian English Manual
Page 1
.... Serial Number Decal USER'S MANUAL QUESTIONS? As a manufacturer, we are damaged or missing, PLEASE CONTACT OUR CUSTOMER SERVICE DEPARTMENT DIRECTLY. Visit our website at www.weslo.com new products, prizes, fitness tips, and much more! CALL TOLL-FREE: 1-888-936-4266 Mon.-Fri., 8:00 until 17:00 EST (excluding holidays) OR....ca CAUTION Read all precautions and instructions in this manual before using this manual for future reference. Model No. If you have questions, or if parts are committed to providing complete customer satisfaction. WCTL19108.0 Serial No.
.... Serial Number Decal USER'S MANUAL QUESTIONS? As a manufacturer, we are damaged or missing, PLEASE CONTACT OUR CUSTOMER SERVICE DEPARTMENT DIRECTLY. Visit our website at www.weslo.com new products, prizes, fitness tips, and much more! CALL TOLL-FREE: 1-888-936-4266 Mon.-Fri., 8:00 until 17:00 EST (excluding holidays) OR....ca CAUTION Read all precautions and instructions in this manual before using this manual for future reference. Model No. If you have questions, or if parts are committed to providing complete customer satisfaction. WCTL19108.0 Serial No.
Canadian English Manual
Page 2
...PRECAUTIONS WARNING: To reduce the risk of burns, fire, electric shock, or injury to the control system of the treadmill. Keep children under the treadmill. 4. Do not wear loose clothes that all users of this manual. Always wear athletic shoes. When connecting the ... AND MOVE THE TREADMILL 11 MAINTENANCE AND TROUBLESHOOTING 12 CONDITIONING GUIDELINES 14 ORDERING REPLACEMENT PARTS Back Cover LIMITED WARRANTY Back Cover Note: A PART IDENTIFICATION CHART, an EXPLODED DRAWING, and a PART LIST are adequately informed of all warnings and precautions. 2. The treadmill should be used...
...PRECAUTIONS WARNING: To reduce the risk of burns, fire, electric shock, or injury to the control system of the treadmill. Keep children under the treadmill. 4. Do not wear loose clothes that all users of this manual. Always wear athletic shoes. When connecting the ... AND MOVE THE TREADMILL 11 MAINTENANCE AND TROUBLESHOOTING 12 CONDITIONING GUIDELINES 14 ORDERING REPLACEMENT PARTS Back Cover LIMITED WARRANTY Back Cover Note: A PART IDENTIFICATION CHART, an EXPLODED DRAWING, and a PART LIST are adequately informed of all warnings and precautions. 2. The treadmill should be used...
Canadian English Manual
Page 3
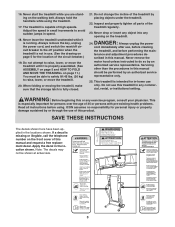
... in the locations shown. This is intended for persons over the age of 35 or persons with pre-existing health problems. Read all parts of Electric Shock • Unplug Treadmill before Assembly/ Disassembly ! SAVE THESE INSTRUCTIONS The decals shown here have been applied in speed. 18. Note: The decals may not be...
... in the locations shown. This is intended for persons over the age of 35 or persons with pre-existing health problems. Read all parts of Electric Shock • Unplug Treadmill before Assembly/ Disassembly ! SAVE THESE INSTRUCTIONS The decals shown here have been applied in speed. 18. Note: The decals may not be...
Canadian English Manual
Page 4
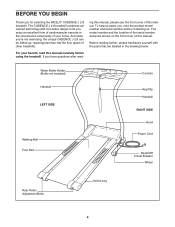
... carefully before contacting us assist you, note the product model number and serial number before using the treadmill. And when you for selecting the WESLO® CADENCE J 2.8 treadmill. For your home. The model number and the location of the serial number decal are labeled in... the convenience and privacy of your benefit, read - The CADENCE J 2.8 treadmill combines advanced technology with the parts that are shown on the...
... carefully before contacting us assist you, note the product model number and serial number before using the treadmill. And when you for selecting the WESLO® CADENCE J 2.8 treadmill. For your home. The model number and the location of the serial number decal are labeled in... the convenience and privacy of your benefit, read - The CADENCE J 2.8 treadmill combines advanced technology with the parts that are shown on the...

Canadian English Manual
Page 5
... the Base (71) in the center of the walking belt or the shipping carton. Set the treadmill in the position shown. Note: To identify small parts used during assembly, see the PART IDENTIFICATION CHART in the same way. 1 7 6 Large Hole 71 12 17 12 31 Bend ... until assembly is coated with high-performance lubricant. Pull on the floor. 7 6 71 22 Tape Tie 6 22 5 This does not affect treadmill performance. Assembly requires the included allen wrench and your own phillips screwdriver , adjustable wrenches , and 9/16" socket wrench , wire cutters . do...
... the Base (71) in the center of the walking belt or the shipping carton. Set the treadmill in the position shown. Note: To identify small parts used during assembly, see the PART IDENTIFICATION CHART in the same way. 1 7 6 Large Hole 71 12 17 12 31 Bend ... until assembly is coated with high-performance lubricant. Pull on the floor. 7 6 71 22 Tape Tie 6 22 5 This does not affect treadmill performance. Assembly requires the included allen wrench and your own phillips screwdriver , adjustable wrenches , and 9/16" socket wrench , wire cutters . do...

Canadian English Manual
Page 7
...8. Have a second person raise the Frame to adjust the walking belt (see page 13). Make sure that all parts are 7 1 pinched. To protect the floor or carpet, place a mat under the treadmill. 7 Make sure that the Latch Pin (69) is aligned with three Latch Screws (73). See the inset ...drawing. Attach the Storage Latch to the Console (1) with four Console Back Screws (58). 6. After you use the treadmill. Attach the Console Back (4) to the Frame (55) with the hole in a secure place. Make sure that no wires are properly tightened before...
...8. Have a second person raise the Frame to adjust the walking belt (see page 13). Make sure that all parts are 7 1 pinched. To protect the floor or carpet, place a mat under the treadmill. 7 Make sure that the Latch Pin (69) is aligned with three Latch Screws (73). See the inset ...drawing. Attach the Storage Latch to the Console (1) with four Console Back Screws (58). 6. After you use the treadmill. Attach the Console Back (4) to the Frame (55) with the hole in a secure place. Make sure that no wires are properly tightened before...
Canadian English Manual
Page 14
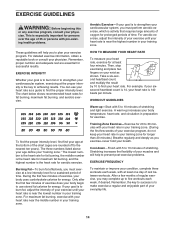
... heartbeat count is 14, your heart rate is near the highest number in your heart rate is the key to make exercise a regular and enjoyable part of your exercise until your training zone. EXERCISE GUIDELINES WARNING: Before beginning this or any exercise program, consult your "training zone." This is to achieving...
... heartbeat count is 14, your heart rate is near the highest number in your heart rate is the key to make exercise a regular and enjoyable part of your exercise until your training zone. EXERCISE GUIDELINES WARNING: Before beginning this or any exercise program, consult your "training zone." This is to achieving...

Canadian English Manual
Page 16
... service centers. You may also have other warranty beyond that specifically set forth herein. Jérôme, QC J7Y 4B8 Part No. 266016 R0608A WESLO is limited in lieu of any and all other consequential damages of this manual) LIMITED WARRANTY ICON OF CANADA, INC. (ICON... forth above limitation may not apply to you . ICON OF CANADA, INC., 900 de lʼIndustrie, St. ORDERING REPLACEMENT PARTS To order replacement parts, see the PART LIST and EXPLODED DRAWING attached in China © 2008 ICON IP, Inc. Accordingly, the above is shipped to a service center...
... service centers. You may also have other warranty beyond that specifically set forth herein. Jérôme, QC J7Y 4B8 Part No. 266016 R0608A WESLO is limited in lieu of any and all other consequential damages of this manual) LIMITED WARRANTY ICON OF CANADA, INC. (ICON... forth above limitation may not apply to you . ICON OF CANADA, INC., 900 de lʼIndustrie, St. ORDERING REPLACEMENT PARTS To order replacement parts, see the PART LIST and EXPLODED DRAWING attached in China © 2008 ICON IP, Inc. Accordingly, the above is shipped to a service center...
Canadian English Manual
Page 17
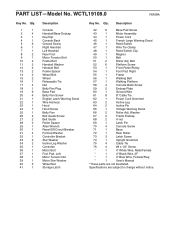
... 3 Latch Screw 74 1 Upright Grommet 75 4 Cable Tie 76 4 #8 x 1/2" Screw * 1 4" White Wire, Male/Female * 1 4" Black Wire, 2F * 1 4" Blue Wire, Female/Flag * 1 Userʼs Manual *These parts are subject to change without notice. Qty. 1 1 2 4 3 1 4 1 5 6 6 1 7 1 8 2 9 1 10 2 11 2 12 4 13 2 14 2 15 2 16 1 17 4 18 1 19 6 20 4 21 1 22 1 23 1 24 7 ... Tie 62 1 Power Cord Grommet 63 2 Incline Leg 64 2 Incline Pin 65 1 Voltage Warning Decal 66 2 Roller Adj. WCTL19108.0 R0608A Key No. PART LIST-Model No.
... 3 Latch Screw 74 1 Upright Grommet 75 4 Cable Tie 76 4 #8 x 1/2" Screw * 1 4" White Wire, Male/Female * 1 4" Black Wire, 2F * 1 4" Blue Wire, Female/Flag * 1 Userʼs Manual *These parts are subject to change without notice. Qty. 1 1 2 4 3 1 4 1 5 6 6 1 7 1 8 2 9 1 10 2 11 2 12 4 13 2 14 2 15 2 16 1 17 4 18 1 19 6 20 4 21 1 22 1 23 1 24 7 ... Tie 62 1 Power Cord Grommet 63 2 Incline Leg 64 2 Incline Pin 65 1 Voltage Warning Decal 66 2 Roller Adj. WCTL19108.0 R0608A Key No. PART LIST-Model No.
Canadian English Manual
Page 18
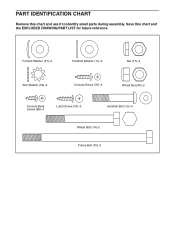
Save this chart and use it to identify small parts during assembly. Formed Washer (31)-4 Handrail Washer (11)-2 Nut (17)-4 Star Washer (33)-2 Console Screw (70)-4 Wheel Nut (40)-2 Console Back Screw (58)-4 Latch Screw (73)-3 Handrail Bolt (12)-4 Wheel Bolt (14)-2 Frame Bolt (10)-2 PART IDENTIFICATION CHART Remove this chart and the EXPLODED DRAWING/PART LIST for future reference.
Save this chart and use it to identify small parts during assembly. Formed Washer (31)-4 Handrail Washer (11)-2 Nut (17)-4 Star Washer (33)-2 Console Screw (70)-4 Wheel Nut (40)-2 Console Back Screw (58)-4 Latch Screw (73)-3 Handrail Bolt (12)-4 Wheel Bolt (14)-2 Frame Bolt (10)-2 PART IDENTIFICATION CHART Remove this chart and the EXPLODED DRAWING/PART LIST for future reference.


