

English Manual
Page 3
.... To purchase a surge suppressor, see HOW TO TURN ON THE POWER on the walking belt. Do not wear loose clothes that meets all warnings on your treadmill before using your local WESLO dealer or call the telephone number on the same circuit. The pulse sensor is damaged..., the walking belt may slow, accelerate, or stop procedure before using the treadmill (see your treadmill. Do not operate the treadmill where aerosol products are...
.... To purchase a surge suppressor, see HOW TO TURN ON THE POWER on the walking belt. Do not wear loose clothes that meets all warnings on your treadmill before using your local WESLO dealer or call the telephone number on the same circuit. The pulse sensor is damaged..., the walking belt may slow, accelerate, or stop procedure before using the treadmill (see your treadmill. Do not operate the treadmill where aerosol products are...

English Manual
Page 5
... parts. Accessory Tray Handrail Console Key/Clip Storage Latch Walking Belt Foot Rail Rear Roller Adjustment Bolts Hood Reset/Off Circuit Breaker Power Cord Wheel Platform Cushion 5 If you ʼre not exercising, the unique treadmill can be folded up, requiring less than half the ... shown on the front cover of features designed to make your benefit, read - The CADENCE G-40 treadmill offers a selection of this manual. To help us assist you for selecting the new WESLO® CADENCE G-40 treadmill. BEFORE YOU BEGIN Thank you , note the product model number and serial number before...
... parts. Accessory Tray Handrail Console Key/Clip Storage Latch Walking Belt Foot Rail Rear Roller Adjustment Bolts Hood Reset/Off Circuit Breaker Power Cord Wheel Platform Cushion 5 If you ʼre not exercising, the unique treadmill can be folded up, requiring less than half the ... shown on the front cover of features designed to make your benefit, read - The CADENCE G-40 treadmill offers a selection of this manual. To help us assist you for selecting the new WESLO® CADENCE G-40 treadmill. BEFORE YOU BEGIN Thank you , note the product model number and serial number before...
English Manual
Page 6
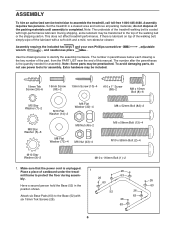
... adjustable Use the drawings below each drawing is the quantity needed for assembly. The number in parentheses below to the top of the walking belt or the shipping carton. Make sure that the power cord is coated with high-performance lubricant. Note: Some parts may be transferred...avoid damaging parts, do not dispose of the packing materials until assembly is lubricant on top of this manual. Place a piece of the treadmill walking belt is unplugged. If there is completed. Note: The underside of cardboard under the tread- 1 26 mill frame to protect the floor during...
... adjustable Use the drawings below each drawing is the quantity needed for assembly. The number in parentheses below to the top of the walking belt or the shipping carton. Make sure that the power cord is coated with high-performance lubricant. Note: Some parts may be transferred...avoid damaging parts, do not dispose of the packing materials until assembly is lubricant on top of this manual. Place a piece of the treadmill walking belt is unplugged. If there is completed. Note: The underside of cardboard under the tread- 1 26 mill frame to protect the floor during...

English Manual
Page 11
...) so that all parts are properly tightened before you use the treadmill. Raise the treadmill to adjust the walking belt (see HOW TO FOLD THE TREADMILL FOR STORAGE on page 17). Keep the included hex keys in a secure place. Make sure that the treadmill Frame (51) is used to the storage position (see page ...72 82 15. Adjust the Incline Legs (95) to each side of them. 53 48 58 14. Lower the treadmill (see page 16). To protect the floor or carpet, place a mat under the treadmill. 11 Raise the Uprights (53, 54). 1 53, 54 2 51 Top View 54 51 53 13. start ...
...) so that all parts are properly tightened before you use the treadmill. Raise the treadmill to adjust the walking belt (see HOW TO FOLD THE TREADMILL FOR STORAGE on page 17). Keep the included hex keys in a secure place. Make sure that the treadmill Frame (51) is used to the storage position (see page ...72 82 15. Adjust the Incline Legs (95) to each side of them. 53 48 58 14. Lower the treadmill (see page 16). To protect the floor or carpet, place a mat under the treadmill. 11 Raise the Uprights (53, 54). 1 53, 54 2 51 Top View 54 51 53 13. start ...
English Manual
Page 12
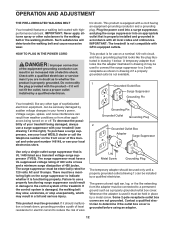
... be grounded. Some 2-pole receptacle outlet box covers are in drawing 1 below. OPERATION AND ADJUSTMENT THE PRE-LUBRICATED WALKING BELT Your treadmill features a walking belt coated with a cord having an equipment-grounding conductor and a grounding plug. A temporary adapter that looks like extending from...proper outlet installed by a qualified electrician. To decrease the possi- To purchase a surge sup- pressor, see your local WESLO dealer or call the telephone number on or off. Grounding Pin Grounded Outlet Grounding Plug Grounded Outlet Box Adapter Surge Suppressor Use...
... be grounded. Some 2-pole receptacle outlet box covers are in drawing 1 below. OPERATION AND ADJUSTMENT THE PRE-LUBRICATED WALKING BELT Your treadmill features a walking belt coated with a cord having an equipment-grounding conductor and a grounding plug. A temporary adapter that looks like extending from...proper outlet installed by a qualified electrician. To decrease the possi- To purchase a surge sup- pressor, see your local WESLO dealer or call the telephone number on or off. Grounding Pin Grounded Outlet Grounding Plug Grounded Outlet Box Adapter Surge Suppressor Use...
English Manual
Page 13
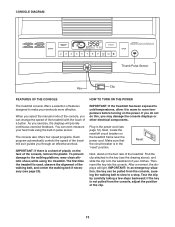
.... The console also offers four speed programs. Each program automatically controls the speed of the walking belt, and center the walking belt if necessary (see page 12). The first time the treadmill is not pulled from the console, causing the walking belt to slow to make your workouts more effective. Next, locate the reset/off circuit breaker...
.... The console also offers four speed programs. Each program automatically controls the speed of the walking belt, and center the walking belt if necessary (see page 12). The first time the treadmill is not pulled from the console, causing the walking belt to slow to make your workouts more effective. Next, locate the reset/off circuit breaker...
English Manual
Page 14
...the desired unit of measurement is shown in either miles or kilometers. To start the walking belt, press the Start button, the speed increase button, or one of calories that you have walked or run on the treadmill, the indicators around the track will be shown in the lower displays. If you ...press the buttons, it . 14 To restart the walking belt, press the Start button or the speed increase button. 4. The ...
...the desired unit of measurement is shown in either miles or kilometers. To start the walking belt, press the Start button, the speed increase button, or one of calories that you have walked or run on the treadmill, the indicators around the track will be shown in the lower displays. If you ...press the buttons, it . 14 To restart the walking belt, press the Start button or the speed increase button. 4. The ...
English Manual
Page 15
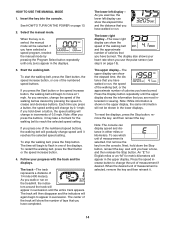
... remove the key from the console. When you press either button, the treadmill will automatically adjust to the speed setting that is programmed for a few seconds to alert you, and then the speed of the walking belt will change if a different speed setting is selected. Measure your thumb for... the first period of the walking belt will change during the program, you do not do this, the treadmillʼs electrical components may be restricted and your thumb on the pulse sensor (see the drawing on the ...
... remove the key from the console. When you press either button, the treadmill will automatically adjust to the speed setting that is programmed for a few seconds to alert you, and then the speed of the walking belt will change if a different speed setting is selected. Measure your thumb for... the first period of the walking belt will change during the program, you do not do this, the treadmillʼs electrical components may be restricted and your thumb on the pulse sensor (see the drawing on the ...
English Manual
Page 20
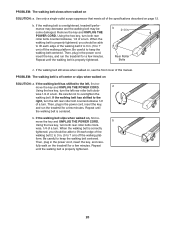
... key and UNPLUG THE POWER CORD. PROBLEM: The walking belt is centered. Repeat until the walking belt is correctly tightened, you should be able to keep the walking belt centered. fully walk on the treadmill for a few minutes. Be careful to the right, turn . If the walking belt still slows when walked on, see the front cover of the specifications described...
... key and UNPLUG THE POWER CORD. PROBLEM: The walking belt is centered. Repeat until the walking belt is correctly tightened, you should be able to keep the walking belt centered. fully walk on the treadmill for a few minutes. Be careful to the right, turn . If the walking belt still slows when walked on, see the front cover of the specifications described...
English Manual
Page 22
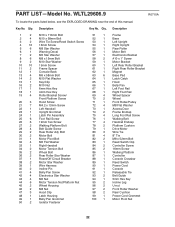
... Handrail 34 2 Motor Tension Bolt 35 2 Wheel Bolt 36 2 Rear Roller Star Washer 37 1 Reset/Off Circuit Breaker 38 2 Motor Star Washer 39 1 Wire Harness 40 2 Incline Pin 41 4 Belly Pan Screw 42 4 Electronics Star Washer 43 4 M6 Nut 44 6 Motor Tension Nut/Platform Nut 45 2 Wheel Housing 46 2 M8... Pan Left Foot Rail Right Foot Rail Wheel Spacer Wheel Front Roller/Pulley M8 Flat Washer Access Door Frame Endcap Long Foot Rail Screw Walking Belt Handrail Endcap Platform Cushion Drive Motor Wire Tie 8" Tie M8 x 52mm Bolt Reed Switch Clip Controller Screw 16mm Screw...
... Handrail 34 2 Motor Tension Bolt 35 2 Wheel Bolt 36 2 Rear Roller Star Washer 37 1 Reset/Off Circuit Breaker 38 2 Motor Star Washer 39 1 Wire Harness 40 2 Incline Pin 41 4 Belly Pan Screw 42 4 Electronics Star Washer 43 4 M6 Nut 44 6 Motor Tension Nut/Platform Nut 45 2 Wheel Housing 46 2 M8... Pan Left Foot Rail Right Foot Rail Wheel Spacer Wheel Front Roller/Pulley M8 Flat Washer Access Door Frame Endcap Long Foot Rail Screw Walking Belt Handrail Endcap Platform Cushion Drive Motor Wire Tie 8" Tie M8 x 52mm Bolt Reed Switch Clip Controller Screw 16mm Screw...


