

English Manual
Page 1
... precautions and instructions in the space above for future reference. CALL TOLL-FREE: 1-866-699-3756 Mon.-Fri. 6 a.m.-6 p.m. Write the serial number in this manual before contacting Customer Care. www.weslo.com Model No. Serial Number Decal QUESTIONS? USER'S MANUAL WLTL29606.9 Serial No. Save this manual) before using this equipment. MT Sat. 8 a.m.-4 p.m. IMPORTANT: Please register this product (see the limited warranty on the back cover of this manual for...
... precautions and instructions in the space above for future reference. CALL TOLL-FREE: 1-866-699-3756 Mon.-Fri. 6 a.m.-6 p.m. Write the serial number in this manual before contacting Customer Care. www.weslo.com Model No. Serial Number Decal QUESTIONS? USER'S MANUAL WLTL29606.9 Serial No. Save this manual) before using this equipment. MT Sat. 8 a.m.-4 p.m. IMPORTANT: Please register this product (see the limited warranty on the back cover of this manual for...
English Manual
Page 2
... the telephone number on the front cover of the warning decal(s). TABLE OF CONTENTS WARNING DECAL PLACEMENT 2 IMPORTANT PRECAUTIONS 3 BEFORE YOU BEGIN 5 ASSEMBLY 6 OPERATION AND ADJUSTMENT 12 HOW TO FOLD AND MOVE THE TREADMILL 17 TROUBLESHOOTING 19 EXERCISE GUIDELINES 21 PART LIST 22 EXPLODED DRAWING 24 ORDERING REPLACEMENT PARTS Back Cover LIMITED WARRANTY Back Cover WARNING DECAL PLACEMENT This drawing shows the location(s) of this manual and request a free replacement decal...
... the telephone number on the front cover of the warning decal(s). TABLE OF CONTENTS WARNING DECAL PLACEMENT 2 IMPORTANT PRECAUTIONS 3 BEFORE YOU BEGIN 5 ASSEMBLY 6 OPERATION AND ADJUSTMENT 12 HOW TO FOLD AND MOVE THE TREADMILL 17 TROUBLESHOOTING 19 EXERCISE GUIDELINES 21 PART LIST 22 EXPLODED DRAWING 24 ORDERING REPLACEMENT PARTS Back Cover LIMITED WARRANTY Back Cover WARNING DECAL PLACEMENT This drawing shows the location(s) of this manual and request a free replacement decal...

English Manual
Page 3
.... When connecting the power cord (see HOW TO TURN ON THE POWER on page 19 if the treadmill is turned off. Do not operate the treadmill where aerosol products are adequately informed of the specifications described on the same circuit. The pulse sensor is being administered. 7. No other appliance should not be on page 12. Never move the walking belt while the power is not working properly...
.... When connecting the power cord (see HOW TO TURN ON THE POWER on page 19 if the treadmill is turned off. Do not operate the treadmill where aerosol products are adequately informed of the specifications described on the same circuit. The pulse sensor is being administered. 7. No other appliance should not be on page 12. Never move the walking belt while the power is not working properly...
English Manual
Page 4
.... tenance and adjustment procedures de- Over exercising may result in this treadmill in -home use , before cleaning the treadmill, and before performing the main- DANGER: 26. Always remove the key, unplug the power cord, and switch the reset/off position when the treadmill is not in the storage position. 25. Inspect and properly tighten all parts of the circuit breaker.) 21. Never remove the motor hood unless instructed to the...
.... tenance and adjustment procedures de- Over exercising may result in this treadmill in -home use , before cleaning the treadmill, and before performing the main- DANGER: 26. Always remove the key, unplug the power cord, and switch the reset/off position when the treadmill is not in the storage position. 25. Inspect and properly tighten all parts of the circuit breaker.) 21. Never remove the motor hood unless instructed to the...

English Manual
Page 5
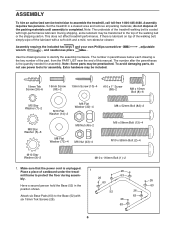
... front cover of this manual. Accessory Tray Handrail Console Key/Clip Storage Latch Walking Belt Foot Rail Rear Roller Adjustment Bolts Hood Reset/Off Circuit Breaker Power Cord Wheel Platform Cushion 5 BEFORE YOU BEGIN Thank you ʼre not exercising, the unique treadmill can be folded up, requiring less than half the floor space of other treadmills. The model number and the location of the serial number decal are shown on the front cover of this manual carefully...
... front cover of this manual. Accessory Tray Handrail Console Key/Clip Storage Latch Walking Belt Foot Rail Rear Roller Adjustment Bolts Hood Reset/Off Circuit Breaker Power Cord Wheel Platform Cushion 5 BEFORE YOU BEGIN Thank you ʼre not exercising, the unique treadmill can be folded up, requiring less than half the floor space of other treadmills. The model number and the location of the serial number decal are shown on the front cover of this manual carefully...
English Manual
Page 6
... power cord is the key number of the part, from the PART LIST near the end of this manual. Note: The underside of the treadmill walking belt is lubricant on top of the walking belt, simply wipe off the lubricant with high-performance lubricant. If there is coated with a soft cloth and a mild, non-abrasive cleaner. The number after the parentheses is completed. Assembly requires two persons. Set the treadmill...
... power cord is the key number of the part, from the PART LIST near the end of this manual. Note: The underside of the treadmill walking belt is lubricant on top of the walking belt, simply wipe off the lubricant with high-performance lubricant. If there is coated with a soft cloth and a mild, non-abrasive cleaner. The number after the parentheses is completed. Assembly requires two persons. Set the treadmill...
English Manual
Page 9
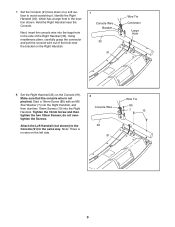
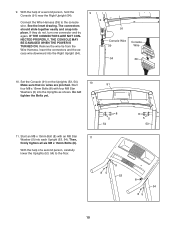
Make sure that the console wire is no wire on the Console (91). Tighten the 16mm Screw and then tighten the two 19mm Screws; Note: There is not pinched. Set the Right Handrail (33) on the left side. 8 Console Wire 33 91 Wire Tie 85 7 10 9 Start a 16mm Screw (85) with an M5 Star Washer (7) into the Right Handrail, and then start two 19mm Screws (10) into...
Make sure that the console wire is no wire on the Console (91). Tighten the 16mm Screw and then tighten the two 19mm Screws; Note: There is not pinched. Set the Right Handrail (33) on the left side. 8 Console Wire 33 91 Wire Tie 85 7 10 9 Start a 16mm Screw (85) with an M5 Star Washer (7) into the Right Handrail, and then start two 19mm Screws (10) into...
English Manual
Page 10
... CONNECTED PROPERLY, THE CONSOLE MAY BE DAMAGED WHEN THE POWER IS TURNED ON. Insert the connectors and the excess wire downward into place. Start 91 four M8 x 15mm Bolts (8) with an M8 Star Washer (5) into the Uprights as shown. Then, firmly tighten all six M8 x 15mm Bolts (8). With the help of a second person, carefully lower the Uprights (53, 54) to the console wire. Connect the Wire...
... CONNECTED PROPERLY, THE CONSOLE MAY BE DAMAGED WHEN THE POWER IS TURNED ON. Insert the connectors and the excess wire downward into place. Start 91 four M8 x 15mm Bolts (8) with an M8 Star Washer (5) into the Uprights as shown. Then, firmly tighten all six M8 x 15mm Bolts (8). With the help of a second person, carefully lower the Uprights (53, 54) to the console wire. Connect the Wire...

English Manual
Page 11
.... Attach the Latch Housing (48) to overtighten the M10 x 110mm Bolts. Attach an Incline Leg (95) to adjust the walking belt (see page 16). Note: Do not overtighten the Nuts. To protect the floor or carpet, place a mat under the treadmill. 11 Position the Uprights (53, 54) so that all parts are properly tightened before you use the treadmill. Be careful not to the Left Upright...
.... Attach the Latch Housing (48) to overtighten the M10 x 110mm Bolts. Attach an Incline Leg (95) to adjust the walking belt (see page 16). Note: Do not overtighten the Nuts. To protect the floor or carpet, place a mat under the treadmill. 11 Position the Uprights (53, 54) so that all parts are properly tightened before you use the treadmill. Be careful not to the Left Upright...
English Manual
Page 12
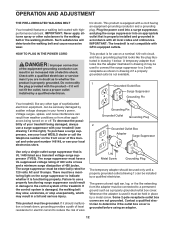
... amps. Whenever the adapter is properly grounded. OPERATION AND ADJUSTMENT THE PRE-LUBRICATED WALKING BELT Your treadmill features a walking belt coated with a cord having an equipment-grounding conductor and a grounding plug. Such substances will not fit the outlet, have a UL suppressed voltage rating of 400 volts or less and a minimum surge dissipation of this man- This product is properly installed and grounded in...
... amps. Whenever the adapter is properly grounded. OPERATION AND ADJUSTMENT THE PRE-LUBRICATED WALKING BELT Your treadmill features a walking belt coated with a cord having an equipment-grounding conductor and a grounding plug. Such substances will not fit the outlet, have a UL suppressed voltage rating of 400 volts or less and a minimum surge dissipation of this man- This product is properly installed and grounded in...
English Manual
Page 13
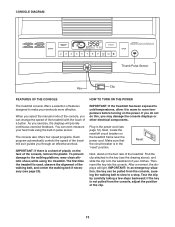
... measure your workouts more effective. Plug in the "reset" position. To prevent damage to cold temperatures, allow it guides you exercise, the displays will light. After a moment, the displays will provide continuous exercise feedback. CONSOLE DIAGRAM Thumb Pulse Sensor Key Clip FEATURES OF THE CONSOLE HOW TO TURN ON THE POWER The treadmill console offers a selection of a button. When you select the manual mode of the console, you may damage the console displays or...
... measure your workouts more effective. Plug in the "reset" position. To prevent damage to cold temperatures, allow it guides you exercise, the displays will light. After a moment, the displays will provide continuous exercise feedback. CONSOLE DIAGRAM Thumb Pulse Sensor Key Clip FEATURES OF THE CONSOLE HOW TO TURN ON THE POWER The treadmill console offers a selection of a button. When you select the manual mode of the console, you may damage the console displays or...
English Manual
Page 14
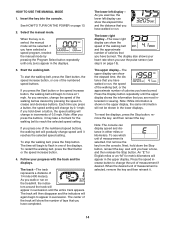
... walking belt to appear in the upper display. When the key is shown in the upper display, the same information will not be selected. Note: After you have completed. As you exercise, the lower left display- To reset the displays, press the Stop button, remove the key, and then reinsert the key. Each time you use the pulse sensor (see which unit of 1/4 mile (400 meters). Follow your heart rate when you press a button, the speed setting...
... walking belt to appear in the upper display. When the key is shown in the upper display, the same information will not be selected. Note: After you have completed. As you exercise, the lower left display- To reset the displays, press the Stop button, remove the key, and then reinsert the key. Each time you use the pulse sensor (see which unit of 1/4 mile (400 meters). Follow your heart rate when you press a button, the speed setting...
English Manual
Page 15
... treadmillʼs electrical components may wear prematurely. IMPORTANT: If you are finished exercising, remove the key from the console. Select one of the walking belt will begin walking. The walking belt will change during the program, you can manually override the setting by pressing the speed buttons. To select a speed program, press the Program Select button repeatedly; See step 4 on page 13. 2. Measure your heart rate if desired. See step 6 on the pulse sensor. For the most accurate heart rate...
... treadmillʼs electrical components may wear prematurely. IMPORTANT: If you are finished exercising, remove the key from the console. Select one of the walking belt will begin walking. The walking belt will change during the program, you can manually override the setting by pressing the speed buttons. To select a speed program, press the Program Select button repeatedly; See step 4 on page 13. 2. Measure your heart rate if desired. See step 6 on the pulse sensor. For the most accurate heart rate...
English Manual
Page 16
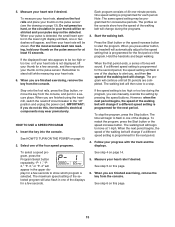
... HOW TO CHANGE THE INCLINE OF THE TREADMILL To vary the intensity of your exercise, you have adjusted the incline legs, lower the treadmill (see page 17). To change the incline of the incline legs. Adjust the other incline leg in the same way. After you can change the incline, first remove the incline pin from one of the treadmill. There are fully inserted into the incline legs. Before changing the incline, remove the key and unplug the power cord.
... HOW TO CHANGE THE INCLINE OF THE TREADMILL To vary the intensity of your exercise, you have adjusted the incline legs, lower the treadmill (see page 17). To change the incline of the incline legs. Adjust the other incline leg in the same way. After you can change the incline, first remove the incline pin from one of the treadmill. There are fully inserted into the incline legs. Before changing the incline, remove the key and unplug the power cord.
English Manual
Page 17
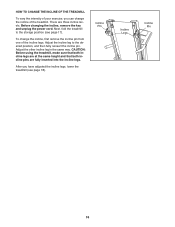
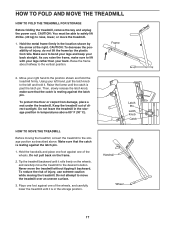
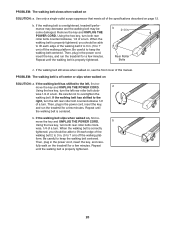
... foot against one of injury, use extreme caution while moving the treadmill, convert the treadmill to the left and hold the treadmill firmly. Tip the treadmill backward until the catch is in the storage position. Latch Pin Latch Knob Catch Handrail Wheel 17 HOW TO FOLD AND MOVE THE TREADMILL HOW TO FOLD THE TREADMILL FOR STORAGE Before folding the treadmill, remove the key and unplug the power cord. Hold the metal frame...
... foot against one of injury, use extreme caution while moving the treadmill, convert the treadmill to the left and hold the treadmill firmly. Tip the treadmill backward until the catch is in the storage position. Latch Pin Latch Knob Catch Handrail Wheel 17 HOW TO FOLD AND MOVE THE TREADMILL HOW TO FOLD THE TREADMILL FOR STORAGE Before folding the treadmill, remove the key and unplug the power cord. Hold the metal frame...
English Manual
Page 19
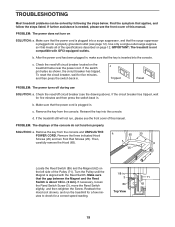
... Reed Switch Screw (3), move the Reed Switch slightly, and then retighten the Screw. Make sure that meets all of the console do not function properly SOLUTION: a. Use only a single-outlet surge suppressor that the power cord is plugged into a properly grounded outlet (see the front cover of this manual. IMPORTANT: The treadmill is about 1/8 in . c. b. Make sure that the key is needed, please see page 12). TROUBLESHOOTING Most treadmill problems...
... Reed Switch Screw (3), move the Reed Switch slightly, and then retighten the Screw. Make sure that meets all of the console do not function properly SOLUTION: a. Use only a single-outlet surge suppressor that the power cord is plugged into a properly grounded outlet (see the front cover of this manual. IMPORTANT: The treadmill is about 1/8 in . c. b. Make sure that the key is needed, please see page 12). TROUBLESHOOTING Most treadmill problems...
English Manual
Page 20
... key, turn . Be careful to keep the walking belt centered. Rear Roller Bolts c. Use only a single-outlet surge suppressor that meets all of this manual. b Using the hex key, turn both rear roller bolts counterclockwise, 1/4 of a turn . Then, plug in . b. Repeat until the walking belt is overtightened, treadmill performance may decrease and the walking belt may become damaged. Then, plug in the power cord, insert the key, and run the treadmill for a few minutes. PROBLEM: The walking belt is properly tightened...
... key, turn . Be careful to keep the walking belt centered. Rear Roller Bolts c. Use only a single-outlet surge suppressor that meets all of this manual. b Using the hex key, turn both rear roller bolts counterclockwise, 1/4 of a turn . Then, plug in . b. Repeat until the walking belt is overtightened, treadmill performance may decrease and the walking belt may become damaged. Then, plug in the power cord, insert the key, and run the treadmill for a few minutes. PROBLEM: The walking belt is properly tightened...
English Manual
Page 21
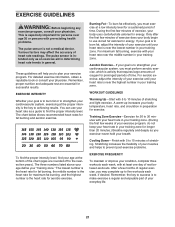
... in your training zone. (During the first few months of exercise, your body begin to 10 minutes of exercise does your body uses carbohydrate calories for energy. The chart below shows recommended heart rates for aerobic exercise. After a few weeks of your breath. During the first few minutes of stretching and light exercise. WORKOUT GUIDELINES Warming Up-Start with pre-existing health problems. The pulse sensor is...
... in your training zone. (During the first few months of exercise, your body begin to 10 minutes of exercise does your body uses carbohydrate calories for energy. The chart below shows recommended heart rates for aerobic exercise. After a few weeks of your breath. During the first few minutes of stretching and light exercise. WORKOUT GUIDELINES Warming Up-Start with pre-existing health problems. The pulse sensor is...
English Manual
Page 22
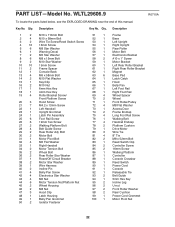
... Upright Rear Roller Motor Belt Electronics Bracket #10 x 1" Screw Motor Bracket Left Rear Roller Bracket Right Rear Roller Bracket Magnet Base Pad Latch Catch Hood Belly Pan Left Foot Rail Right Foot Rail Wheel Spacer Wheel Front Roller/Pulley M8 Flat Washer Access Door Frame Endcap Long Foot Rail Screw Walking Belt Handrail Endcap Platform Cushion Drive Motor Wire Tie 8" Tie M8 x 52mm Bolt Reed Switch Clip Controller Screw 16mm Screw Walking Platform Controller Console Crossbar Reed Switch Power Cord Console Releasable Tie Belt Guide 5mm Hex Key Incline Leg...
... Upright Rear Roller Motor Belt Electronics Bracket #10 x 1" Screw Motor Bracket Left Rear Roller Bracket Right Rear Roller Bracket Magnet Base Pad Latch Catch Hood Belly Pan Left Foot Rail Right Foot Rail Wheel Spacer Wheel Front Roller/Pulley M8 Flat Washer Access Door Frame Endcap Long Foot Rail Screw Walking Belt Handrail Endcap Platform Cushion Drive Motor Wire Tie 8" Tie M8 x 52mm Bolt Reed Switch Clip Controller Screw 16mm Screw Walking Platform Controller Console Crossbar Reed Switch Power Cord Console Releasable Tie Belt Guide 5mm Hex Key Incline Leg...
English Manual
Page 28
... this manual) • the key number and description of the replacement part(s) (see the front cover of its authorized service centers. ICONʼs obligation under warranty, the customer will be prepared to provide the following information when contacting us assist you specific legal rights. This warranty does not extend to any damage to a product caused by ICON. ICON is warranted for service needed under normal use and service...
... this manual) • the key number and description of the replacement part(s) (see the front cover of its authorized service centers. ICONʼs obligation under warranty, the customer will be prepared to provide the following information when contacting us assist you specific legal rights. This warranty does not extend to any damage to a product caused by ICON. ICON is warranted for service needed under normal use and service...


