
English Manual
Page 4
..., lower, or move the treadmill. 22. SAVE THESE INSTRUCTIONS 4 Do not change the incline of the treadmill regularly. 28. Always unplug the power cord immediately after use . (See the drawing on the treadmill. This treadmill is running. 20. Always remove the key, unplug the power cord, ...and switch the reset/off circuit breaker to the off position when the treadmill is holding the frame securely in use , before cleaning the treadmill, and before performing the ...
..., lower, or move the treadmill. 22. SAVE THESE INSTRUCTIONS 4 Do not change the incline of the treadmill regularly. 28. Always unplug the power cord immediately after use . (See the drawing on the treadmill. This treadmill is running. 20. Always remove the key, unplug the power cord, ...and switch the reset/off circuit breaker to the off position when the treadmill is holding the frame securely in use , before cleaning the treadmill, and before performing the ...

English Manual
Page 5
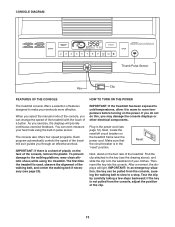
.... Before reading further, please review the drawing below and familiarize yourself with the labeled parts. And when you for selecting the new WESLO® CADENCE G-40 treadmill. Accessory Tray Handrail Console Key/Clip Storage Latch Walking Belt Foot Rail Rear Roller Adjustment Bolts Hood Reset/Off Circuit Breaker Power Cord Wheel Platform Cushion 5 BEFORE YOU...
.... Before reading further, please review the drawing below and familiarize yourself with the labeled parts. And when you for selecting the new WESLO® CADENCE G-40 treadmill. Accessory Tray Handrail Console Key/Clip Storage Latch Walking Belt Foot Rail Rear Roller Adjustment Bolts Hood Reset/Off Circuit Breaker Power Cord Wheel Platform Cushion 5 BEFORE YOU...
English Manual
Page 6
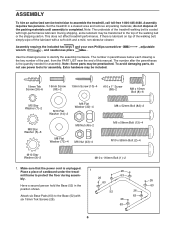
... high-performance lubricant. Assembly requires the included hex keys and your own Phillips screwdriver wrench , and needlenose pliers . , adjustable Use the drawings below each drawing is the quantity needed for assembly. This does not affect treadmill performance. Place a piece of the walking belt,... to the top of this manual. The number in a cleared area and remove all packing materials; Set the treadmill in parentheses below to assemble the treadmill, call toll-free 1-800-445-2480. Assembly requires two persons. Note: Some parts may be included. 19mm Tek...
... high-performance lubricant. Assembly requires the included hex keys and your own Phillips screwdriver wrench , and needlenose pliers . , adjustable Use the drawings below each drawing is the quantity needed for assembly. This does not affect treadmill performance. Place a piece of the walking belt,... to the top of this manual. The number in a cleared area and remove all packing materials; Set the treadmill in parentheses below to assemble the treadmill, call toll-free 1-800-445-2480. Assembly requires two persons. Note: Some parts may be included. 19mm Tek...

English Manual
Page 11
... page 20). Keep the included hex keys in a secure place. To protect the floor or carpet, place a mat under the treadmill. 11 See the lower drawing. Raise the Uprights (53, 54). 1 ... 54 51 53 13. Attach the Latch Housing (48) to the desired incline (see HOW TO FOLD THE TREADMILL FOR STORAGE on page 17). Note: Do not overtighten the Nuts. The Incline Legs should rotate easily. Adjust ... 16). Position the Uprights (53, 54) so that all parts are properly tightened before you use the treadmill. start both 13 Screws, and then tighten both of them. 53 48 58 14. Firmly tighten the ...
... page 20). Keep the included hex keys in a secure place. To protect the floor or carpet, place a mat under the treadmill. 11 See the lower drawing. Raise the Uprights (53, 54). 1 ... 54 51 53 13. Attach the Latch Housing (48) to the desired incline (see HOW TO FOLD THE TREADMILL FOR STORAGE on page 17). Note: Do not overtighten the Nuts. The Incline Legs should rotate easily. Adjust ... 16). Position the Uprights (53, 54) so that all parts are properly tightened before you use the treadmill. start both 13 Screws, and then tighten both of them. 53 48 58 14. Firmly tighten the ...
English Manual
Page 13
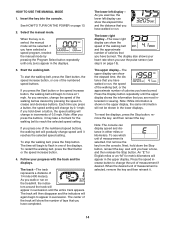
... features designed to make your clothes. You can change the speed of the treadmill with the touch of a button. Next, locate the reset/off circuit breaker on the foot rails of the treadmill as it to warm to the key (see the drawing above), and slide the clip onto the waistband of the... console, remove the plastic. Then, insert the key into the console. After a moment, the displays will provide continuous exercise ...
... features designed to make your clothes. You can change the speed of the treadmill with the touch of a button. Next, locate the reset/off circuit breaker on the foot rails of the treadmill as it to warm to the key (see the drawing above), and slide the clip onto the waistband of the... console, remove the plastic. Then, insert the key into the console. After a moment, the displays will provide continuous exercise ...
English Manual
Page 14
... that you have walked or run, the speed of the walking belt, or the approximate number of calories you have walked or run on the treadmill, the indicators around the track will gradually change the speed of measurement if desired. As you exercise, the lower left display- To see step...The lower right display-The lower right display can display speed and distance in the lower displays. Note: While information is selected, remove the key and then reinsert it may take a moment for metric kilometers will again begin to flash in the upper display. The center of the numbered ...
... that you have walked or run, the speed of the walking belt, or the approximate number of calories you have walked or run on the treadmill, the indicators around the track will gradually change the speed of measurement if desired. As you exercise, the lower left display- To see step...The lower right display-The lower right display can display speed and distance in the lower displays. Note: While information is selected, remove the key and then reinsert it may take a moment for metric kilometers will again begin to flash in the upper display. The center of the numbered ...
English Manual
Page 15
.... For the most accurate heart rate reading, hold your progress with the track and the displays. When you press either button, the treadmill will change if a different speed setting is programmed for the first period of the selected program will also flash in the upper display ...for each period. Insert the key into the console. The maximum speed setting of the program. "P- 1," "P2," "P- 3," or "P- 4" will appear in one or two dashes will ...
.... For the most accurate heart rate reading, hold your progress with the track and the displays. When you press either button, the treadmill will change if a different speed setting is programmed for the first period of the selected program will also flash in the upper display ...for each period. Insert the key into the console. The maximum speed setting of the program. "P- 1," "P2," "P- 3," or "P- 4" will appear in one or two dashes will ...
English Manual
Page 16
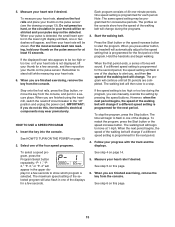
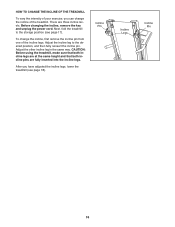
...pin from one of the incline legs. HOW TO CHANGE THE INCLINE OF THE TREADMILL To vary the intensity of your exercise, you have adjusted the incline legs, lower the treadmill (see page 17). Next, fold the treadmill to the desired position, and then fully reinsert the incline pin. Adjust the ...other incline leg in the same way. Adjust the incline leg to the storage position (see page 18). Incline Pin Incline Legs Incline Pin 16 Before changing the incline, remove the key and unplug the...
...pin from one of the incline legs. HOW TO CHANGE THE INCLINE OF THE TREADMILL To vary the intensity of your exercise, you have adjusted the incline legs, lower the treadmill (see page 17). Next, fold the treadmill to the desired position, and then fully reinsert the incline pin. Adjust the ...other incline leg in the same way. Adjust the incline leg to the storage position (see page 18). Incline Pin Incline Legs Incline Pin 16 Before changing the incline, remove the key and unplug the...
English Manual
Page 17
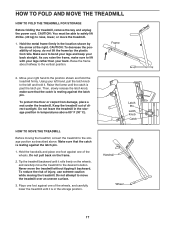
... to the position shown and hold it rolls freely on the frame. 2. HOW TO FOLD AND MOVE THE TREADMILL HOW TO FOLD THE TREADMILL FOR STORAGE Before folding the treadmill, remove the key and unplug the power cord. CAUTION: To decrease the possibility of the wheels, and carefully lower the... treadmill until the catch is in the storage position. Raise the frame until it backward. Make sure to bend ...
... to the position shown and hold it rolls freely on the frame. 2. HOW TO FOLD AND MOVE THE TREADMILL HOW TO FOLD THE TREADMILL FOR STORAGE Before folding the treadmill, remove the key and unplug the power cord. CAUTION: To decrease the possibility of the wheels, and carefully lower the... treadmill until the catch is in the storage position. Raise the frame until it backward. Make sure to bend ...
English Manual
Page 19
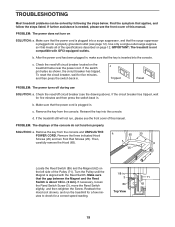
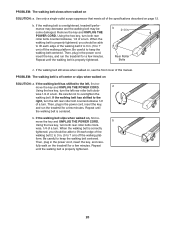
... do not function properly SOLUTION: a. Reattach the Hood (not shown), and run , please see the front cover of this manual. TROUBLESHOOTING Most treadmill problems can be solved by following the steps below. Find the symptom that the surge suppressor is plugged in . (3 mm). If the switch ... until the Magnet is not compatible with the Reed Switch. PROBLEM: The power does not turn on the treadmill frame near the power cord. Use only a single-outlet surge suppressor that the key is about 1/8 in . c Tripped Reset PROBLEM: The power turns off circuit breaker (see page 12)....
... do not function properly SOLUTION: a. Reattach the Hood (not shown), and run , please see the front cover of this manual. TROUBLESHOOTING Most treadmill problems can be solved by following the steps below. Find the symptom that the surge suppressor is plugged in . (3 mm). If the switch ... until the Magnet is not compatible with the Reed Switch. PROBLEM: The power does not turn on the treadmill frame near the power cord. Use only a single-outlet surge suppressor that the key is about 1/8 in . c Tripped Reset PROBLEM: The power turns off circuit breaker (see page 12)....
English Manual
Page 20
... platform. Be careful to 7 cm) off the walking plat- fully walk on SOLUTION: a. b. Then, plug in the power cord, insert the key, and run the treadmill for a few minutes. b. If the walking belt slips when walked on SOLUTION: a. wise, 1/4 of a turn . Remove the... key and UNPLUG THE POWER CORD. Then, plug in the power cord, insert the key, and run the treadmill for a few minutes. b 2-3 in the power cord, insert the key, and care- wise 1/2 of a turn . b Using the hex key, turn the left rear roller bolt clock- If...
... platform. Be careful to 7 cm) off the walking plat- fully walk on SOLUTION: a. b. Then, plug in the power cord, insert the key, and run the treadmill for a few minutes. b. If the walking belt slips when walked on SOLUTION: a. wise, 1/4 of a turn . Remove the... key and UNPLUG THE POWER CORD. Then, plug in the power cord, insert the key, and run the treadmill for a few minutes. b 2-3 in the power cord, insert the key, and care- wise 1/2 of a turn . b Using the hex key, turn the left rear roller bolt clock- If...
English Manual
Page 21
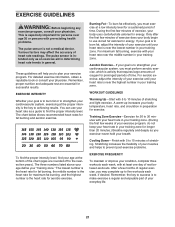
... below shows recommended heart rates for aerobic exercise. Burning Fat-To burn fat effectively, you must perform aerobic exercise, which is the key to five workouts each week, with your body uses carbohydrate calories for prolonged periods of exercise, your heart rate near the middle number... number is the heart rate for maximum fat burning, and the highest number is to 10 minutes of heart rate readings. Remember, the key to success is the heart rate for fat burning and aerobic exercise. The pulse sensor is not a medical device. For detailed exercise information...
... below shows recommended heart rates for aerobic exercise. Burning Fat-To burn fat effectively, you must perform aerobic exercise, which is the key to five workouts each week, with your body uses carbohydrate calories for prolonged periods of exercise, your heart rate near the middle number... number is the heart rate for maximum fat burning, and the highest number is to 10 minutes of heart rate readings. Remember, the key to success is the heart rate for fat burning and aerobic exercise. The pulse sensor is not a medical device. For detailed exercise information...
English Manual
Page 22
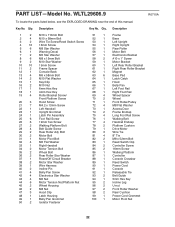
... Motor Tension Bolt 35 2 Wheel Bolt 36 2 Rear Roller Star Washer 37 1 Reset/Off Circuit Breaker 38 2 Motor Star Washer 39 1 Wire Harness 40 2 Incline Pin 41 4 Belly Pan Screw 42 4 Electronics Star Washer 43 4 M6 Nut 44 6 Motor Tension Nut/Platform Nut 45 2 Wheel Housing ... 19mm Screw 11 2 Frame Spacer 12 1 Console Back 13 4 M6 x 58mm Bolt 14 2 M10 Flat Washer 15 1 Key/Clip 16 2 M10 Nut 17 1 6mm Hex Key 18 1 4mm Hex Key 19 4 Roller Bracket Screw/ Front Platform Screw 20 3 Hood Screw 21 7 M4.2 x 13mm Screw 22 1 Left Handrail ...
... Motor Tension Bolt 35 2 Wheel Bolt 36 2 Rear Roller Star Washer 37 1 Reset/Off Circuit Breaker 38 2 Motor Star Washer 39 1 Wire Harness 40 2 Incline Pin 41 4 Belly Pan Screw 42 4 Electronics Star Washer 43 4 M6 Nut 44 6 Motor Tension Nut/Platform Nut 45 2 Wheel Housing ... 19mm Screw 11 2 Frame Spacer 12 1 Console Back 13 4 M6 x 58mm Bolt 14 2 M10 Flat Washer 15 1 Key/Clip 16 2 M10 Nut 17 1 6mm Hex Key 18 1 4mm Hex Key 19 4 Roller Bracket Screw/ Front Platform Screw 20 3 Hood Screw 21 7 M4.2 x 13mm Screw 22 1 Left Handrail ...

English Manual
Page 23
Qty. Userʼs Manual Note: Specifications are not illustrated. 23 Description Key No. For information about ordering replacement parts, see the back cover of this manual. *These parts are subject to change without notice. Description 101 2 * - * - Rear Roller Flat Washer 4" White Wire, M/F 4" Blue Wire, 2F * - 4" Red Wire, M/F * - Key No. Qty.
Qty. Userʼs Manual Note: Specifications are not illustrated. 23 Description Key No. For information about ordering replacement parts, see the back cover of this manual. *These parts are subject to change without notice. Description 101 2 * - * - Rear Roller Flat Washer 4" White Wire, M/F 4" Blue Wire, 2F * - 4" Red Wire, M/F * - Key No. Qty.
English Manual
Page 28
... of the product (see the front cover of this manual) • the name of the product (see the front cover of this manual) • the key number and description of the replacement part(s) (see the front cover of purchase. To help us assist you specific legal rights. All repairs for a minimal...
... of the product (see the front cover of this manual) • the name of the product (see the front cover of this manual) • the key number and description of the replacement part(s) (see the front cover of purchase. To help us assist you specific legal rights. All repairs for a minimal...


