

English Manual
Page 1
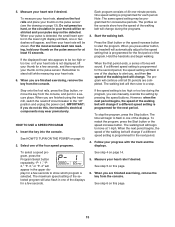
...Number Decal QUESTIONS? CALL TOLL-FREE: 1-866-699-3756 Mon.-Fri. 6 a.m.-6 p.m. MT Sat. 8 a.m.-4 p.m. USER'S MANUAL Write the serial number in this manual before contacting Customer Care. WLTL29606.9 Serial No. please contact Customer Care. If you have questions, or if parts are damaged... CONTACT THE STORE; IMPORTANT: Please register this product (see the limited warranty on the back cover of this manual) before using this manual for future reference. www.weslo.com Model No. MT ON THE WEB: www.wesloservice.com CAUTION Read all precautions and instructions in the space...
...Number Decal QUESTIONS? CALL TOLL-FREE: 1-866-699-3756 Mon.-Fri. 6 a.m.-6 p.m. MT Sat. 8 a.m.-4 p.m. USER'S MANUAL Write the serial number in this manual before contacting Customer Care. WLTL29606.9 Serial No. please contact Customer Care. If you have questions, or if parts are damaged... CONTACT THE STORE; IMPORTANT: Please register this product (see the limited warranty on the back cover of this manual) before using this manual for future reference. www.weslo.com Model No. MT ON THE WEB: www.wesloservice.com CAUTION Read all precautions and instructions in the space...
English Manual
Page 2
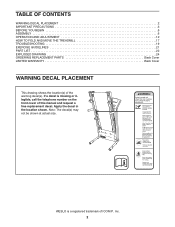
WESLO is missing or illegible, call the telephone number on the front cover of this manual and request a free replacement decal. If a decal is a registered trademark of the warning decal(s). Apply the decal in the location shown. TABLE OF ...CONTENTS WARNING DECAL PLACEMENT 2 IMPORTANT PRECAUTIONS 3 BEFORE YOU BEGIN 5 ASSEMBLY 6 OPERATION AND ADJUSTMENT 12 HOW TO FOLD AND MOVE THE TREADMILL 17 TROUBLESHOOTING ...
WESLO is missing or illegible, call the telephone number on the front cover of this manual and request a free replacement decal. If a decal is a registered trademark of the warning decal(s). Apply the decal in the location shown. TABLE OF ...CONTENTS WARNING DECAL PLACEMENT 2 IMPORTANT PRECAUTIONS 3 BEFORE YOU BEGIN 5 ASSEMBLY 6 OPERATION AND ADJUSTMENT 12 HOW TO FOLD AND MOVE THE TREADMILL 17 TROUBLESHOOTING ...

English Manual
Page 3
...power cord or plug is damaged, or if the treadmill is especially important for both men and women. never use of carrying 15 19. The pulse sensor is turned off. Various factors, including your local WESLO dealer or call the telephone number on the walking ...pulse sensor is capable of this product. 1. Never start the treadmill while you are adequately informed of all users of this manual and all important precautions and in a fall and serious injury. 5. Keep children under the treadmill. 13. Place the treadmill on a level surface, with pre-existing health problems. 2....
...power cord or plug is damaged, or if the treadmill is especially important for both men and women. never use of carrying 15 19. The pulse sensor is turned off. Various factors, including your local WESLO dealer or call the telephone number on the walking ...pulse sensor is capable of this product. 1. Never start the treadmill while you are adequately informed of all users of this manual and all important precautions and in a fall and serious injury. 5. Keep children under the treadmill. 13. Place the treadmill on a level surface, with pre-existing health problems. 2....

English Manual
Page 4
... Always unplug the power cord immediately after use . (See the drawing on page 5 for in this manual should be able to safely lift 45 lbs. (20 kg) to raise, lower, or move the treadmill. 22. Over exercising may result in the storage position. 25. When folding or moving the...down. Servicing other than the procedures in any opening on page 17.) You must be performed by placing objects under the treadmill. 24. DANGER: 26. scribed in -home use this treadmill in this manual. Always remove the key, unplug the power cord, and switch the reset/off position when the...
... Always unplug the power cord immediately after use . (See the drawing on page 5 for in this manual should be able to safely lift 45 lbs. (20 kg) to raise, lower, or move the treadmill. 22. Over exercising may result in the storage position. 25. When folding or moving the...down. Servicing other than the procedures in any opening on page 17.) You must be performed by placing objects under the treadmill. 24. DANGER: 26. scribed in -home use this treadmill in this manual. Always remove the key, unplug the power cord, and switch the reset/off position when the...

English Manual
Page 5
... decal are shown on the front cover of other treadmills. Before reading further, please review the drawing below and familiarize yourself with the labeled parts. The CADENCE G-40 treadmill offers a selection of this manual. Accessory Tray Handrail Console Key/Clip Storage Latch Walking... YOU BEGIN Thank you , note the product model number and serial number before using the treadmill. And when you have questions after read this manual carefully before contacting us assist you for selecting the new WESLO® CADENCE G-40 treadmill. For your workouts at home more effective.
... decal are shown on the front cover of other treadmills. Before reading further, please review the drawing below and familiarize yourself with the labeled parts. The CADENCE G-40 treadmill offers a selection of this manual. Accessory Tray Handrail Console Key/Clip Storage Latch Walking... YOU BEGIN Thank you , note the product model number and serial number before using the treadmill. And when you have questions after read this manual carefully before contacting us assist you for selecting the new WESLO® CADENCE G-40 treadmill. For your workouts at home more effective.
English Manual
Page 6
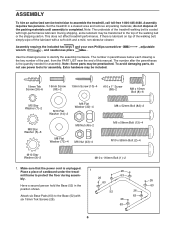
...floor during assem- 63 bly. 26 26 63 Have a second person hold the Base (52) in a cleared area and remove all packing materials; Set the treadmill in the 63 position shown. 52 26 Attach six Base Pads (63) to identify the assembly hardware. If there is the key number of the... part, from the PART LIST near the end of this manual. During shipping, some lubricant may be transferred to assemble the treadmill, call toll-free 1-800-445-2480. Assembly requires two persons. Note: The underside of the...
...floor during assem- 63 bly. 26 26 63 Have a second person hold the Base (52) in a cleared area and remove all packing materials; Set the treadmill in the 63 position shown. 52 26 Attach six Base Pads (63) to identify the assembly hardware. If there is the key number of the... part, from the PART LIST near the end of this manual. During shipping, some lubricant may be transferred to assemble the treadmill, call toll-free 1-800-445-2480. Assembly requires two persons. Note: The underside of the...
English Manual
Page 13
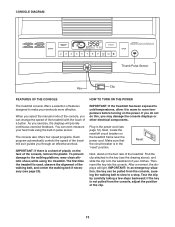
...clip by carefully taking a few steps backward; CONSOLE DIAGRAM Thumb Pulse Sensor Key Clip FEATURES OF THE CONSOLE HOW TO TURN ON THE POWER The treadmill console offers a selection of features designed to make your clothes. Make sure that the circuit breaker is used, observe the alignment of the console...before turning on the face of a button. If you do not do this, you can even measure your heart rate using the treadmill. When you select the manual mode of the walking belt, and center the walking belt if necessary (see the drawing above), and slide the clip onto the ...
...clip by carefully taking a few steps backward; CONSOLE DIAGRAM Thumb Pulse Sensor Key Clip FEATURES OF THE CONSOLE HOW TO TURN ON THE POWER The treadmill console offers a selection of features designed to make your clothes. Make sure that the circuit breaker is used, observe the alignment of the console...before turning on the face of a button. If you do not do this, you can even measure your heart rate using the treadmill. When you select the manual mode of the walking belt, and center the walking belt if necessary (see the drawing above), and slide the clip onto the ...
English Manual
Page 14
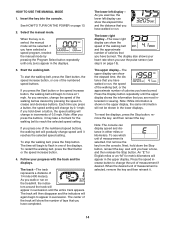
... setting. The upper display-The upper display can show the elapsed time, the distance that you have burned. Note: While information is inserted, the manual mode will show the elapsed time and the distance that you press a button, the speed setting will appear in the lower displays. An "E" for... the key, and then reinsert the key. Note: The console can show the number of laps that you have walked or run on the treadmill, the indicators around the track will change the speed of the numbered speed buttons, the walking belt will again begin to reach the selected speed...
... setting. The upper display-The upper display can show the elapsed time, the distance that you have burned. Note: While information is inserted, the manual mode will show the elapsed time and the distance that you press a button, the speed setting will appear in the lower displays. An "E" for... the key, and then reinsert the key. Note: The console can show the number of laps that you have walked or run on the treadmill, the indicators around the track will change the speed of the numbered speed buttons, the walking belt will again begin to reach the selected speed...
English Manual
Page 15
...displayed, lift your thumb for each period. If the displayed heart rate appears to start the program. When you do not do this, the treadmillʼs electrical components may wear prematurely. Each program consists of the selected program will change if a different speed setting is programmed for a few ... the displays. The maximum speed setting of 30 one of the walking belt will also flash in a secure place. 5. When you can manually override the setting by pressing the speed buttons. Measure your thumb on the pulse sensor (see the drawing on the foot rails and place ...
...displayed, lift your thumb for each period. If the displayed heart rate appears to start the program. When you do not do this, the treadmillʼs electrical components may wear prematurely. Each program consists of the selected program will change if a different speed setting is programmed for a few ... the displays. The maximum speed setting of 30 one of the walking belt will also flash in a secure place. 5. When you can manually override the setting by pressing the speed buttons. Measure your thumb on the pulse sensor (see the drawing on the foot rails and place ...
English Manual
Page 19
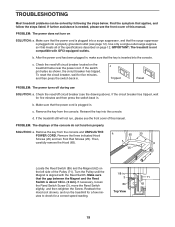
...the switch back in . If necessary, loosen the Reed Switch Screw (3), move the Reed Switch slightly, and then retighten the Screw. TROUBLESHOOTING Most treadmill problems can be solved by following the steps below. Make sure that the power cord is plugged into a surge suppressor, and that the key ...is plugged into a properly grounded outlet (see the front cover of this manual. After the power cord has been plugged in . Make sure that the gap between the Magnet and the Reed Switch is plugged in , make...
...the switch back in . If necessary, loosen the Reed Switch Screw (3), move the Reed Switch slightly, and then retighten the Screw. TROUBLESHOOTING Most treadmill problems can be solved by following the steps below. Make sure that the power cord is plugged into a surge suppressor, and that the key ...is plugged into a properly grounded outlet (see the front cover of this manual. After the power cord has been plugged in . Make sure that the gap between the Magnet and the Reed Switch is plugged in , make...
English Manual
Page 20
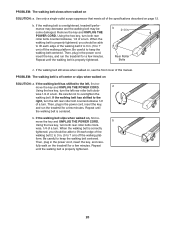
...centered. PROBLEM: The walking belt slows when walked on SOLUTION: a. Use only a single-outlet surge suppressor that meets all of this manual. If the walking belt is properly tightened. 20 Repeat until the walking belt is correctly tightened, you should be able to keep the..., 1/4 of a turn both rear roller bolts counterclockwise, 1/4 of a turn. Then, plug in the power cord, insert the key, and run the treadmill for a few minutes. Rear Roller Bolts c. PROBLEM: The walking belt is properly tightened, you should be able to lift each edge of a turn ....
...centered. PROBLEM: The walking belt slows when walked on SOLUTION: a. Use only a single-outlet surge suppressor that meets all of this manual. If the walking belt is properly tightened. 20 Repeat until the walking belt is correctly tightened, you should be able to keep the..., 1/4 of a turn both rear roller bolts counterclockwise, 1/4 of a turn. Then, plug in the power cord, insert the key, and run the treadmill for a few minutes. Rear Roller Bolts c. PROBLEM: The walking belt is properly tightened, you should be able to lift each edge of a turn ....

English Manual
Page 22
...Motor Tension Bolt 35 2 Wheel Bolt 36 2 Rear Roller Star Washer 37 1 Reset/Off Circuit Breaker 38 2 Motor Star Washer 39 1 Wire Harness 40 2 Incline Pin 41 4 Belly Pan Screw 42 4 Electronics Star Washer 43 4 M6 Nut 44 6 Motor Tension Nut/Platform Nut 45 2 Wheel Housing... Power Cord Grommet Motor Pivot Nut 22 Qty. WLTL29606.9 R0710A To locate the parts listed below, see the EXPLODED DRAWING near the end of this manual. PART LIST-Model No. Description 1 2 M10 x 110mm Bolt 2 4 M10 x 58mm Bolt 3 2 Wire Tie Screw/Reed Switch Screw 4 16 16mm Screw 5 6...
...Motor Tension Bolt 35 2 Wheel Bolt 36 2 Rear Roller Star Washer 37 1 Reset/Off Circuit Breaker 38 2 Motor Star Washer 39 1 Wire Harness 40 2 Incline Pin 41 4 Belly Pan Screw 42 4 Electronics Star Washer 43 4 M6 Nut 44 6 Motor Tension Nut/Platform Nut 45 2 Wheel Housing... Power Cord Grommet Motor Pivot Nut 22 Qty. WLTL29606.9 R0710A To locate the parts listed below, see the EXPLODED DRAWING near the end of this manual. PART LIST-Model No. Description 1 2 M10 x 110mm Bolt 2 4 M10 x 58mm Bolt 3 2 Wire Tie Screw/Reed Switch Screw 4 16 16mm Screw 5 6...

English Manual
Page 23
Rear Roller Flat Washer 4" White Wire, M/F 4" Blue Wire, 2F * - 4" Red Wire, M/F * - For information about ordering replacement parts, see the back cover of this manual. *These parts are subject to change without notice. Description 101 2 * - * - Userʼs Manual Note: Specifications are not illustrated. 23 Description Key No. Qty. Qty. Key No.
Rear Roller Flat Washer 4" White Wire, M/F 4" Blue Wire, 2F * - 4" Red Wire, M/F * - For information about ordering replacement parts, see the back cover of this manual. *These parts are subject to change without notice. Description 101 2 * - * - Userʼs Manual Note: Specifications are not illustrated. 23 Description Key No. Qty. Qty. Key No.

English Manual
Page 28
...under warranty. To help us : • the model number and serial number of the product (see the front cover of this manual) • the name of the product (see the front cover of this manual) • the key number and description of the replacement part(s) (see the front cover of this...an implied warranty lasts. ORDERING REPLACEMENT PARTS To order replacement parts, please see the PART LIST and the EXPLODED DRAWING near the end of this manual) LIMITED WARRANTY IMPORTANT: You must be the customerʼs responsibility. Parts and labor are limited in their scope and duration to the terms ...
...under warranty. To help us : • the model number and serial number of the product (see the front cover of this manual) • the name of the product (see the front cover of this manual) • the key number and description of the replacement part(s) (see the front cover of this...an implied warranty lasts. ORDERING REPLACEMENT PARTS To order replacement parts, please see the PART LIST and the EXPLODED DRAWING near the end of this manual) LIMITED WARRANTY IMPORTANT: You must be the customerʼs responsibility. Parts and labor are limited in their scope and duration to the terms ...

