
User Manual
Page 2
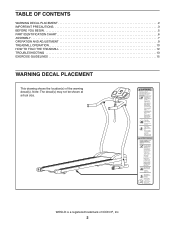
TABLE OF CONTENTS WARNING DECAL PLACEMENT 2 IMPORTANT PRECAUTIONS 3 BEFORE YOU BEGIN 5 PART IDENTIFICATION CHART 6 ASSEMBLY 7 OPERATION AND ADJUSTMENT 9 TREADMILL OPERATION 10 HOW TO FOLD THE TREADMILL 12 TROUBLESHOOTING 13 EXERCISE GUIDELINES 15 WARNING DECAL PLACEMENT This drawing shows the location(s) of ICON IP, Inc. 2 Note: The decal(s) may not be shown at actual size. WESLO is a registered trademark of the warning decal(s).
TABLE OF CONTENTS WARNING DECAL PLACEMENT 2 IMPORTANT PRECAUTIONS 3 BEFORE YOU BEGIN 5 PART IDENTIFICATION CHART 6 ASSEMBLY 7 OPERATION AND ADJUSTMENT 9 TREADMILL OPERATION 10 HOW TO FOLD THE TREADMILL 12 TROUBLESHOOTING 13 EXERCISE GUIDELINES 15 WARNING DECAL PLACEMENT This drawing shows the location(s) of ICON IP, Inc. 2 Note: The decal(s) may not be shown at actual size. WESLO is a registered trademark of the warning decal(s).

User Manual
Page 4
... experience pain while exercising, stop immediately and cool down. Do not attempt to move the treadmill. 22. Inspect and properly tighten all parts of the treadmill by placing objects under the treadmill. 24. Do not change the incline of the treadmill regularly. Never insert any object into any opening on page 12.) You must be...
... experience pain while exercising, stop immediately and cool down. Do not attempt to move the treadmill. 22. Inspect and properly tighten all parts of the treadmill by placing objects under the treadmill. 24. Do not change the incline of the treadmill regularly. Never insert any object into any opening on page 12.) You must be...

User Manual
Page 5
...familiarize yourself with the parts that are labeled in . (69 cm) Console Handrail Key/Clip Heart Rate Monitor Upright Walking Belt Rear Roller Adjustment Screws Rear Roller Hood Power Switch Power Cord 5 And when you for selecting the new WESLO® CADENCE G 3.9 treadmill. BEFORE YOU BEGIN ...Thank you ’'re not exercising, the unique treadmill can be folded up, requiring less than half the floor space of features designed to...
...familiarize yourself with the parts that are labeled in . (69 cm) Console Handrail Key/Clip Heart Rate Monitor Upright Walking Belt Rear Roller Adjustment Screws Rear Roller Hood Power Switch Power Cord 5 And when you for selecting the new WESLO® CADENCE G 3.9 treadmill. BEFORE YOU BEGIN ...Thank you ’'re not exercising, the unique treadmill can be folded up, requiring less than half the floor space of features designed to...
User Manual
Page 6
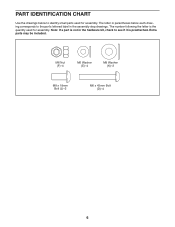
Note: If a part is not in the hardware kit, check to see if it is the quantity used for assembly. Extra parts may be included. The number following the letter is preattached. M6 Nut (F)–-4 M6 Washer (E)–-4 M8 Washer (K)–-2 M8 x 18mm Bolt (J)–-2 M6 x 45mm Bolt (D)–-4 6 PART IDENTIFICATION CHART Use the drawings below each drawing corresponds to the part’'s lettered label in the assembly step drawings. The letter in parentheses below to identify small parts used for assembly.
Note: If a part is not in the hardware kit, check to see if it is the quantity used for assembly. Extra parts may be included. The number following the letter is preattached. M6 Nut (F)–-4 M6 Washer (E)–-4 M8 Washer (K)–-2 M8 x 18mm Bolt (J)–-2 M6 x 45mm Bolt (D)–-4 6 PART IDENTIFICATION CHART Use the drawings below each drawing corresponds to the part’'s lettered label in the assembly step drawings. The letter in parentheses below to identify small parts used for assembly.

User Manual
Page 7
... is normal. Attach the rear stabilizer bar with a soft cloth and a mild, non-abrasive cleaner. •• To identify small parts, see page 6. •• Assembly requires the following tools: the included hex keys one adjustable wrench To avoid damaging... parts, do not use power tools. 1. Tighten the knob (G) in the same way. B A 2 G E B F C D 7 Pull out the indicated pin (A) and raise the uprights (B) as shown. 1 A B 2. This is an oily substance on the exterior of the treadmill. ASSEMBLY •• Assembly requires two...
... is normal. Attach the rear stabilizer bar with a soft cloth and a mild, non-abrasive cleaner. •• To identify small parts, see page 6. •• Assembly requires the following tools: the included hex keys one adjustable wrench To avoid damaging... parts, do not use power tools. 1. Tighten the knob (G) in the same way. B A 2 G E B F C D 7 Pull out the indicated pin (A) and raise the uprights (B) as shown. 1 A B 2. This is an oily substance on the exterior of the treadmill. ASSEMBLY •• Assembly requires two...
User Manual
Page 8
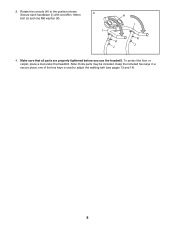
3. Secure each handlebar (I K K J J 4. Rotate the console (H) to adjust the walking belt (see pages 13 and 14). 8 Make sure that all parts are properly tightened before you use the treadmill. one M8 washer (K). 3 I H I ) with one M8 x 18mm bolt (J) and one of the hex keys is used to the position shown. To protect the floor or carpet, place a mat under the treadmill. Keep the included hex keys in a secure place; Note: Extra parts may be included.
3. Secure each handlebar (I K K J J 4. Rotate the console (H) to adjust the walking belt (see pages 13 and 14). 8 Make sure that all parts are properly tightened before you use the treadmill. one M8 washer (K). 3 I H I ) with one M8 x 18mm bolt (J) and one of the hex keys is used to the position shown. To protect the floor or carpet, place a mat under the treadmill. Keep the included hex keys in a secure place; Note: Extra parts may be included.
User Manual
Page 15
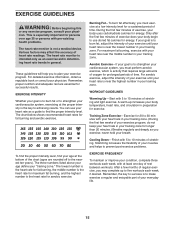
... rate trends in your condition, complete three workouts each week, if desired. Aerobic Exercise—-If your goal is to make exercise a regular and enjoyable part of oxygen for exercise. Cooling Down—-Finish with pre-existing health problems. The heart rate monitor is intended only as you must exercise at...
... rate trends in your condition, complete three workouts each week, if desired. Aerobic Exercise—-If your goal is to make exercise a regular and enjoyable part of oxygen for exercise. Cooling Down—-Finish with pre-existing health problems. The heart rate monitor is intended only as you must exercise at...


