

English Manual
Page 2
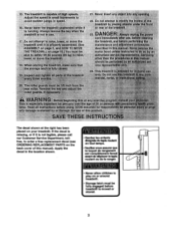
etreral owinOre's an..one•PerSOn on t readthIll ... othhig drag tla treadmill not wear loose othin• ar:sOtikl.bicsaii.caught Ih the • • ' • ... .1tfinkiippntisOn ee . tio u 6 and :surge. 0t0, o a ro strou :se .....no an ie use ottn y person • . ... TABLE OF CONTENTS IMPORTANT PRECAUTIONS BEFORE YOU BEGIN ASSEMBLY OPERATION AND ADJUSTMENT HOW TO FOLD AND MOVE THE TREADMILL MAINTENANCE AND TROUBLE-SHOOTING CONDITIONING GUIDELINES ORDERING REPLACEMENT PARTS LIMITED WARRANTY 2 4 5 7 10 12 14 Back Cover Back Cover Note: A PART LIST and an EXPLODED...
etreral owinOre's an..one•PerSOn on t readthIll ... othhig drag tla treadmill not wear loose othin• ar:sOtikl.bicsaii.caught Ih the • • ' • ... .1tfinkiippntisOn ee . tio u 6 and :surge. 0t0, o a ro strou :se .....no an ie use ottn y person • . ... TABLE OF CONTENTS IMPORTANT PRECAUTIONS BEFORE YOU BEGIN ASSEMBLY OPERATION AND ADJUSTMENT HOW TO FOLD AND MOVE THE TREADMILL MAINTENANCE AND TROUBLE-SHOOTING CONDITIONING GUIDELINES ORDERING REPLACEMENT PARTS LIMITED WARRANTY 2 4 5 7 10 12 14 Back Cover Back Cover Note: A PART LIST and an EXPLODED...
English Manual
Page 3
... PARTS on , page Yoninuatbe ela:a ei 446% 4- hood "instructed noii*.ed er han tea:p ouid be fully engaged before treadmill is not legible, please call our Customer Service Department, tollfree, to order a free replacement decal (see . . cord inimediat after': ~etare iirt ....:the treadmill; Adjust the speed in small increments, to play on your treadmill. tO Irank, .10:040 Instructions the age' .eaaOn k spans sc IOW • grfyta:of high speeds. . Do...
... PARTS on , page Yoninuatbe ela:a ei 446% 4- hood "instructed noii*.ed er han tea:p ouid be fully engaged before treadmill is not legible, please call our Customer Service Department, tollfree, to order a free replacement decal (see . . cord inimediat after': ~etare iirt ....:the treadmill; Adjust the speed in small increments, to play on your treadmill. tO Irank, .10:040 Instructions the age' .eaaOn k spans sc IOW • grfyta:of high speeds. . Do...
English Manual
Page 4
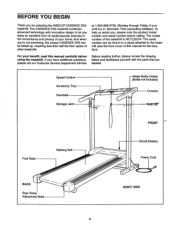
... be folded up, requiring less than half the floor space of your benefit, read this manual for selecting the WESLO® CADENCE DX5 treadmill. at 1-800-999-3756, Monday through Friday, 6 a.m. The model number of this manual carefully before calling. For your home. until 6 p.m. To help us assist you ...
... be folded up, requiring less than half the floor space of your benefit, read this manual for selecting the WESLO® CADENCE DX5 treadmill. at 1-800-999-3756, Monday through Friday, 6 a.m. The model number of this manual carefully before calling. For your home. until 6 p.m. To help us assist you ...
English Manual
Page 5
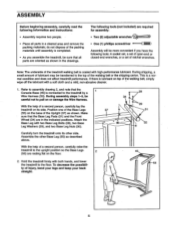
... positions. Position one of the Base Legs 37 (55) on or damage the Wire Harness. This is coated with both hands, and lower the treadmill to the treadmill by a Wire Harness (53). Make sure that the 1 Console Base (45) is completed. • As you have the following information and ...Pads (31) and the Front Wheel (34) are resting flat on the floor. 34 • 30 28 29 31 55 45 2. Hold the treadmill firmly with high-performance lubricant. During shipping, a small amount of the Upright (37) as described above. If there is lubricant on its other ...
... positions. Position one of the Base Legs 37 (55) on or damage the Wire Harness. This is coated with both hands, and lower the treadmill to the treadmill by a Wire Harness (53). Make sure that the 1 Console Base (45) is completed. • As you have the following information and ...Pads (31) and the Front Wheel (34) are resting flat on the floor. 34 • 30 28 29 31 55 45 2. Hold the treadmill firmly with high-performance lubricant. During shipping, a small amount of the Upright (37) as described above. If there is lubricant on its other ...
English Manual
Page 6
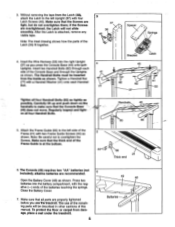
... floor or carpet from the Latch (38), attach the Latch to the left Upright (37) with two Frame Guide Screws (44) as you •uselhe-treadmill. Insert two Handrail Bolts (82) through each Handrail Bolt. 3 37 38 . 40 -- . Regularly inspect and tight- Handrails 45 , ..,... ■ of... (40). Carefully lift up and push down onthe handralls to overtighten the Screws. Without removing the tape from damage, place a mat under the treadmill. 6 49 48 . - Attach the Frame Guide (66) to the left side of the remaining parts will not slide smoothly. Note: The...
... floor or carpet from the Latch (38), attach the Latch to the left Upright (37) with two Frame Guide Screws (44) as you •uselhe-treadmill. Insert two Handrail Bolts (82) through each Handrail Bolt. 3 37 38 . 40 -- . Regularly inspect and tight- Handrails 45 , ..,... ■ of... (40). Carefully lift up and push down onthe handralls to overtighten the Screws. Without removing the tape from damage, place a mat under the treadmill. 6 49 48 . - Attach the Frame Guide (66) to the left side of the remaining parts will not slide smoothly. Note: The...

English Manual
Page 7
... a grounding plug that is equipped with 2 a 14-gauge cord of your treadmill. The temporary adapter should malfunction or break down, grounding provides a path of electric shock. Your treadmill, like the plug illustrated in drawing 2 may be grounded. Grounded Outlet Grounded ... are not grounded. They will deterioratelhe walking belt and cause excessive wear. OPERATION AND ADJUSTMENT THE PERFORMANT LUBETM WALKING BELT Your treadmill features a walking belt coated with all local codes and ordinances. IMPORTANT: Never apply silicone spray or other appli- by ...
... a grounding plug that is equipped with 2 a 14-gauge cord of your treadmill. The temporary adapter should malfunction or break down, grounding provides a path of electric shock. Your treadmill, like the plug illustrated in drawing 2 may be grounded. Grounded Outlet Grounded ... are not grounded. They will deterioratelhe walking belt and cause excessive wear. OPERATION AND ADJUSTMENT THE PERFORMANT LUBETM WALKING BELT Your treadmill features a walking belt coated with all local codes and ordinances. IMPORTANT: Never apply silicone spray or other appli- by ...
English Manual
Page 8
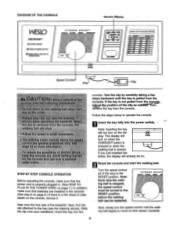
... UP WNW MOW RUIr Next, slowly turn on when the ON/RESET button is pressed or when the walking belt is a thin sheet of the treadmill. e Oat Note: Inserting the key will turn the speed control until the key is stopped, the speed control must be on the display. Step onto...
... UP WNW MOW RUIr Next, slowly turn on when the ON/RESET button is pressed or when the walking belt is a thin sheet of the treadmill. e Oat Note: Inserting the key will turn the speed control until the key is stopped, the speed control must be on the display. Step onto...
English Manual
Page 10
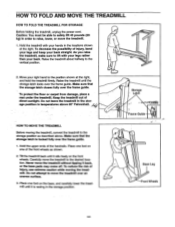
...guide. Storage Latch •'-Ctored Frame Guide Base Leg Front Wheels n To protect the floor or carpet from damage, place a mat under the treadmill. Place one of injury, bend your legs and keep your back. To decrease the possibility of the front wheels as described above 85° ... storage latch closes fully over the frame guide. 1. Do not attempt to the position shown at the right. Raise the treadmill about halfway to raise, lower, or move the treadmill over the frame guide. Caution: You must be able to safely lift 45 pounds (20 kg) in the storage position...
...guide. Storage Latch •'-Ctored Frame Guide Base Leg Front Wheels n To protect the floor or carpet from damage, place a mat under the treadmill. Place one of injury, bend your legs and keep your back. To decrease the possibility of the front wheels as described above 85° ... storage latch closes fully over the frame guide. 1. Do not attempt to the position shown at the right. Raise the treadmill about halfway to raise, lower, or move the treadmill over the frame guide. Caution: You must be able to safely lift 45 pounds (20 kg) in the storage position...
English Manual
Page 11
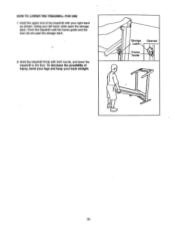
Hold the treadmill firmly with your right hand as shown. Hold the upper end of injury, bend your legs and keep your left hand, slide open the storage latch. Pivot the treadmill until the frame guide and the foot rail are past the storage latch. 2. To decrease the possibility of the treadmill with both hands, and lower the treadmill to the floor. Using your back straight. Storage Latch Frame Guide Opened 0 O 11 HOW TO LOWER THE TREADMILL FOR USE 1.
Hold the treadmill firmly with your right hand as shown. Hold the upper end of injury, bend your legs and keep your left hand, slide open the storage latch. Pivot the treadmill until the frame guide and the foot rail are past the storage latch. 2. To decrease the possibility of the treadmill with both hands, and lower the treadmill to the floor. Using your back straight. Storage Latch Frame Guide Opened 0 O 11 HOW TO LOWER THE TREADMILL FOR USE 1.
English Manual
Page 12
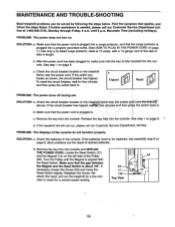
...less in . Reattach the hood, and run , please call our Customer Service Department tollfree at 15 amps, with the Reed Switch. See step 1 on the treadmill frame near the power cord. c Tripped Reset PROBLEM: The power turns off during use SOLUTION: a. Check the batteries in . until the Magnet is plugged in... inserted into the console. If the circuit breaker has tripped: walfloir fKre minutes.and then preSs the switch back in the console. If the treadmill still will not run the treadmill for a few minutes to be solved by following the steps below. b.
...less in . Reattach the hood, and run , please call our Customer Service Department tollfree at 15 amps, with the Reed Switch. See step 1 on the treadmill frame near the power cord. c Tripped Reset PROBLEM: The power turns off during use SOLUTION: a. Check the batteries in . until the Magnet is plugged in... inserted into the console. If the circuit breaker has tripped: walfloir fKre minutes.and then preSs the switch back in the console. If the treadmill still will not run the treadmill for a few minutes to be solved by following the steps below. b.
English Manual
Page 13
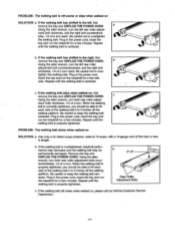
...off the walking platform. Plug in the power cord, insert the key and run the treadmill for a few min- tighten the walking belt. c. Remove the key and UNPLUG THE POWER CORD. ...Repeat until the walking belt is overtightened, treadmill performance may decrease and the walking belt may be able to lift each side of five feet... or less in the power cord, insert the key and run the treadmill for a few minutes. utes. c Using the alien wrench, turn the left , first remove the ...
...off the walking platform. Plug in the power cord, insert the key and run the treadmill for a few min- tighten the walking belt. c. Remove the key and UNPLUG THE POWER CORD. ...Repeat until the walking belt is overtightened, treadmill performance may decrease and the walking belt may be able to lift each side of five feet... or less in the power cord, insert the key and run the treadmill for a few minutes. utes. c Using the alien wrench, turn the left , first remove the ...
English Manual
Page 14
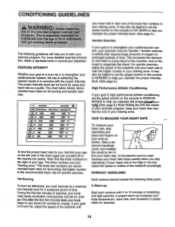
...prolonged periods of exercise, your body uses easily accessible carbohydrate calories for exercise. 14 For aerobic exercise, adjust the speed of the treadmill until A Warm-up increases your body temperature, heart rate, and circulation in preparation for energy. Only.affertheiirst few minutes tiDeS yourbody... will help you maintain the proper intensity level. (See page 8.) Aerobic Exercise If your goal is to the right of the treadmill accordingly. The chart below shows recommended heart rates for energy. A proper warm-up Start each workout with the proper intensity. For...
...prolonged periods of exercise, your body uses easily accessible carbohydrate calories for exercise. 14 For aerobic exercise, adjust the speed of the treadmill until A Warm-up increases your body temperature, heart rate, and circulation in preparation for energy. Only.affertheiirst few minutes tiDeS yourbody... will help you maintain the proper intensity level. (See page 8.) Aerobic Exercise If your goal is to the right of the treadmill accordingly. The chart below shows recommended heart rates for energy. A proper warm-up Start each workout with the proper intensity. For...
English Manual
Page 16
...toll-free at ICON's option, the product through Friday, 6 a.m. Some, states do not allow limitations on how long an implied warranty lasts. DX5 treadmill) • The SERIAL NUMBER of the product (see the front cover of this manual) • The KEY NUMBER and DESCRIPTION of the desired...gives you . ICON HEALTH & FITNESS, INC., 1500 S. 1000 W., LOGAN, UT 84321-9813 Part No. 161752 R1200A Printed in the center of the product (WESLO CADENCE. Some states do not allow the exclusion or limitation of ICON Health & Fitness, Inc. = LIMITED WARRANTY ICON Health & Fitness, Inc. (ICON), warrants ...
...toll-free at ICON's option, the product through Friday, 6 a.m. Some, states do not allow limitations on how long an implied warranty lasts. DX5 treadmill) • The SERIAL NUMBER of the product (see the front cover of this manual) • The KEY NUMBER and DESCRIPTION of the desired...gives you . ICON HEALTH & FITNESS, INC., 1500 S. 1000 W., LOGAN, UT 84321-9813 Part No. 161752 R1200A Printed in the center of the product (WESLO CADENCE. Some states do not allow the exclusion or limitation of ICON Health & Fitness, Inc. = LIMITED WARRANTY ICON Health & Fitness, Inc. (ICON), warrants ...


