
English Manual
Page 4
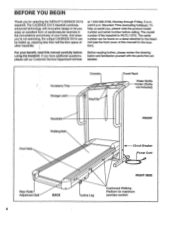
... Power Cord Rear Roller Adjustment Bolt 4 BACK 0 Incline Leg RIGHT SIDE Cushioned Walking Platform for selecting the WESLO® CADENCE DX15 treadmill. Accessory Tray Storage Latch Console rr Towel Rack Water Bottle Holder (Bottle not included) Foot Rails Handrails Walking Belt FRONT -4-- until 6 p.m. The CADENCE DX15 treadmill combines advanced technology with the parts that are labeled. at 1-800-999-3756...
... Power Cord Rear Roller Adjustment Bolt 4 BACK 0 Incline Leg RIGHT SIDE Cushioned Walking Platform for selecting the WESLO® CADENCE DX15 treadmill. Accessory Tray Storage Latch Console rr Towel Rack Water Bottle Holder (Bottle not included) Foot Rails Handrails Walking Belt FRONT -4-- until 6 p.m. The CADENCE DX15 treadmill combines advanced technology with the parts that are labeled. at 1-800-999-3756...
English Manual
Page 7
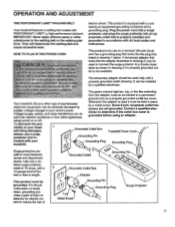
... the like the adapter illustrated in your home's power. OPERATION AND ADJUSTMENT THE PERFORMANT LUBETu WALKING BELT Your treadmill features a walking belt coated with a cord having an equipment-grounding conductor and a grounding plug. Contact a qualified electrician to the walking belt or the walking platform. sibility of Lug Metal Screw Grounding Pin Grounding Plug Surge Protector 7 Grounded Outlet Grounded...
... the like the adapter illustrated in your home's power. OPERATION AND ADJUSTMENT THE PERFORMANT LUBETu WALKING BELT Your treadmill features a walking belt coated with a cord having an equipment-grounding conductor and a grounding plug. Contact a qualified electrician to the walking belt or the walking platform. sibility of Lug Metal Screw Grounding Pin Grounding Plug Surge Protector 7 Grounded Outlet Grounded...
English Manual
Page 9
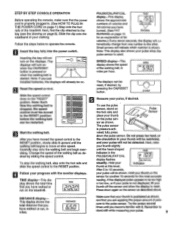
... will not turn on page 7.) Step onto the foot rails of the walking belt, in miles per hour. ON/RESET Measure your clothing Follow the steps below to the RESET position, slowly slide it . fully press down again on the treadmill. Press down the pulse sensor. Remember to move at this level. Note...
... will not turn on page 7.) Step onto the foot rails of the walking belt, in miles per hour. ON/RESET Measure your clothing Follow the steps below to the RESET position, slowly slide it . fully press down again on the treadmill. Press down the pulse sensor. Remember to move at this level. Note...
English Manual
Page 10
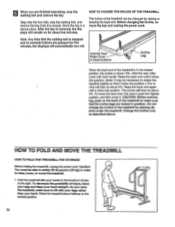
...lift with both hands. Change the incline only as described above. To decrease the possibility of the treadmill to make sure to raise, lower, or move the treadmill. ( - 1. Step onto the foot rails, stop the walking belt and remove the key. After the key is about five minutes. As you are finished exercising, ... remain on the back of injury, bend your legs and keep your hands in the locations shown at the right. 6 When you raise the treadmill, make sure that the walking belt is stopped and no console buttons are locked in position. Store the key in a secure place. Hold the...
...lift with both hands. Change the incline only as described above. To decrease the possibility of the treadmill to make sure to raise, lower, or move the treadmill. ( - 1. Step onto the foot rails, stop the walking belt and remove the key. After the key is about five minutes. As you are finished exercising, ... remain on the back of injury, bend your legs and keep your hands in the locations shown at the right. 6 When you raise the treadmill, make sure that the walking belt is stopped and no console buttons are locked in position. Store the key in a secure place. Hold the...
English Manual
Page 13
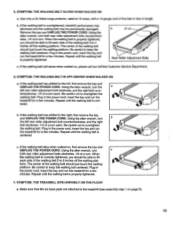
.... If the walking belt has shifted to overtighten the walking belt. b. c. Repeat until the walking belt is overtightened, treadmill performance may decrease and the walking belt may be permanently...walking belt 2 to the treadmill (see assembly step 1 on page 5). 13 When the walking belt is centered. SYMPTOM: THE WALKING BELT SLOWS WHEN WALKED ON a. Repeat until the walking belt is properly tightened. 7. When the walking belt is correctly tightened, you should be able to lift each side of the walking belt 3 to keep the walking belt centered. SYMPTOM: THE WALKING BELT...
.... If the walking belt has shifted to overtighten the walking belt. b. c. Repeat until the walking belt is overtightened, treadmill performance may decrease and the walking belt may be permanently...walking belt 2 to the treadmill (see assembly step 1 on page 5). 13 When the walking belt is centered. SYMPTOM: THE WALKING BELT SLOWS WHEN WALKED ON a. Repeat until the walking belt is properly tightened. 7. When the walking belt is correctly tightened, you should be able to lift each side of the walking belt 3 to keep the walking belt centered. SYMPTOM: THE WALKING BELT...
English Manual
Page 19
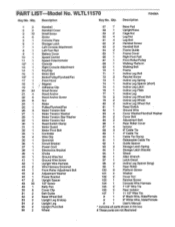
...Storage Latch Left Console Attachment Left Foot Rail Battery Cover Speed Control Speed Potentiometer Console Right Console Attachment Key/Clip Motor Belt Motor/Pulley/FlywheeVFan Front Hood Magnet Adhesive Clip Small Screw Hood Anchor Hood Anchor Screw Nut Motor Pulley/FlywheeVFan Motor ...62 2 Handrail Screw 63 2 Handrail Bolt 64 2 Frame Guide 65 1 Frame Cover 66 1 Right Foot Rail 67 1 Front Roller/Pulley 68 1 Walking Platform 69 1 Walking Belt 70 1 Frame 71 1 Incline Leg Bolt 72 2 Ratchet Screw 73 1 Incline Leg Spring 74 1 Incline Leg Spacer (short) 75 1 Incline Leg...
...Storage Latch Left Console Attachment Left Foot Rail Battery Cover Speed Control Speed Potentiometer Console Right Console Attachment Key/Clip Motor Belt Motor/Pulley/FlywheeVFan Front Hood Magnet Adhesive Clip Small Screw Hood Anchor Hood Anchor Screw Nut Motor Pulley/FlywheeVFan Motor ...62 2 Handrail Screw 63 2 Handrail Bolt 64 2 Frame Guide 65 1 Frame Cover 66 1 Right Foot Rail 67 1 Front Roller/Pulley 68 1 Walking Platform 69 1 Walking Belt 70 1 Frame 71 1 Incline Leg Bolt 72 2 Ratchet Screw 73 1 Incline Leg Spring 74 1 Incline Leg Spacer (short) 75 1 Incline Leg...


