
English Manual
Page 2
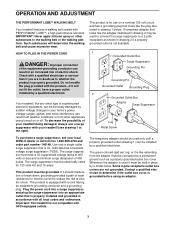
... or covered patio, or near water. 5. Do not put the treadmill in this manual. Use the treadmill only as a transient voltage surge suppressor (TVSS). Keep children under the treadmill. 4. Never use an extension cord. 11. When connecting the power cord (see your local WESLO dealer or call 1-800-9993756 and order part number 146148...
... or covered patio, or near water. 5. Do not put the treadmill in this manual. Use the treadmill only as a transient voltage surge suppressor (TVSS). Keep children under the treadmill. 4. Never use an extension cord. 11. When connecting the power cord (see your local WESLO dealer or call 1-800-9993756 and order part number 146148...

English Manual
Page 3
.... Note: The decal is not in the location shown. Always remove the key and unplug the power cord when the treadmill is shown at 38% of the treadmill by an authorized service representative only. 24. Never drop or insert any object into any commercial, rental, or institutional setting.... Apply the decal in use of this treadmill in this manual should be able to safely lift 45 pounds (20 kg) in general. 17. Adjust the speed in small increments to do...
.... Note: The decal is not in the location shown. Always remove the key and unplug the power cord when the treadmill is shown at 38% of the treadmill by an authorized service representative only. 24. Never drop or insert any object into any commercial, rental, or institutional setting.... Apply the decal in use of this treadmill in this manual should be able to safely lift 45 pounds (20 kg) in general. 17. Adjust the speed in small increments to do...
English Manual
Page 4
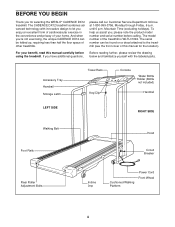
... the floor space of your benefit, read this manual for selecting the WESLO® CADENCE DX12 treadmill. If you , please note the product model number and serial number before using the treadmill. Accessory Tray Handrail Storage Latch Towel Rack Key/Clip Console Water Bottle Holder...free at 1-800-999-3756, Monday through Friday, 6 a.m. until 6 p.m. Mountain Time (excluding holidays). For your home. The CADENCE DX12 treadmill combines advanced technology with the labeled parts. The model number of this manual carefully before calling. To help us assist you have additional...
... the floor space of your benefit, read this manual for selecting the WESLO® CADENCE DX12 treadmill. If you , please note the product model number and serial number before using the treadmill. Accessory Tray Handrail Storage Latch Towel Rack Key/Clip Console Water Bottle Holder...free at 1-800-999-3756, Monday through Friday, 6 a.m. until 6 p.m. Mountain Time (excluding holidays). For your home. The CADENCE DX12 treadmill combines advanced technology with the labeled parts. The model number of this manual carefully before calling. To help us assist you have additional...
English Manual
Page 5
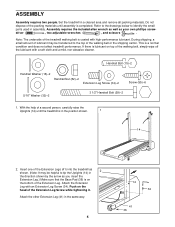
... help of a second person, carefully raise the Uprights (14) until assembly is completed. Push on the bottom of the packing materials until the treadmill is coated with high-performance lubricant. During shipping, a small amount of lubricant may be transferred to tip the Uprights (14) in a cleared ... Leg Screw (34)-2 Screw (55)-6 5/16" Washer (32)-2 3 1/2" Handrail Bolt (59)-2 1. Attach the other Extension Leg (41) in assembly. Set the treadmill in the direction shown by the arrow as you insert the Extension Leg.) Make sure that the Base Pad (36) is on the head of...
... help of a second person, carefully raise the Uprights (14) until assembly is completed. Push on the bottom of the packing materials until the treadmill is coated with high-performance lubricant. During shipping, a small amount of lubricant may be transferred to tip the Uprights (14) in a cleared ... Leg Screw (34)-2 Screw (55)-6 5/16" Washer (32)-2 3 1/2" Handrail Bolt (59)-2 1. Attach the other Extension Leg (41) in assembly. Set the treadmill in the direction shown by the arrow as you insert the Extension Leg.) Make sure that the Base Pad (36) is on the head of...
English Manual
Page 6
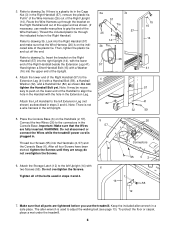
... 6 14 55 6 2 55 12 7. After all parts are fully inserted. do not overtighten the Screws. 6. To protect the floor or carpet, place a mat under the treadmill. 6 Pull 6" of the Wire Harness (26) out of the plastic tie. Route the Wire Harness up through the indicated holes in the Extension Leg. WARNING...: Do not disconnect or connect the Wires while the treadmill power cord is a plastic tie in the Cage Nut (3) in . Attach the Storage Latch (12) to drawing 3c. If there is plugged in the ...
... 6 14 55 6 2 55 12 7. After all parts are fully inserted. do not overtighten the Screws. 6. To protect the floor or carpet, place a mat under the treadmill. 6 Pull 6" of the Wire Harness (26) out of the plastic tie. Route the Wire Harness up through the indicated holes in the Extension Leg. WARNING...: Do not disconnect or connect the Wires while the treadmill power cord is a plastic tie in the Cage Nut (3) in . Attach the Storage Latch (12) to drawing 3c. If there is plugged in the ...
English Manual
Page 7
Check with a qualified electrician or serviceman if you are not grounded. Do not modify the plug provided with your local WESLO dealer or call toll-free 1-800-999-3756 and order part number 146148. To decrease the possibility of your home's power. Use only a single-outlet ... the plug illustrated in an increased risk of least resistance for use a surge suppressor with the product-if it must be held in your treadmill being turned on a nominal 120-volt circuit, and has a grounding plug that looks like extending from other substances to a permanent ground such as to whether ...
Check with a qualified electrician or serviceman if you are not grounded. Do not modify the plug provided with your local WESLO dealer or call toll-free 1-800-999-3756 and order part number 146148. To decrease the possibility of your home's power. Use only a single-outlet ... the plug illustrated in an increased risk of least resistance for use a surge suppressor with the product-if it must be held in your treadmill being turned on a nominal 120-volt circuit, and has a grounding plug that looks like extending from other substances to a permanent ground such as to whether ...
English Manual
Page 8
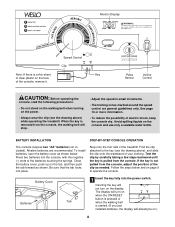
Monitor Display Speed Control Clip Note: If there is a thin sheet Key of clear plastic on the face of the treadmill. Avoid spilling liquids on the tab, and then push the tab forward as shown. Be sure that the tab locks into the power switch. Step .... (If you just installed batteries, the display will not turn on the power. • Always wear the clip (see the drawing above ) while operating the treadmill. If the key is removed from the console, adjust the position of your clothing. Pulse Sensor Incline Control CAUTION: Before operating the console, read the...
Monitor Display Speed Control Clip Note: If there is a thin sheet Key of clear plastic on the face of the treadmill. Avoid spilling liquids on the tab, and then push the tab forward as shown. Be sure that the tab locks into the power switch. Step .... (If you just installed batteries, the display will not turn on the power. • Always wear the clip (see the drawing above ) while operating the treadmill. If the key is removed from the console, adjust the position of your clothing. Pulse Sensor Incline Control CAUTION: Before operating the console, read the...
English Manual
Page 9
... on the sensor for another 15 seconds for six minutes. 9 Next, slowly turn off in the pulse display flashes steadily. Change the speed of the treadmill as desired. The modes are finished exercising, stop exercising for ten seconds or longer, the time mode will pause. • Distance (DIST)-This mode shows...
... on the sensor for another 15 seconds for six minutes. 9 Next, slowly turn off in the pulse display flashes steadily. Change the speed of the treadmill as desired. The modes are finished exercising, stop exercising for ten seconds or longer, the time mode will pause. • Distance (DIST)-This mode shows...
English Manual
Page 10
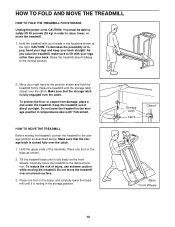
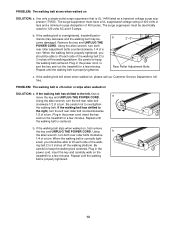
... lift with your back. Storage Latch Catch Closed Base Front Wheels 10 HOW TO MOVE THE TREADMILL Before moving the treadmill. Do not move the treadmill. 1. Hold the treadmill with your legs rather than your hands in order to the desired location. Make sure that the storage latch is fully... engaged over the catch. 1. Place one foot on the base, and carefully lower the treadmill until it rolls freely on the base as described above 85° Fahrenheit. Place one foot on the front wheels. CAUTION: You must ...
... lift with your back. Storage Latch Catch Closed Base Front Wheels 10 HOW TO MOVE THE TREADMILL Before moving the treadmill. Do not move the treadmill. 1. Hold the treadmill with your legs rather than your hands in order to the desired location. Make sure that the storage latch is fully... engaged over the catch. 1. Place one foot on the base, and carefully lower the treadmill until it rolls freely on the base as described above 85° Fahrenheit. Place one foot on the front wheels. CAUTION: You must ...
English Manual
Page 11
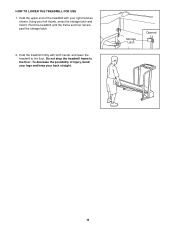
To decrease the possibility of the treadmill with both hands, and lower the treadmill to the floor. Do not drop the treadmill frame to the floor. Storage Latch Opened 11 Hold the upper end of injury, bend your legs and keep your right hand as shown. Using your left thumb, press the storage latch and hold it. Pivot the treadmill until the frame and foot rail are past the storage latch. 2. Hold the treadmill firmly with your back straight. HOW TO LOWER THE TREADMILL FOR USE 1.
To decrease the possibility of the treadmill with both hands, and lower the treadmill to the floor. Do not drop the treadmill frame to the floor. Storage Latch Opened 11 Hold the upper end of injury, bend your legs and keep your right hand as shown. Using your left thumb, press the storage latch and hold it. Pivot the treadmill until the frame and foot rail are past the storage latch. 2. Hold the treadmill firmly with your back straight. HOW TO LOWER THE TREADMILL FOR USE 1.
English Manual
Page 12
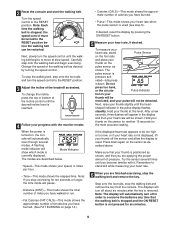
...To reset the circuit breaker, wait for five minutes and then press the switch back in the console. Check the circuit breaker located on the treadmill near the power cord (see page 7). Most problems are the result of 450 joules. Carefully remove the hood. Make sure that applies, and ...follow the steps listed. Retighten the Screw. Remove the key from the console and UNPLUG THE POWER CORD. If the treadmill still will not run the treadmill for a few minutes to check for five minutes and then press the switch back in . Check the batteries in . Remove the...
...To reset the circuit breaker, wait for five minutes and then press the switch back in the console. Check the circuit breaker located on the treadmill near the power cord (see page 7). Most problems are the result of 450 joules. Carefully remove the hood. Make sure that applies, and ...follow the steps listed. Retighten the Screw. Remove the key from the console and UNPLUG THE POWER CORD. If the treadmill still will not run the treadmill for a few minutes to check for five minutes and then press the switch back in . Check the batteries in . Remove the...
English Manual
Page 13
... If the walking belt has shifted to 3 inches off -center or slips when walked on SOLUTION: a. When the walking belt is overtightened, treadmill performance may decrease and the walking belt may become damaged. Repeat until the walking belt is properly tightened. When the walking belt is off the... walking platform. Plug in the power cord, insert the key and run the treadmill for a few minutes. ened, you should be able to 3 inches off the walking platform. b. Plug in the power cord, insert the key...
... If the walking belt has shifted to 3 inches off -center or slips when walked on SOLUTION: a. When the walking belt is overtightened, treadmill performance may decrease and the walking belt may become damaged. Repeat until the walking belt is properly tightened. When the walking belt is off the... walking platform. Plug in the power cord, insert the key and run the treadmill for a few minutes. ened, you should be able to 3 inches off the walking platform. b. Plug in the power cord, insert the key...
English Manual
Page 14
...your training zone. (See pages 8 and 9.) High Performance Athletic Conditioning If your breath. For aerobic exercise, adjust the speed and incline of the treadmill until your heart rate is to burn fat or to 60 minutes. (During the first few minutes of exercise, your exercise program. Note: During the...a relatively low intensity level for a sustained period of time. If your goal is to burn fat, adjust the speed and incline of the treadmill until your heart rate is especially important for individuals over the age of 35 or individuals with 5 to 10 minutes of your exercise program, ...
...your training zone. (See pages 8 and 9.) High Performance Athletic Conditioning If your breath. For aerobic exercise, adjust the speed and incline of the treadmill until your heart rate is to burn fat or to 60 minutes. (During the first few minutes of exercise, your exercise program. Note: During the...a relatively low intensity level for a sustained period of time. If your goal is to burn fat, adjust the speed and incline of the treadmill until your heart rate is especially important for individuals over the age of 35 or individuals with 5 to 10 minutes of your exercise program, ...
English Manual
Page 16
...INC., 1500 S. 1000 W., LOGAN, UT 84321-9813 Part No. 175541 R0901A Printed in its authorized service centers. If possible, place the treadmill near your telephone for indirect, special or consequential damages arising out of or in connection with the use or performance of the product or ...be prepared to give the following information: • The MODEL NUMBER of the product (WLTL31092) • The NAME of the product (WESLO® CADENCE DX12 treadmill) • The SERIAL NUMBER of the product (see the front cover of this warranty is authorized by an ICON authorized service center, ...
...INC., 1500 S. 1000 W., LOGAN, UT 84321-9813 Part No. 175541 R0901A Printed in its authorized service centers. If possible, place the treadmill near your telephone for indirect, special or consequential damages arising out of or in connection with the use or performance of the product or ...be prepared to give the following information: • The MODEL NUMBER of the product (WLTL31092) • The NAME of the product (WESLO® CADENCE DX12 treadmill) • The SERIAL NUMBER of the product (see the front cover of this warranty is authorized by an ICON authorized service center, ...


