
Canadian English Manual
Page 3
... is capable of five feet or less in small increments to raise, lower, or move the walking belt while the power is properly assembled. (See ASSEMBLY on page 6, and HOW TO MOVE THE TREADMILL on the walking belt. 16. Do not use . 9. Keep the power cord and the surge protector away from moisture and...
... is capable of five feet or less in small increments to raise, lower, or move the walking belt while the power is properly assembled. (See ASSEMBLY on page 6, and HOW TO MOVE THE TREADMILL on the walking belt. 16. Do not use . 9. Keep the power cord and the surge protector away from moisture and...
Canadian English Manual
Page 5
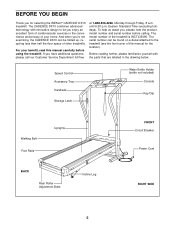
... to the treadmill (see the front cover of your benefit, read this manual for selecting the WESLO® CADENCE DX10 treadmill. Speed Control Accessory Tray Handrails Storage Latch Water Bottle Holder (bottle not included) Console Key/Clip Walking Belt Foot Rails Uprights BACK Rear Roller Adjustment Bolts Incline Leg FRONT Circuit Breaker Power Cord RIGHT...
... to the treadmill (see the front cover of your benefit, read this manual for selecting the WESLO® CADENCE DX10 treadmill. Speed Control Accessory Tray Handrails Storage Latch Water Bottle Holder (bottle not included) Console Key/Clip Walking Belt Foot Rails Uprights BACK Rear Roller Adjustment Bolts Incline Leg FRONT Circuit Breaker Power Cord RIGHT...

Canadian English Manual
Page 8
... apply silicone spray or other appropriate outlet that looks like any other appli- grounded in accordance with the product-if it will deteriorate the walking belt and ordinances. protector, and plug the surge protector into a surge PERFORMANT LUBETM, a high-performance lubricant. trated in drawing 2 may be... if you are in an increased risk of least resistance for use on or off. This product must be connected to the walking belt or the walking plat- Check with your 1 treadmill being turned on a nominal 120-volt circuit, HOW TO PLUG IN THE POWER CORD and...
... apply silicone spray or other appropriate outlet that looks like any other appli- grounded in accordance with the product-if it will deteriorate the walking belt and ordinances. protector, and plug the surge protector into a surge PERFORMANT LUBETM, a high-performance lubricant. trated in drawing 2 may be... if you are in an increased risk of least resistance for use on or off. This product must be connected to the walking belt or the walking plat- Check with your 1 treadmill being turned on a nominal 120-volt circuit, HOW TO PLUG IN THE POWER CORD and...
Canadian English Manual
Page 9
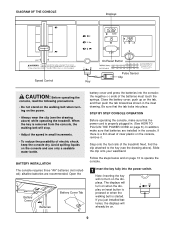
... onto the foot rails of the batteries must touch the springs. The displays will already be on /reset button is pressed or when the walking belt is a thin sheet of electric shock, keep the console dry. If you just installed batteries, the displays will turn on the tab, and... On/Reset Button Speed Control Pulse Sensor Clip Key CAUTION: Before operating the console, read the following precautions. • Do not stand on the walking belt when turning on the power. • Always wear the clip (see the drawing above ) while operating the treadmill. alkaline batteries are installed in...
... onto the foot rails of the batteries must touch the springs. The displays will already be on /reset button is pressed or when the walking belt is a thin sheet of electric shock, keep the console dry. If you just installed batteries, the displays will turn on the tab, and... On/Reset Button Speed Control Pulse Sensor Clip Key CAUTION: Before operating the console, read the following precautions. • Do not stand on the walking belt when turning on the power. • Always wear the clip (see the drawing above ) while operating the treadmill. alkaline batteries are installed in...

Canadian English Manual
Page 10
...measure your pulse, stand on the foot rails and place your thumb is stationary and the console buttons are applying the proper amount of the walking belt as shown, and that you become familiar with the three displays. sor is stopped, the speed control must be moved to the other,... Do not press too hard, or the circulation in miles per hour. Hold your thumb off the power. Try the sensor several times until the walking belt begins to be restarted. ed-fully press it . After a few seconds, three dashes will appear in miles per hour. CALORIES/FAT CALORIES/PULSE ...
...measure your pulse, stand on the foot rails and place your thumb is stationary and the console buttons are applying the proper amount of the walking belt as shown, and that you become familiar with the three displays. sor is stopped, the speed control must be moved to the other,... Do not press too hard, or the circulation in miles per hour. Hold your thumb off the power. Try the sensor several times until the walking belt begins to be restarted. ed-fully press it . After a few seconds, three dashes will appear in miles per hour. CALORIES/FAT CALORIES/PULSE ...
Canadian English Manual
Page 14
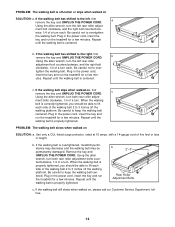
... and run the treadmill for a few minutes. tighten the walking belt. Repeat until the walking belt is properly tightened. If the walking belt slips when walked on SOLUTION: a. Plug in length. PROBLEM: The walking belt is off the walking platform. If the walking belt has shifted to 3 inches off -center or slips when walked on , first c remove the key and UNPLUG THE POWER...
... and run the treadmill for a few minutes. tighten the walking belt. Repeat until the walking belt is properly tightened. If the walking belt slips when walked on SOLUTION: a. Plug in length. PROBLEM: The walking belt is off the walking platform. If the walking belt has shifted to 3 inches off -center or slips when walked on , first c remove the key and UNPLUG THE POWER...
Canadian English Manual
Page 22
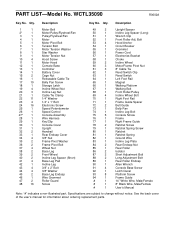
... Clip 63 1 Reed Switch 64 1 Left Foot Rail 65 1 Magnet 66 1 Walking Platform 67 1 Walking Belt 68 1 Front Roller/Pulley 69 4 Incline Wheel Bolt 70 1 Right Foot Rail 71 1 Frame Guide Spacer 72 2 Belt Guide 73 1 Belly Pan 74 1 Incline Leg Bolt 75 6 Console Screw 76 ...1 31 1 32 2 33 1 34 4 35 2 36 2 37 4 38 2 39 2 40 2 41 4 42 1 43 4 44 4 45 2 46 1 47 2 48 16 Motor Belt Motor/Pulley/Flywheel/Fan Pulley/Flywheel/Fan Motor Motor Pivot Bolt Tension Bolt Motor Tension Washer Star Washer Motor Tension Nut Hood Screw Motor Hood...
... Clip 63 1 Reed Switch 64 1 Left Foot Rail 65 1 Magnet 66 1 Walking Platform 67 1 Walking Belt 68 1 Front Roller/Pulley 69 4 Incline Wheel Bolt 70 1 Right Foot Rail 71 1 Frame Guide Spacer 72 2 Belt Guide 73 1 Belly Pan 74 1 Incline Leg Bolt 75 6 Console Screw 76 ...1 31 1 32 2 33 1 34 4 35 2 36 2 37 4 38 2 39 2 40 2 41 4 42 1 43 4 44 4 45 2 46 1 47 2 48 16 Motor Belt Motor/Pulley/Flywheel/Fan Pulley/Flywheel/Fan Motor Motor Pivot Bolt Tension Bolt Motor Tension Washer Star Washer Motor Tension Nut Hood Screw Motor Hood...


