
Canadian English Manual
Page 3
... the treadmill where aerosol products are adequately informed of all users of this manual. 3. Always hold the handrails while using the treadmill. Always remove the key when the treadmill is running. Always wear athletic shoes. Do not attempt to avoid sudden jumps in this treadmill are used by placing objects under...
... the treadmill where aerosol products are adequately informed of all users of this manual. 3. Always hold the handrails while using the treadmill. Always remove the key when the treadmill is running. Always wear athletic shoes. Do not attempt to avoid sudden jumps in this treadmill are used by placing objects under...
Canadian English Manual
Page 5
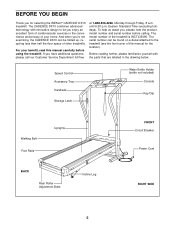
...be found on a decal attached to let you enjoy an excellent form of your benefit, read this manual for selecting the WESLO® CADENCE DX10 treadmill. Before reading further, please familiarize yourself with innovative design to the treadmill (see the front cover of this manual ... holidays). The model number of other treadmills. Speed Control Accessory Tray Handrails Storage Latch Water Bottle Holder (bottle not included) Console Key/Clip Walking Belt Foot Rails Uprights BACK Rear Roller Adjustment Bolts Incline Leg FRONT Circuit Breaker Power Cord RIGHT SIDE 5 until 6:30...
...be found on a decal attached to let you enjoy an excellent form of your benefit, read this manual for selecting the WESLO® CADENCE DX10 treadmill. Before reading further, please familiarize yourself with innovative design to the treadmill (see the front cover of this manual ... holidays). The model number of other treadmills. Speed Control Accessory Tray Handrails Storage Latch Water Bottle Holder (bottle not included) Console Key/Clip Walking Belt Foot Rails Uprights BACK Rear Roller Adjustment Bolts Incline Leg FRONT Circuit Breaker Power Cord RIGHT SIDE 5 until 6:30...
Canadian English Manual
Page 9
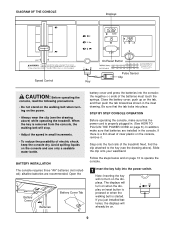
...a sealable water bottle. Be sure that batteries are recommended. Slide the clip onto your waistband. Follow the steps below and on page 10 to the key (see the drawing above ). the negative (-) ends of clear plastic on the console, remove it. Next, find the clip attached to operate the console... on the walking belt when turning on the power. • Always wear the clip (see the drawing above ) while operating the treadmill. When the key is a thin sheet of the batteries must touch the springs. Avoid spilling liquids on . 9 Close the battery cover, push up on the tab,...
...a sealable water bottle. Be sure that batteries are recommended. Slide the clip onto your waistband. Follow the steps below and on page 10 to the key (see the drawing above ). the negative (-) ends of clear plastic on the console, remove it. Next, find the clip attached to operate the console... on the walking belt when turning on the power. • Always wear the clip (see the drawing above ) while operating the treadmill. When the key is a thin sheet of the batteries must touch the springs. Avoid spilling liquids on . 9 Close the battery cover, push up on the tab,...
Canadian English Manual
Page 11
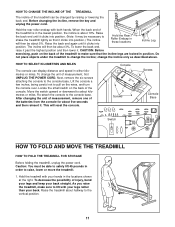
... STORAGE Before folding the treadmill, unplug the power cord. To decrease the possibility of the treadmill is about 10%. Before changing the incline, remove the key and unplug the power cord. Re-attach the console to select kilometres or miles. Raise the treadmill about 3%. Raise the back end until it . To...
... STORAGE Before folding the treadmill, unplug the power cord. To decrease the possibility of the treadmill is about 10%. Before changing the incline, remove the key and unplug the power cord. Re-attach the console to select kilometres or miles. Raise the treadmill about 3%. Raise the back end until it . To...
Canadian English Manual
Page 13
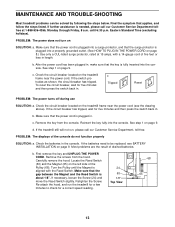
...the Magnet is plugged in length. b. Make sure that the gap between the Magnet and the Reed Switch is plugged into the console. Reinsert the key fully into a properly grounded outlet. (See HOW TO PLUG IN THE POWER CORD on page 8.) Use only a CUL-listed surge protector, rated ...936-4266, Monday through Friday, 8 a.m. See step 1 on page 9. Most problems are the result of five feet or less in . First remove the key and UNPLUG THE POWER CORD. Retighten the Screw. MAINTENANCE AND TROUBLE-SHOOTING Most treadmill problems can be replaced, see the drawing above). PROBLEM: The power...
...the Magnet is plugged in length. b. Make sure that the gap between the Magnet and the Reed Switch is plugged into the console. Reinsert the key fully into a properly grounded outlet. (See HOW TO PLUG IN THE POWER CORD on page 8.) Use only a CUL-listed surge protector, rated ...936-4266, Monday through Friday, 8 a.m. See step 1 on page 9. Most problems are the result of five feet or less in . First remove the key and UNPLUG THE POWER CORD. Retighten the Screw. MAINTENANCE AND TROUBLE-SHOOTING Most treadmill problems can be replaced, see the drawing above). PROBLEM: The power...
Canadian English Manual
Page 14
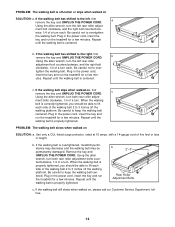
... belt is off the walking platform. When the walking belt is properly tightened, you should be permanently damaged. Plug in the power cord, insert the key and run the treadmill for a few min- Be careful to lift each side of a turn both rear roller adjustment bolts counterclockwise, 1/4 of a turn... Use only a CUL-listed surge protector, rated at 15 amps, with a 14-gauge cord of five feet or less in the power cord, insert the key and run the treadmill for a few minutes. Be careful not to 3 inches off -center or slips when walked on SOLUTION: a. wise, 1/4 of the...
... belt is off the walking platform. When the walking belt is properly tightened, you should be permanently damaged. Plug in the power cord, insert the key and run the treadmill for a few min- Be careful to lift each side of a turn both rear roller adjustment bolts counterclockwise, 1/4 of a turn... Use only a CUL-listed surge protector, rated at 15 amps, with a 14-gauge cord of five feet or less in the power cord, insert the key and run the treadmill for a few minutes. Be careful not to 3 inches off -center or slips when walked on SOLUTION: a. wise, 1/4 of the...
Canadian English Manual
Page 15
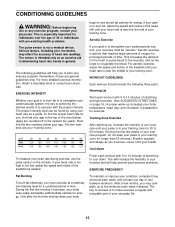
...each workout with 5 to 10 minutes of the chart below your "training zone." During the first few weeks of oxygen for exercise. The key to strengthen your exercise must exercise at least one day of exercise, your breath. EXERCISE INTENSITY Whether your goal is to burn fat or ...20 to achieving the desired results is not a medical device. If your heart rate is to strengthen your cardiovascular system, your cardiovascular system, the key to 60 minutes. (During the first few minutes of rest between workouts. If your goal is to burn fat, adjust the speed and incline...
...each workout with 5 to 10 minutes of the chart below your "training zone." During the first few weeks of oxygen for exercise. The key to strengthen your exercise must exercise at least one day of exercise, your breath. EXERCISE INTENSITY Whether your goal is to burn fat or ...20 to achieving the desired results is not a medical device. If your heart rate is to strengthen your cardiovascular system, your cardiovascular system, the key to 60 minutes. (During the first few minutes of rest between workouts. If your goal is to burn fat, adjust the speed and incline...
Canadian English Manual
Page 19
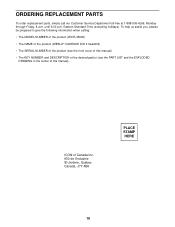
... when calling: • The MODEL NUMBER of the product (WCTL35090) • The NAME of the product (WESLO® CADENCE DX10 treadmill) • The SERIAL NUMBER of the product (see the front cover of this manual) • The KEY NUMBER and DESCRIPTION of the desired part(s) (see the PART LIST and the EXPLODED DRAWING in...
... when calling: • The MODEL NUMBER of the product (WCTL35090) • The NAME of the product (WESLO® CADENCE DX10 treadmill) • The SERIAL NUMBER of the product (see the front cover of this manual) • The KEY NUMBER and DESCRIPTION of the desired part(s) (see the PART LIST and the EXPLODED DRAWING in...
Canadian English Manual
Page 22
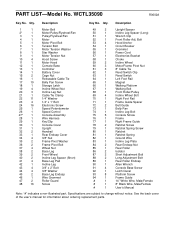
Qty. See the back cover of the user's manual for information about ordering replacement parts. Specifications are subject to change without notice. Description Key No. Bolt 53 4 Hood Anchor 54 1 Circuit Breaker 55 1 Grommet 56 1 Power Cord 57 1 Electronics Bracket 58 1 Choke 59...Wheel Nut Incline Leg Nut Cable Tie Clamp 1/4" Washer 1/4" x 1" Bolt Electronic Screw Speed Potentiometer Speed Control Console Assembly Wire Harness Key/Clip Console Cover Upright Handrail Rear Endcap Cover 3/8" Nut Frame Pivot Washer Frame Pivot Bolt Wheel Nut Base Leg Front Wheel Incline Leg...
Qty. See the back cover of the user's manual for information about ordering replacement parts. Specifications are subject to change without notice. Description Key No. Bolt 53 4 Hood Anchor 54 1 Circuit Breaker 55 1 Grommet 56 1 Power Cord 57 1 Electronics Bracket 58 1 Choke 59...Wheel Nut Incline Leg Nut Cable Tie Clamp 1/4" Washer 1/4" x 1" Bolt Electronic Screw Speed Potentiometer Speed Control Console Assembly Wire Harness Key/Clip Console Cover Upright Handrail Rear Endcap Cover 3/8" Nut Frame Pivot Washer Frame Pivot Bolt Wheel Nut Base Leg Front Wheel Incline Leg...


