
Canadian English Manual
Page 4
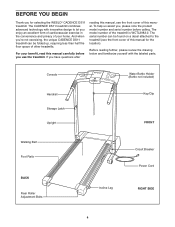
... model number and serial number before you 're not exercising, the unique CADENCE DS11 treadmill can be folded up, requiring less than half the floor space of other treadmills. Console Water Bottle Holder (Bottle not included) Handrail Storage Latch Upright Key/Clip FRONT...of this manual for selecting the WESLO® CADENCE DS11 treadmill. Before reading further, please review the drawing below and familiarize yourself with innovative design to the treadmill (see the front cover of the treadmill is WCTL2982.0. The CADENCE DS11 treadmill combines advanced technology with the ...
... model number and serial number before you 're not exercising, the unique CADENCE DS11 treadmill can be folded up, requiring less than half the floor space of other treadmills. Console Water Bottle Holder (Bottle not included) Handrail Storage Latch Upright Key/Clip FRONT...of this manual for selecting the WESLO® CADENCE DS11 treadmill. Before reading further, please review the drawing below and familiarize yourself with innovative design to the treadmill (see the front cover of the treadmill is WCTL2982.0. The CADENCE DS11 treadmill combines advanced technology with the ...
Canadian English Manual
Page 6
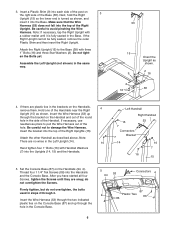
... Right Upright (15) to damage the Wire Harness. Do not tighten the Bolts yet. Assemble the Left Upright (not shown) in the brackets on the Console Base (87) and up through the two indicated plastic ties on the Handrails, 4 remove them. Hold one of the Handrail. Make sure that the Wire... Harness (53) does not fall into the Handrails and the Console Base. If there are no wires in the Base. Attach the other Handrail as shown. After you have started all four Screws, tighten the Screws...
... Right Upright (15) to damage the Wire Harness. Do not tighten the Bolts yet. Assemble the Left Upright (not shown) in the brackets on the Console Base (87) and up through the two indicated plastic ties on the Handrails, 4 remove them. Hold one of the Handrail. Make sure that the Wire... Harness (53) does not fall into the Handrails and the Console Base. If there are no wires in the Base. Attach the other Handrail as shown. After you have started all four Screws, tighten the Screws...
Canadian English Manual
Page 7
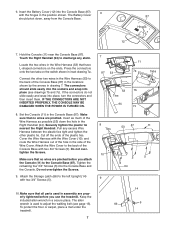
...is used in the Console Base (87). Make sure that have L-shaped connectors on the switch shown in the position shown. The connectors should pivot down the hole in a secure place. Do not overtighten the Screws. To protect the floor or carpet, place a mat under the treadmill. 7 7 87 ...53 11 7a Tabs 53 7b Ties 94 7c 8 53 87 11 Ties 10 5 5 5 94 9 14 66 5 Insert the Battery Cover (12) into place (see page 13). Touch the Right Handrail (94) to the Console Base (87). Do not overtighten the Screws...
...is used in the Console Base (87). Make sure that have L-shaped connectors on the switch shown in the position shown. The connectors should pivot down the hole in a secure place. Do not overtighten the Screws. To protect the floor or carpet, place a mat under the treadmill. 7 7 87 ...53 11 7a Tabs 53 7b Ties 94 7c 8 53 87 11 Ties 10 5 5 5 94 9 14 66 5 Insert the Battery Cover (12) into place (see page 13). Touch the Right Handrail (94) to the Console Base (87). Do not overtighten the Screws...

Canadian English Manual
Page 9
...clip by carefully taking a few steps backward until the key is pulled from the console, the walking belt will stop. • Adjust the speed in (see the drawing below) while using the treadmill. Make sure that the power cord is properly plugged in small increments. • ...To reduce the possibility of the treadmill. Before operating the console, make sure that the negative (-) ends of your clothes. Note: To...
...clip by carefully taking a few steps backward until the key is pulled from the console, the walking belt will stop. • Adjust the speed in (see the drawing below) while using the treadmill. Make sure that the power cord is properly plugged in small increments. • ...To reduce the possibility of the treadmill. Before operating the console, make sure that the negative (-) ends of your clothes. Note: To...
Canadian English Manual
Page 10
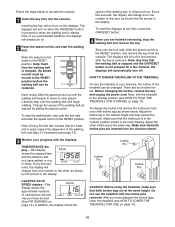
...TIME/DISTANCE display-This display Arrow shows the elapsed time and the distance that the incline pin is used, inspect the alignment of the treadmill can be changed. Incline Pin Incline Pin Incline Pin CALS/FAT CALS/ SPEED display-This Arrow display shows the approximate numbers of the... will turn on . 2 Reset the speed control and start the walking belt. To change from one number to operate the console. 1 Insert the key fully into the console. Note: Each time the walking belt is not pressed for a few seconds, the display will change the incline, first remove...
...TIME/DISTANCE display-This display Arrow shows the elapsed time and the distance that the incline pin is used, inspect the alignment of the treadmill can be changed. Incline Pin Incline Pin Incline Pin CALS/FAT CALS/ SPEED display-This Arrow display shows the approximate numbers of the... will turn on . 2 Reset the speed control and start the walking belt. To change from one number to operate the console. 1 Insert the key fully into the console. Note: Each time the walking belt is not pressed for a few seconds, the display will change the incline, first remove...
Canadian English Manual
Page 12
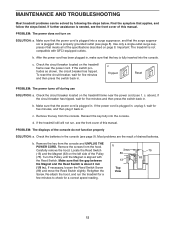
...is fully inserted into a properly grounded outlet (see 1. PROBLEM: The displays of drained batteries. Important: The treadmill is plugged into the console. Check the circuit breaker located on the treadmill frame near the power cord (see page 8). Check the circuit breaker located on page 8. b. After the ...five minutes, and then plug it , wait for five minutes and then press the switch back in the console (see the front cover of the specifications described on the treadmill frame near the power cord. Check the batteries in . If necessary, loosen the Reed Switch Screw (...
...is fully inserted into a properly grounded outlet (see 1. PROBLEM: The displays of drained batteries. Important: The treadmill is plugged into the console. Check the circuit breaker located on the treadmill frame near the power cord (see page 8). Check the circuit breaker located on page 8. b. After the ...five minutes, and then plug it , wait for five minutes and then press the switch back in the console (see the front cover of the specifications described on the treadmill frame near the power cord. Check the batteries in . If necessary, loosen the Reed Switch Screw (...
Canadian English Manual
Page 14
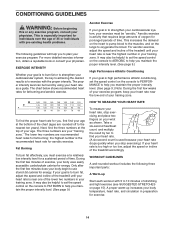
... physician. Next, find the proper heart rate for you stop exercising and place two fingers on the console to PERFORMANCE to burn fat, adjust the speed and incline of the treadmill until your age. The three numbers are recommended heart rates for a sustained period of the lower two...proper intensity level. (See page 9.) High Performance Athletic Conditioning If your goal is high performance athletic conditioning, set the speed control on the console to FAT BURN to help you maintain the proper intensity level. (See page 9.) To measure your heart rate, stop exercising.) If your ...
... physician. Next, find the proper heart rate for you stop exercising and place two fingers on the console to PERFORMANCE to burn fat, adjust the speed and incline of the treadmill until your age. The three numbers are recommended heart rates for a sustained period of the lower two...proper intensity level. (See page 9.) High Performance Athletic Conditioning If your goal is high performance athletic conditioning, set the speed control on the console to FAT BURN to help you maintain the proper intensity level. (See page 9.) To measure your heart rate, stop exercising.) If your ...

Canadian English Manual
Page 18
... 49* 1 50 1 Front Endcap Screw Star Washer Plastic Tie Left Handrail 3/4" Screw Key/Clip Handrail Washer Incline Leg Shim Wire Cover Console Battery Cover Reed Switch Left Upright Right Upright 1" Bolt Cage Nut Motor Belt Motor Tension Bolt Motor Tension Washer Tension Star Washer Motor Pivot ...Adj. Bolt 53 1 Wire Harness 54 1 Speed Pot 55 1 Speed Knob 56 1 5/32" Allen Wrench 57 1 Choke 58 2 Belt Guide 59 1 Console Warning Decal 60 2 Isolator 61 1 Latch Catch 62 1 Frame Spacer (Left) 63 1 Magnet 64 2 Incline Pin 65 2 Endcap Washer 66 1 Storage ...
... 49* 1 50 1 Front Endcap Screw Star Washer Plastic Tie Left Handrail 3/4" Screw Key/Clip Handrail Washer Incline Leg Shim Wire Cover Console Battery Cover Reed Switch Left Upright Right Upright 1" Bolt Cage Nut Motor Belt Motor Tension Bolt Motor Tension Washer Tension Star Washer Motor Pivot ...Adj. Bolt 53 1 Wire Harness 54 1 Speed Pot 55 1 Speed Knob 56 1 5/32" Allen Wrench 57 1 Choke 58 2 Belt Guide 59 1 Console Warning Decal 60 2 Isolator 61 1 Latch Catch 62 1 Frame Spacer (Left) 63 1 Magnet 64 2 Incline Pin 65 2 Endcap Washer 66 1 Storage ...


