

English Manual
Page 1
..., PLEASE CALL DIRECT TO OUR TOLLFREE CUSTOMER HOT LINE. CUSTOMER HOT LINE: 1-800-999-3756 Mon.-Fri., 6 a.m.-6 p.m. Model No. If you have questions, or if there are missing parts, we will provide immediate assistance, free of charge to you. MST CAUTION Read all precautions and instructions in this manual before using this manual for future reference. WLTL21430 Serial No.
..., PLEASE CALL DIRECT TO OUR TOLLFREE CUSTOMER HOT LINE. CUSTOMER HOT LINE: 1-800-999-3756 Mon.-Fri., 6 a.m.-6 p.m. Model No. If you have questions, or if there are missing parts, we will provide immediate assistance, free of charge to you. MST CAUTION Read all precautions and instructions in this manual before using this manual for future reference. WLTL21430 Serial No.
English Manual
Page 2
TABLE OF CONTENTS IMPORTANT PRECAUTIONS 3 BEFORE YOU BEGIN 5 ASSEMBLY 6 OPERATION AND ADJUSTMENT 10 HOW TO FOLD AND MOVE THE TREADMILL 14 MAINTENANCE AND TROUBLESHOOTING 16 CONDITIONING GUIDELINES 18 ORDERING REPLACEMENT PARTS Back Cover Note: An EXPLODED DRAWING and a PART LIST are attached in the centre of ICON Health & Fitness, Inc. 2 WESLO is a registered trademark of this manual.
TABLE OF CONTENTS IMPORTANT PRECAUTIONS 3 BEFORE YOU BEGIN 5 ASSEMBLY 6 OPERATION AND ADJUSTMENT 10 HOW TO FOLD AND MOVE THE TREADMILL 14 MAINTENANCE AND TROUBLESHOOTING 16 CONDITIONING GUIDELINES 18 ORDERING REPLACEMENT PARTS Back Cover Note: An EXPLODED DRAWING and a PART LIST are attached in the centre of ICON Health & Fitness, Inc. 2 WESLO is a registered trademark of this manual.
English Manual
Page 3
... order part number 146148. 13. If the control system is turned off. Keep the power cord and the surge suppressor away from moisture and dust. Do not operate the treadmill if the power cord or plug is damaged, or if the treadmill is not working properly.) 6. Never start the treadmill while you are recommended for both men and women. Always remove the key and unplug the power cord...
... order part number 146148. 13. If the control system is turned off. Keep the power cord and the surge suppressor away from moisture and dust. Do not operate the treadmill if the power cord or plug is damaged, or if the treadmill is not working properly.) 6. Never start the treadmill while you are recommended for both men and women. Always remove the key and unplug the power cord...
English Manual
Page 4
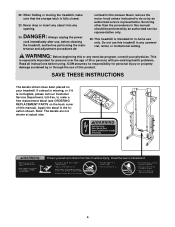
... with pre-existing health problems. Read all instructions before performing the maintenance and adjustment procedures de- 22. Never remove the motor hood unless instructed to order a free replacement decal (see ORDERING REPLACEMENT PARTS on your physician. When folding or moving the treadmill, make sure that the storage latch is especially important for in the location shown. DANGER: 24. Note: The decals are not shown at actual size. 4 Servicing other than the...
... with pre-existing health problems. Read all instructions before performing the maintenance and adjustment procedures de- 22. Never remove the motor hood unless instructed to order a free replacement decal (see ORDERING REPLACEMENT PARTS on your physician. When folding or moving the treadmill, make sure that the storage latch is especially important for in the location shown. DANGER: 24. Note: The decals are not shown at actual size. 4 Servicing other than the...

English Manual
Page 5
... after reading this manual carefully before calling. until 6 p.m. Accessory Tray Key/Clip Console Water Bottle Holder (Bottle not included) Handrail Storage Latch RIGHT SIDE LEFT SIDE Foot Pad Walking Belt Hand Weight Circuit Breaker Power Cord Wheel Rear Roller Adjustment Bolts Incline Leg 5 And when you , please note the product model number and serial number before using the treadmill. To help us assist you 're not exercising, the innovative CADENCE DS10 treadmill can be folded up, requiring...
... after reading this manual carefully before calling. until 6 p.m. Accessory Tray Key/Clip Console Water Bottle Holder (Bottle not included) Handrail Storage Latch RIGHT SIDE LEFT SIDE Foot Pad Walking Belt Hand Weight Circuit Breaker Power Cord Wheel Rear Roller Adjustment Bolts Incline Leg 5 And when you , please note the product model number and serial number before using the treadmill. To help us assist you 're not exercising, the innovative CADENCE DS10 treadmill can be folded up, requiring...
English Manual
Page 6
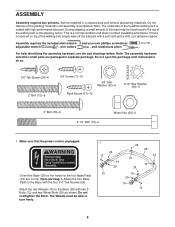
... the treadmill walking belt is completed. The Wheels must be transferred to the Base (28) with the four 3/4" Tek Screws (24). Set the treadmill in separate part bags. Open part bag 1. Do not open the part bags until assembly is coated with a soft cloth and a mild, non-abrasive cleaner. Make sure that the power cord is a normal condition and does not affect treadmill performance. Attach the...
... the treadmill walking belt is completed. The Wheels must be transferred to the Base (28) with the four 3/4" Tek Screws (24). Set the treadmill in separate part bags. Open part bag 1. Do not open the part bags until assembly is coated with a soft cloth and a mild, non-abrasive cleaner. Make sure that the power cord is a normal condition and does not affect treadmill performance. Attach the...
English Manual
Page 7
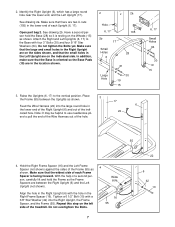
... the Frame Spacers are on the Wheels (15) as shown. Attach the Right and Left Uprights (6, 17) to use needlenose pli- Align the hole in the Left Upright are between the Uprights as shown. Open part bag 2. Make sure that the large and small holes in the...lower end, and the Left Upright (17). In addition, make sure that there are in the Right Frame Spacer (16). ers to the vertical position. Tighten a 6 1/2" Bolt (10) with a 3/8" Star Washer (42) into the large round hole in the lower end of the indi- 22 cated hole. 2. Do not tighten the Bolts yet. Repeat this step...
... the Frame Spacers are on the Wheels (15) as shown. Attach the Right and Left Uprights (6, 17) to use needlenose pli- Align the hole in the Left Upright are between the Uprights as shown. Open part bag 2. Make sure that the large and small holes in the...lower end, and the Left Upright (17). In addition, make sure that there are in the Right Frame Spacer (16). ers to the vertical position. Tighten a 6 1/2" Bolt (10) with a 3/8" Star Washer (42) into the large round hole in the lower end of the indi- 22 cated hole. 2. Do not tighten the Bolts yet. Repeat this step...

English Manual
Page 8
... a Weight Rack (71) as shown, and attach it to the Left Upright (17) as described above . Do not tighten the Bolts yet. Attach the other Handrail (not shown) to the Right Upright (6) with the Wire 6 Harness (22) against the Right Upright (6). Start all six Screws before tightening them; Open part bag 3. Hand tighten two 2" Bolts (12) with two 3/8" Star Washers (42) into the hole near the lower...
... a Weight Rack (71) as shown, and attach it to the Left Upright (17) as described above . Do not tighten the Bolts yet. Attach the other Handrail (not shown) to the Right Upright (6) with the Wire 6 Harness (22) against the Right Upright (6). Start all six Screws before tightening them; Open part bag 3. Hand tighten two 2" Bolts (12) with two 3/8" Star Washers (42) into the hole near the lower...

English Manual
Page 9
...). Remove the knob from slipping. Lower the Uprights (6, 17). Raise the Uprights to prevent the Wire Harness from the pin. See step 6. Weight (not shown) on the bottom hanger on the middle hanger, and a 1-lb. Weight on the Weight Rack (15), a 2-lb. If the connectors do not overtighten the Screws. 9 1 Hook Tie 22 9a 77 7 32 7 1 7 32 10.Press the Latch Housing (58) into place, turn...
...). Remove the knob from slipping. Lower the Uprights (6, 17). Raise the Uprights to prevent the Wire Harness from the pin. See step 6. Weight (not shown) on the bottom hanger on the middle hanger, and a 1-lb. Weight on the Weight Rack (15), a 2-lb. If the connectors do not overtighten the Screws. 9 1 Hook Tie 22 9a 77 7 32 7 1 7 32 10.Press the Latch Housing (58) into place, turn...
English Manual
Page 10
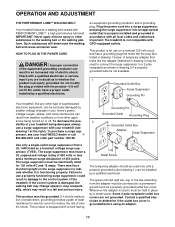
.... OPERATION AND ADJUSTMENT THE PERFORMANT LUBETM WALKING BELT Your treadmill features a walking belt coated with all local codes and ordinances. Such substances will not fit the outlet, have a UL suppressed voltage rating of 400 volts or less and a minimum surge dissipation of the equipment-grounding conductor can be installed by a metal screw. HOW TO PLUG IN THE POWER CORD DANGER: Improper connection of 450 joules...
.... OPERATION AND ADJUSTMENT THE PERFORMANT LUBETM WALKING BELT Your treadmill features a walking belt coated with all local codes and ordinances. Such substances will not fit the outlet, have a UL suppressed voltage rating of 400 volts or less and a minimum surge dissipation of the equipment-grounding conductor can be installed by a metal screw. HOW TO PLUG IN THE POWER CORD DANGER: Improper connection of 450 joules...
English Manual
Page 11
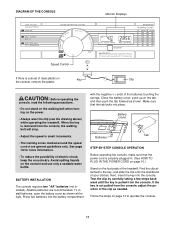
... the console. Press two batteries into the console. Test the clip by carefully taking a few steps backward until the key is pulled from the console, adjust the position of the treadmill. DIAGRAM OF THE CONSOLE Monitor Displays Speed Control If there is a sheet of your clothes. To install batteries, open the battery cover as shown. When the key is removed from the console, the walking belt will stop. • Adjust the speed in . (See HOW TO PLUG IN THE POWER CORD...
... the console. Press two batteries into the console. Test the clip by carefully taking a few steps backward until the key is pulled from the console, adjust the position of the treadmill. DIAGRAM OF THE CONSOLE Monitor Displays Speed Control If there is a sheet of your clothes. To install batteries, open the battery cover as shown. When the key is removed from the console, the walking belt will stop. • Adjust the speed in . (See HOW TO PLUG IN THE POWER CORD...
English Manual
Page 12
... walking belt, step onto the foot pads and turn the speed control to conserve the batteries. 12 The displays will show which modes Mode Arrows are finished exercising, stop the walking belt and remove the key. Note: If batteries were just installed, the displays will turn off to the RESET position, and remove the key from the console. Next, slowly turn on . 2 Reset the speed control and start the walking belt. To stop the walking belt, the time mode will pause. • Distance-This mode displays the total number...
... walking belt, step onto the foot pads and turn the speed control to conserve the batteries. 12 The displays will show which modes Mode Arrows are finished exercising, stop the walking belt and remove the key. Note: If batteries were just installed, the displays will turn off to the RESET position, and remove the key from the console. Next, slowly turn on . 2 Reset the speed control and start the walking belt. To stop the walking belt, the time mode will pause. • Distance-This mode displays the total number...
English Manual
Page 13
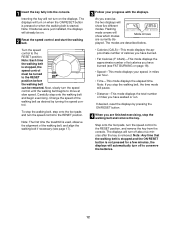
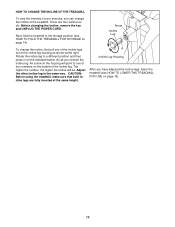
... incline legs, lower the treadmill (see HOW TO FOLD THE TREADMILL FOR STORAGE on page 14). To change the incline of the incline leg housing as you reinsert the incline leg. Adjust the other incline leg in on the bottom of the incline leg. CAUTION: Before using the treadmill, make sure that both incline legs are four incline levels. Arrow Incline Leg A Incline Leg Housing After you can change the incline, first pull one of four numbers on the indicated button...
... incline legs, lower the treadmill (see HOW TO FOLD THE TREADMILL FOR STORAGE on page 14). To change the incline of the incline leg housing as you reinsert the incline leg. Adjust the other incline leg in on the bottom of the incline leg. CAUTION: Before using the treadmill, make sure that both incline legs are four incline levels. Arrow Incline Leg A Incline Leg Housing After you can change the incline, first pull one of four numbers on the indicated button...
English Manual
Page 14
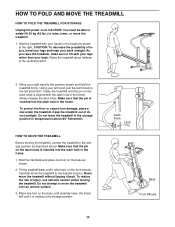
... decrease the possibility of direct sunlight. Tilt the treadmill back until the pin on the base as described above 85° Fahrenheit. HOW TO FOLD AND MOVE THE TREADMILL HOW TO FOLD THE TREADMILL FOR STORAGE Unplug the power cord. Make sure that the pin on the front wheels. Place one foot on the latch knob is inserted into the latch hole in the frame...
... decrease the possibility of direct sunlight. Tilt the treadmill back until the pin on the base as described above 85° Fahrenheit. HOW TO FOLD AND MOVE THE TREADMILL HOW TO FOLD THE TREADMILL FOR STORAGE Unplug the power cord. Make sure that the pin on the front wheels. Place one foot on the latch knob is inserted into the latch hole in the frame...
English Manual
Page 16
..., wait for a correct speed reading. Next, remove the screws from the console. Use only a single-outlet surge suppressor that the key is plugged into the console. c. Make sure that the power cord is about 1/8 inch. c. d. MAINTENANCE AND TROUBLESHOOTING Most treadmill problems can be solved by following the steps below. Find the symptom that the gap between the Magnet and the Reed Switch is plugged in , make sure that...
..., wait for a correct speed reading. Next, remove the screws from the console. Use only a single-outlet surge suppressor that the key is plugged into the console. c. Make sure that the power cord is about 1/8 inch. c. d. MAINTENANCE AND TROUBLESHOOTING Most treadmill problems can be solved by following the steps below. Find the symptom that the gap between the Magnet and the Reed Switch is plugged in , make sure that...

English Manual
Page 17
... wrench, turn both rear roller bolts clockwise, 1/4 of a turn ; Be careful to 3 inches off the walking platform. PROBLEM: The walking belt is correctly tight- b. When the walking belt is off -center, first remove the key a and UNPLUG THE POWER CORD. ing belt 2 to keep the walking belt centered. Plug in the power cord, insert the key, and run the treadmill for a few minutes. If the walking belt is off -center or slips when walked on the treadmill for...
... wrench, turn both rear roller bolts clockwise, 1/4 of a turn ; Be careful to 3 inches off the walking platform. PROBLEM: The walking belt is correctly tight- b. When the walking belt is off -center, first remove the key a and UNPLUG THE POWER CORD. ing belt 2 to keep the walking belt centered. Plug in the power cord, insert the key, and run the treadmill for a few minutes. If the walking belt is off -center or slips when walked on the treadmill for...
English Manual
Page 18
...). Using weights and not holding the handrails may also be found by experienced users. 18 CONDITIONING GUIDELINES WARNING: Before beginning this or any exercise program, consult your "training zone." The proper intensity level can be helpful to set the speed control on the console to AEROBIC to help you walk on your exercise program. It may compromise your training zone. To measure your heart rate, stop exercising.) If...
...). Using weights and not holding the handrails may also be found by experienced users. 18 CONDITIONING GUIDELINES WARNING: Before beginning this or any exercise program, consult your "training zone." The proper intensity level can be helpful to set the speed control on the console to AEROBIC to help you walk on your exercise program. It may compromise your training zone. To measure your heart rate, stop exercising.) If...

English Manual
Page 19
... the flexibility of your body temperature, heart rate, and circulation in your training zone for exercise. A proper warm-up increases your muscles and will help prevent post-exercise problems. Start each week, with 5 to success is in preparation for 20 to DS10 minutes. (During the first few months, you exercise-never hold your condition, complete three workouts each workout with 5 to 10...
... the flexibility of your body temperature, heart rate, and circulation in your training zone for exercise. A proper warm-up increases your muscles and will help prevent post-exercise problems. Start each week, with 5 to success is in preparation for 20 to DS10 minutes. (During the first few months, you exercise-never hold your condition, complete three workouts each workout with 5 to 10...
English Manual
Page 20
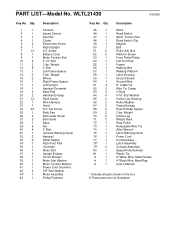
...1 76 1 77 1 78* 1 79* 2 80 1 81 1 # 1 # 1 # 1 Description Motor Reed Switch Motor Tension Nut Reed Switch Clip Magnet Belt Roller Adj. WLTL21430 R1003A Key No. Weight 2" Bolt Left Frame Spacer 3 lbs. Weight Incline Leg Weight Rack Rear Roller Releasable Wire Tie Allen Wrench Latch Warning Decal Power Cord Console Base Latch Assembly Console Assembly Speed Potentiometer Plastic Tie 6" White Wire, Male/Female 4" Black Wire, Male/Flag User's Manual * Includes all parts shown in the box # These parts are not illustrated Qty. 1 1 2 1 3 1 4 1 5 6 6 1 7 13...
...1 76 1 77 1 78* 1 79* 2 80 1 81 1 # 1 # 1 # 1 Description Motor Reed Switch Motor Tension Nut Reed Switch Clip Magnet Belt Roller Adj. WLTL21430 R1003A Key No. Weight 2" Bolt Left Frame Spacer 3 lbs. Weight Incline Leg Weight Rack Rear Roller Releasable Wire Tie Allen Wrench Latch Warning Decal Power Cord Console Base Latch Assembly Console Assembly Speed Potentiometer Plastic Tie 6" White Wire, Male/Female 4" Black Wire, Male/Flag User's Manual * Includes all parts shown in the box # These parts are not illustrated Qty. 1 1 2 1 3 1 4 1 5 6 6 1 7 13...

English Manual
Page 22
... (WESLO CADENCE® DS10 treadmill) • The SERIAL NUMBER of the product (see the PART LIST and the EXPLODED DRAWING in workmanship and material, under normal use or performance of the product or damages with respect to the terms set forth above limitation may not apply to be pre-authorized by an ICON authorized service center; products used as store display models. No other warranty beyond that specifically set...
... (WESLO CADENCE® DS10 treadmill) • The SERIAL NUMBER of the product (see the PART LIST and the EXPLODED DRAWING in workmanship and material, under normal use or performance of the product or damages with respect to the terms set forth above limitation may not apply to be pre-authorized by an ICON authorized service center; products used as store display models. No other warranty beyond that specifically set...


