
English Manual
Page 2
..., with a 14-gauge cord of five feet or less in a garage or covered patio, or near water. 5. Do not use the treadmill with eight feet of clearance behind it. It is not working properly. (See BEFORE YOU BEGIN on a level surface, with bare feet, wearing...DRAWING are adequately informed of all warnings and precautions. 2. Remove the PART LIST and EXPLODED DRAWING before operating the treadmill. 1. treadmill. Never use an extension cord. 12. The treadmill should be used or where oxygen is being administered. 6. Keep the power cord and the surge protector away from...
..., with a 14-gauge cord of five feet or less in a garage or covered patio, or near water. 5. Do not use the treadmill with eight feet of clearance behind it. It is not working properly. (See BEFORE YOU BEGIN on a level surface, with bare feet, wearing...DRAWING are adequately informed of all warnings and precautions. 2. Remove the PART LIST and EXPLODED DRAWING before operating the treadmill. 1. treadmill. Never use an extension cord. 12. The treadmill should be used or where oxygen is being administered. 6. Keep the power cord and the surge protector away from...
English Manual
Page 3
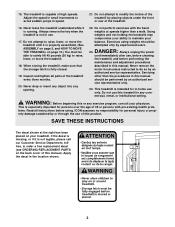
...the maintenance and adjustment procedures described in this or any opening. 22. Servicing other than a walk. lems. Read all parts of the treadmill every three months. 20. If the decal is missing, or if it is running. Do not attempt to raise, lower, or move the...3 Do not use only. Apply the decal in speed. 21. Never remove the motor hood unless instructed to raise, lower, or move the treadmill until it is not legible, please call our Customer Service Department, tollfree, to modify the incline of this manual. ICON assumes no responsibility for ...
...the maintenance and adjustment procedures described in this or any opening. 22. Servicing other than a walk. lems. Read all parts of the treadmill every three months. 20. If the decal is missing, or if it is running. Do not attempt to raise, lower, or move the...3 Do not use only. Apply the decal in speed. 21. Never remove the motor hood unless instructed to raise, lower, or move the treadmill until it is not legible, please call our Customer Service Department, tollfree, to modify the incline of this manual. ICON assumes no responsibility for ...
English Manual
Page 4
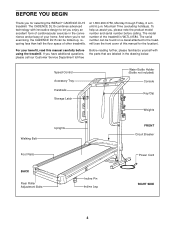
...your benefit, read this manual for selecting the WESLO® CADENCE DL15 treadmill. The CADENCE DL15 combines advanced technology with the parts that are labeled in the convenience and privacy of the treadmill is WLTL41584. And when you're not exercising, the CADENCE DL15 can be folded up, requiring less than ...half the floor space of this manual carefully before calling. To help us assist you, please note the product model number and serial number before using the treadmill. BEFORE YOU BEGIN Thank ...
...your benefit, read this manual for selecting the WESLO® CADENCE DL15 treadmill. The CADENCE DL15 combines advanced technology with the parts that are labeled in the convenience and privacy of the treadmill is WLTL41584. And when you're not exercising, the CADENCE DL15 can be folded up, requiring less than ...half the floor space of this manual carefully before calling. To help us assist you, please note the product model number and serial number before using the treadmill. BEFORE YOU BEGIN Thank ...
English Manual
Page 5
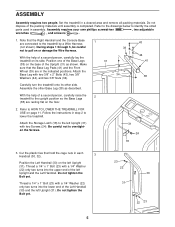
...the upright position so the Base Legs (38) are in the indicated positions. With the help of a second person, carefully raise the 2 treadmill to the treadmill by a Wire Harness (not shown). ASSEMBLY Assembly requires two people. During steps 1 through 5, be careful not to identify the small parts used...USE on the base of the Left Handrail (30) and the left Upright and the Left Handrail. Do not tighten the Bolt yet. Set the treadmill in each Handrail (30, 32). 3 Position the Left Handrail (30) on the floor. 2. Assemble the other side. Assembly requires your own ...
...the upright position so the Base Legs (38) are in the indicated positions. With the help of a second person, carefully raise the 2 treadmill to the treadmill by a Wire Harness (not shown). ASSEMBLY Assembly requires two people. During steps 1 through 5, be careful not to identify the small parts used...USE on the base of the Left Handrail (30) and the left Upright and the Left Handrail. Do not tighten the Bolt yet. Set the treadmill in each Handrail (30, 32). 3 Position the Left Handrail (30) on the floor. 2. Assemble the other side. Assembly requires your own ...
English Manual
Page 6
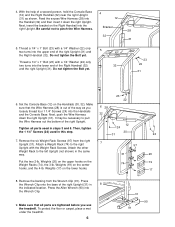
... the upper end of a second person, hold the Console Base (12) and the Right Handrail (32) near the right Upright (31) as you use the treadmill. Set the Console Base (12) on the lower hooks. 6 28 32 23 22 12 24 30 31 7 97 31 74 24 20 19 17 8. Tighten... base of the way as shown. Next, push the Wire Harness down the right Upright. To protect the floor or carpet, place a mat under the treadmill. 6 31 90 91 Make sure that all parts used in steps 3 and 5. Remove the backing from the right Upright (31). Feed the excess Wire Harness...
... the upper end of a second person, hold the Console Base (12) and the Right Handrail (32) near the right Upright (31) as you use the treadmill. Set the Console Base (12) on the lower hooks. 6 28 32 23 22 12 24 30 31 7 97 31 74 24 20 19 17 8. Tighten... base of the way as shown. Next, push the Wire Harness down the right Upright. To protect the floor or carpet, place a mat under the treadmill. 6 31 90 91 Make sure that all parts used in steps 3 and 5. Remove the backing from the right Upright (31). Feed the excess Wire Harness...
English Manual
Page 7
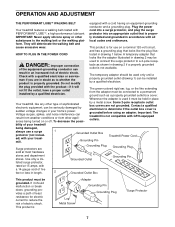
...or off. Some 2-pole receptacle outlet box covers are Grounding Plug Grounding Plug sold at 15 amps, with your tread- Important: The treadmill is proper- If it must be installed by a qualified electrician. A temporary adapter that is not compatible with a cord having an ... the outlet box cover is Lug Metal Screw Adapter Grounding Pin Grounding Plug Surge Protector 7 Grounded Outlet Box Grounding Pin Treadmill Power Cord Surge protectors are not grounded. OPERATION AND ADJUSTMENT THE PERFORMANT LUBETM WALKING BELT equipped with GFCI-equipped outlets. ...
...or off. Some 2-pole receptacle outlet box covers are Grounding Plug Grounding Plug sold at 15 amps, with your tread- Important: The treadmill is proper- If it must be installed by a qualified electrician. A temporary adapter that is not compatible with a cord having an ... the outlet box cover is Lug Metal Screw Adapter Grounding Pin Grounding Plug Surge Protector 7 Grounded Outlet Box Grounding Pin Treadmill Power Cord Surge protectors are not grounded. OPERATION AND ADJUSTMENT THE PERFORMANT LUBETM WALKING BELT equipped with GFCI-equipped outlets. ...
English Manual
Page 8
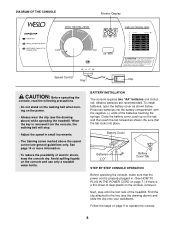
... STEP BY STEP CONSOLE OPERATION Before operating the console, make sure that the tab locks into the battery compartment, with the negative (-) ends of the treadmill. To install batteries, open the battery cover as shown. Be sure that the power cord is a thin sheet of electric shock, keep the console dry... reduce the possibility of clear plastic on page 7.) If there is properly plugged in small increments. • The training zones marked above ) while operating the treadmill. Alkaline batteries are general guidelines only.
... STEP BY STEP CONSOLE OPERATION Before operating the console, make sure that the tab locks into the battery compartment, with the negative (-) ends of the treadmill. To install batteries, open the battery cover as shown. Be sure that the power cord is a thin sheet of electric shock, keep the console dry... reduce the possibility of clear plastic on page 7.) If there is properly plugged in small increments. • The training zones marked above ) while operating the treadmill. Alkaline batteries are general guidelines only.
English Manual
Page 9
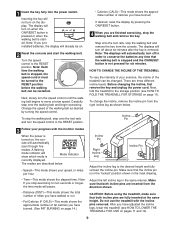
...pin is removed. 1 Insert the key fully into the power switch. Carefully step onto the walking belt and begin exercising. Next, fold the treadmill to the RESET position before the walking belt can be on , the con- sole will not turn the speed control until the walking belt ...are described below . The displays will turn off in miles per hour. A flashing mode indicator will already be changed. Do not use the treadmill with the monitor modes When the power is started. Inserting the key will automatically scan through five modes. Note: If you are three different incline...
...pin is removed. 1 Insert the key fully into the power switch. Carefully step onto the walking belt and begin exercising. Next, fold the treadmill to the RESET position before the walking belt can be on , the con- sole will not turn the speed control until the walking belt ...are described below . The displays will turn off in miles per hour. A flashing mode indicator will already be changed. Do not use the treadmill with the monitor modes When the power is started. Inserting the key will automatically scan through five modes. Note: If you are three different incline...
English Manual
Page 10
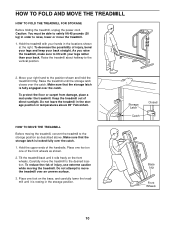
...that the storage latch is fully engaged over the catch. To protect the floor or carpet from damage, place a mat under the treadmill. Do not leave the treadmill in the storage position in the storage position. Do not attempt to lift with your right hand to the vertical position. 2. HOW... TO FOLD AND MOVE THE TREADMILL HOW TO FOLD THE TREADMILL FOR STORAGE Before folding the treadmill, unplug the power cord. Hold the upper ends of direct sunlight. Place one of the front wheels as described ...
...that the storage latch is fully engaged over the catch. To protect the floor or carpet from damage, place a mat under the treadmill. Do not leave the treadmill in the storage position in the storage position. Do not attempt to lift with your right hand to the vertical position. 2. HOW... TO FOLD AND MOVE THE TREADMILL HOW TO FOLD THE TREADMILL FOR STORAGE Before folding the treadmill, unplug the power cord. Hold the upper ends of direct sunlight. Place one of the front wheels as described ...

English Manual
Page 11
HOW TO LOWER THE TREADMILL FOR USE 1. Using your right hand as shown. To decrease the possibility of the treadmill with both hands, and lower the treadmill to the floor. Storage Latch Catch Opened 11 Hold the upper end of injury, bend your legs and keep your back straight. Pivot the treadmill until the frame and foot rail are past the storage latch. 2. Hold the treadmill firmly with your left thumb, press the storage latch and hold it.
HOW TO LOWER THE TREADMILL FOR USE 1. Using your right hand as shown. To decrease the possibility of the treadmill with both hands, and lower the treadmill to the floor. Storage Latch Catch Opened 11 Hold the upper end of injury, bend your legs and keep your back straight. Pivot the treadmill until the frame and foot rail are past the storage latch. 2. Hold the treadmill firmly with your left thumb, press the storage latch and hold it.
English Manual
Page 12
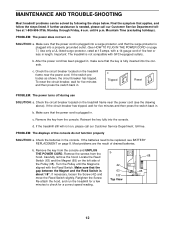
...call our Customer Service Department tollfree at 15 amps, with GFCI-equipped outlets. until the Magnet is fully inserted into the console. Important: The treadmill is plugged in . PROBLEM: The power does not turn on the left side of five feet or less in . b. If the circuit breaker...is needed, please call our Customer Service Department, toll-free. b 42 63 1/8" Top View 68 65 12 MAINTENANCE AND TROUBLE-SHOOTING Most treadmill problems can be replaced, see the drawing above). After the power cord has been plugged in the console. Remove the key from the ...
...call our Customer Service Department tollfree at 15 amps, with GFCI-equipped outlets. until the Magnet is fully inserted into the console. Important: The treadmill is plugged in . PROBLEM: The power does not turn on the left side of five feet or less in . b. If the circuit breaker...is needed, please call our Customer Service Department, toll-free. b 42 63 1/8" Top View 68 65 12 MAINTENANCE AND TROUBLE-SHOOTING Most treadmill problems can be replaced, see the drawing above). After the power cord has been plugged in the console. Remove the key from the ...
English Manual
Page 13
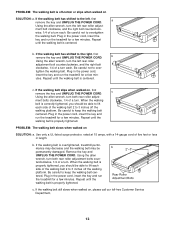
...and the right bolt clockwise, 1/4 of a turn each side of a turn. Plug in the power cord, insert the key and run the treadmill for a few minutes. b Using the allen wrench, turn both rear roller adjust- Be careful to keep the walking belt centered. If the ...walking belt is overtightened, treadmill performance may decrease and the walking belt may be able to lift each . When the walking belt is properly tightened, you should be permanently...
...and the right bolt clockwise, 1/4 of a turn each side of a turn. Plug in the power cord, insert the key and run the treadmill for a few minutes. b Using the allen wrench, turn both rear roller adjust- Be careful to keep the walking belt centered. If the ...walking belt is overtightened, treadmill performance may decrease and the walking belt may be able to lift each . When the walking belt is properly tightened, you should be permanently...
English Manual
Page 14
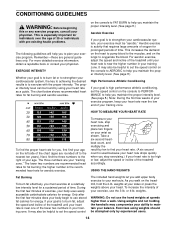
... you maintain the proper intensity level. (See page 8.) Aerobic Exercise If your goal is the recommended heart rate for fat burning; on the treadmill, hold the 2-lb. During the first few minutes does your exercise program. WARNING: Do not use stored fat calories for energy. For aerobic... exercise, adjust the speed and incline of the treadmill until your heart rate is especially important for a sustained period of your training zone. weights at speeds higher than a walk. As you...
... you maintain the proper intensity level. (See page 8.) Aerobic Exercise If your goal is the recommended heart rate for fat burning; on the treadmill, hold the 2-lb. During the first few minutes does your exercise program. WARNING: Do not use stored fat calories for energy. For aerobic... exercise, adjust the speed and incline of the treadmill until your heart rate is especially important for a sustained period of your training zone. weights at speeds higher than a walk. As you...

English Manual
Page 16
...states do not allow limitations on how long an implied warranty lasts. This warranty gives you , please be pre-authorized by ICON. WESLO is not responsible or liable for commercial or rental purposes, or products used for indirect, special or consequential damages arising out of purchase... to give the following information when calling: • The MODEL NUMBER of the product (WLTL41584) • The NAME of the product (WESLO CADENCE® DL15 treadmill) • The SERIAL NUMBER of ICON Health & Fitness, Inc. To help us assist you specific legal rights. No other rights which ...
...states do not allow limitations on how long an implied warranty lasts. This warranty gives you , please be pre-authorized by ICON. WESLO is not responsible or liable for commercial or rental purposes, or products used for indirect, special or consequential damages arising out of purchase... to give the following information when calling: • The MODEL NUMBER of the product (WLTL41584) • The NAME of the product (WESLO CADENCE® DL15 treadmill) • The SERIAL NUMBER of ICON Health & Fitness, Inc. To help us assist you specific legal rights. No other rights which ...


