
English Manual
Page 2
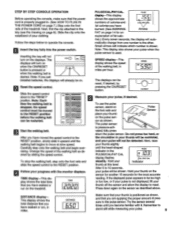
... sane.: • s9on!yva ttl,4lusted anrgc. TABLE OF CONTENTS IMPORTANT PRECAUTIONS BEFORE YOU BEGIN ASSEMBLY OPERATION AND ADJUSTMENT HOW TO FOLD AND MOVE THE TREADMILL TROUBLE-SHOOTING CONDITIONING GUIDELINES ORDERING REPLACEMENT PARTS LIMITED WARRANTY 2 4 5 7 11 12 14 Back Cover Back Cover Note: An EXPLODED DRAWING and a PART LIST are 'Os...
... sane.: • s9on!yva ttl,4lusted anrgc. TABLE OF CONTENTS IMPORTANT PRECAUTIONS BEFORE YOU BEGIN ASSEMBLY OPERATION AND ADJUSTMENT HOW TO FOLD AND MOVE THE TREADMILL TROUBLE-SHOOTING CONDITIONING GUIDELINES ORDERING REPLACEMENT PARTS LIMITED WARRANTY 2 4 5 7 11 12 14 Back Cover Back Cover Note: An EXPLODED DRAWING and a PART LIST are 'Os...
English Manual
Page 3
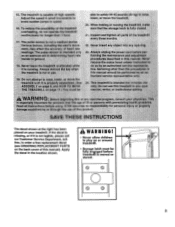
...Department, tollfree, to avoid sudden.jumps in speed. . . A WARNING! • Never allow children to raise, lower, or move the treadmill 20. O 0 0 O CD 3 tOr-icingeeinaiit:no0 7.:;-:-.ThapOlSeseneorlanota:medlOW0evice. tnie ofahy importantfor ereon6*artnkege.ot 35 aOgf:eror.6a0606r8o11ram: p;rf"... when eili tt0100 per, move the mblad (See py able to safely lift 45 pounds (20 kg) to play on your treadmill. posslbllltyOf.thelreadrniII overheating, donotoperate.tnatreadmill : • .... . lqspect,end:lighten all patty f, 0)0 tread eyory.tnree Month!, 2....
...Department, tollfree, to avoid sudden.jumps in speed. . . A WARNING! • Never allow children to raise, lower, or move the treadmill 20. O 0 0 O CD 3 tOr-icingeeinaiit:no0 7.:;-:-.ThapOlSeseneorlanota:medlOW0evice. tnie ofahy importantfor ereon6*artnkege.ot 35 aOgf:eror.6a0606r8o11ram: p;rf"... when eili tt0100 per, move the mblad (See py able to safely lift 45 pounds (20 kg) to play on your treadmill. posslbllltyOf.thelreadrniII overheating, donotoperate.tnatreadmill : • .... . lqspect,end:lighten all patty f, 0)0 tread eyory.tnree Month!, 2....
English Manual
Page 4
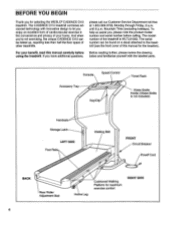
... Rails Walking Belt FRONT Circuit Breaker Powef Cord BACK Rear Roller Adjustment Bolt 4 Incline Leg Cushioned Walking Platform for selecting the WESLO® CADENCE Ct10 treadmill. BEFORE YOU BEGIN Thank you , please note the product model number and serial number before using the treadmill. To help us assist you for maximum exercise comfort RIGHT SIDE
... Rails Walking Belt FRONT Circuit Breaker Powef Cord BACK Rear Roller Adjustment Bolt 4 Incline Leg Cushioned Walking Platform for selecting the WESLO® CADENCE Ct10 treadmill. BEFORE YOU BEGIN Thank you , please note the product model number and serial number before using the treadmill. To help us assist you for maximum exercise comfort RIGHT SIDE
English Manual
Page 5
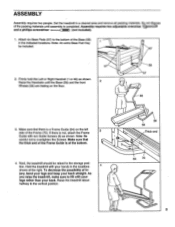
... on the floor. 58 57 -oC 46 3. Note: Be careful not to the vertical position. 4 ( 64 70 5 As you raise the treadmill, make sure to lift with your legs rather than your hands in the locations shown at the bottom. 56 58 Thick end 3 4. Raise the...bend your legs and keep your back straight. ASSEMBLY Assembly requires two people. Attach six Base Pads (57) to the storage position. Set the treadmill in the indicated locations. If there is completed. Assembly requires two adjustable wrenches and a phillips screwdriver .0.=1:3::=3) (not included). 1. To decrease the ...
... on the floor. 58 57 -oC 46 3. Note: Be careful not to the vertical position. 4 ( 64 70 5 As you raise the treadmill, make sure to lift with your legs rather than your hands in the locations shown at the bottom. 56 58 Thick end 3 4. Raise the...bend your legs and keep your back straight. ASSEMBLY Assembly requires two people. Attach six Base Pads (57) to the storage position. Set the treadmill in the indicated locations. If there is completed. Assembly requires two adjustable wrenches and a phillips screwdriver .0.=1:3::=3) (not included). 1. To decrease the ...

English Manual
Page 6
... (62) onto the bottom of injury, bend your legs and keep your left thumb, slide the Storage Latch (6) _ to the left. Pivot the treadmill slightly until the 5 Storage Latch (6) closes over the Frame Guide. 0 Closed 6. To decrease the possibility of the Stabilizer (63) in the indicated ...location. 6 6 6 64 64 Attach the Stabilizer (63) to the floor. Move your right hand as shown. Raise the treadmill until the Frame Guide (64) is past the Storage Latch. Remove the paper backing from the Adhesive Clip (19). Using your ti back straight...
... (62) onto the bottom of injury, bend your legs and keep your left thumb, slide the Storage Latch (6) _ to the left. Pivot the treadmill slightly until the 5 Storage Latch (6) closes over the Frame Guide. 0 Closed 6. To decrease the possibility of the Stabilizer (63) in the indicated ...location. 6 6 6 64 64 Attach the Stabilizer (63) to the floor. Move your right hand as shown. Raise the treadmill until the Frame Guide (64) is past the Storage Latch. Remove the paper backing from the Adhesive Clip (19). Using your ti back straight...

English Manual
Page 7
...a surge protector (not In- being damaged, always use on or off. To decrease the posslbility of five feet or less in your treadmill. 0 Grounding Plug Grounding Plug Surge protectors are not grounded. This product must be installed by a metal screw. They will deteriorate the walking...and electric shock. Voltage surges, spikes, and noise interference can be held in place by a qualified electrician. Ott Otok: ctrfca Your treadmill, like extending from other appliances The green-colored rigid ear, lug, or the like any other substances to determine if the outlet ...
...a surge protector (not In- being damaged, always use on or off. To decrease the posslbility of five feet or less in your treadmill. 0 Grounding Plug Grounding Plug Surge protectors are not grounded. This product must be installed by a metal screw. They will deteriorate the walking...and electric shock. Voltage surges, spikes, and noise interference can be held in place by a qualified electrician. Ott Otok: ctrfca Your treadmill, like extending from other appliances The green-colored rigid ear, lug, or the like any other substances to determine if the outlet ...
English Manual
Page 9
...detected. Slide the speed control down the pulse sensor. Start the walking belt. fat calories you have burned. (See BURNING Arrows FAT on the treadmill. Small arrows will not be on the displays. SPEED display-This SPEED display shows the speed of calories and CA• /FAT L. Do not...stopped, the speed control must be moved to the key (see the drawing on the sensor for another 15 seconds for an explanation of the treadmill. vated; Press down again on page 7.) Step onto the foot rails of fat calo- Slide the clip onto the waistband of your progress ...
...detected. Slide the speed control down the pulse sensor. Start the walking belt. fat calories you have burned. (See BURNING Arrows FAT on the treadmill. Small arrows will not be on the displays. SPEED display-This SPEED display shows the speed of calories and CA• /FAT L. Do not...stopped, the speed control must be moved to the key (see the drawing on the sensor for another 15 seconds for an explanation of the treadmill. vated; Press down again on page 7.) Step onto the foot rails of fat calo- Slide the clip onto the waistband of your progress ...
English Manual
Page 10
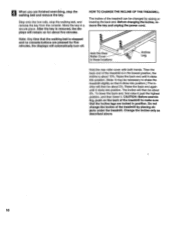
.... Change the incline only as described above. 10 HOW TO CHANGE THE INCLINE OF THE TREADMILL The incline of the treadmill is removed, the displays will then be changed by placing objects under the treadmill. Hold the rear roller cover with both hands. CAUTION: Before exercising, push on for ... will then be necessary to make sure that the incline legs are pressed for about 5%. Do not change the incline of the treadmill to shake the treadmill slightly so that the walking belt is stopped and no console buttons are locked in the lowest position, the incline is about 3%....
.... Change the incline only as described above. 10 HOW TO CHANGE THE INCLINE OF THE TREADMILL The incline of the treadmill is removed, the displays will then be changed by placing objects under the treadmill. Hold the rear roller cover with both hands. CAUTION: Before exercising, push on for ... will then be necessary to make sure that the incline legs are pressed for about 5%. Do not change the incline of the treadmill to shake the treadmill slightly so that the walking belt is stopped and no console buttons are locked in the lowest position, the incline is about 3%....

English Manual
Page 11
...fully over the frame guide. 1. Storage Latch Frame Guide Closed oo O Base Front Wheels Storage Latch Opened 11 Do not leave the treadmill in the storage position in the storage position. To reduce the risk of injury, bend your legs and keep your hands in the ... hand to the storage position as shown. 2. Move your right hand as shown. HOW TO LOWER THE TREADMILL FOR USE 1. HOW TO MOVE THE TREADMILL Before moving the treadmill. Pivot the treadmill slightly until the storage latch closes over an uneven surface. 3. To decrease the possibility of injury, use ...
...fully over the frame guide. 1. Storage Latch Frame Guide Closed oo O Base Front Wheels Storage Latch Opened 11 Do not leave the treadmill in the storage position in the storage position. To reduce the risk of injury, bend your legs and keep your hands in the ... hand to the storage position as shown. 2. Move your right hand as shown. HOW TO LOWER THE TREADMILL FOR USE 1. HOW TO MOVE THE TREADMILL Before moving the treadmill. Pivot the treadmill slightly until the storage latch closes over an uneven surface. 3. To decrease the possibility of injury, use ...
English Manual
Page 12
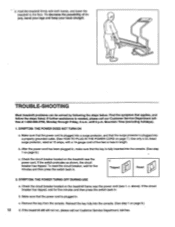
... the switch back in length. If the circuit breaker has tripped, wait for five minutes and then press the switch back in - Hold the treadmill firmly with a 14-gauge cord of in . until 6 p.m. Make sure that the power cord is plugged into a surge protector, and that...Time (excluding holidays). 1. After the power cord has been plugged in . Check the circuit breaker located on the treadmill near the power cord (see 1. Check the circuit breaker located on the treadmill frame near the power cord. b. Make sure that applies, and follow the steps listed. Find the symptom that the...
... the switch back in length. If the circuit breaker has tripped, wait for five minutes and then press the switch back in - Hold the treadmill firmly with a 14-gauge cord of in . until 6 p.m. Make sure that the power cord is plugged into a surge protector, and that...Time (excluding holidays). 1. After the power cord has been plugged in . Check the circuit breaker located on the treadmill near the power cord (see 1. Check the circuit breaker located on the treadmill frame near the power cord. b. Make sure that applies, and follow the steps listed. Find the symptom that the...
English Manual
Page 13
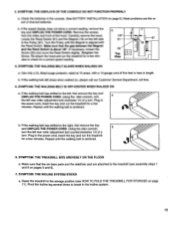
...THE DISPLAYS OF THE CONSOLE DO NOT FUNCTION PROPERLY a. b. Repeat until the Magnet is centered. 6. b. Retighten the Screw. Re-attach the hood and run the treadmill for a few minutes to the left side of a turn . b 1/8" 81 20 Top View V .4( 67 18 r 4. Carefully remove the hood. Use... belt still slows when walked on page 8.) Most problems are attached to break in the power cord, insert the key and run the treadmill for a correct speed reading. Plug in length. SYMPTOM: THE WALKING BELT IS OFF-CENTER WHEN WALKED ON a. 3. Plug in the incline...
...THE DISPLAYS OF THE CONSOLE DO NOT FUNCTION PROPERLY a. b. Repeat until the Magnet is centered. 6. b. Retighten the Screw. Re-attach the hood and run the treadmill for a few minutes to the left side of a turn . b 1/8" 81 20 Top View V .4( 67 18 r 4. Carefully remove the hood. Use... belt still slows when walked on page 8.) Most problems are attached to break in the power cord, insert the key and run the treadmill for a correct speed reading. Plug in length. SYMPTOM: THE WALKING BELT IS OFF-CENTER WHEN WALKED ON a. 3. Plug in the incline...
English Manual
Page 14
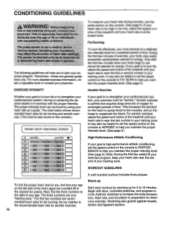
... low intensity level for a sustained period of the chart (ages are your movem O. For aerobic exercise, adjust the speed and incline of the treadmill until your age. Begin with the proper intensity. CONDITIONING GUIDELINES ARNIS„:„.. ":: i•.s.„•n„....o.•••t ea device. ... be helpful to set the speed control on the console to PERFORMANCE to burn fat, adjust the speed and incline of the treadmill until your heart rate is near the low end of your heart rate is high performance athletic conditioning, set the speed control ...
... low intensity level for a sustained period of the chart (ages are your movem O. For aerobic exercise, adjust the speed and incline of the treadmill until your age. Begin with the proper intensity. CONDITIONING GUIDELINES ARNIS„:„.. ":: i•.s.„•n„....o.•••t ea device. ... be helpful to set the speed control on the console to PERFORMANCE to burn fat, adjust the speed and incline of the treadmill until your heart rate is near the low end of your heart rate is high performance athletic conditioning, set the speed control ...
English Manual
Page 16
...is made must be prepared to give the following information: • The MODEL NUMBER OF THE PRODUCT (WLTL91063). • The NAME OF THE PRODUCT (WESLO® CADENCE Ct10 treadmill). • The SERIAL NUMBER OF THE PRODUCT (see the front cover of this manual). • The KEY NUMBER OF THE PART(S) (see the ... not apply to state. AD products for which vary from state to you . ICON is limited to products used as store display models. WESLO is limited in connection with the use or performance of the product or damages with respect to any product or damage to a product caused by...
...is made must be prepared to give the following information: • The MODEL NUMBER OF THE PRODUCT (WLTL91063). • The NAME OF THE PRODUCT (WESLO® CADENCE Ct10 treadmill). • The SERIAL NUMBER OF THE PRODUCT (see the front cover of this manual). • The KEY NUMBER OF THE PART(S) (see the ... not apply to state. AD products for which vary from state to you . ICON is limited to products used as store display models. WESLO is limited in connection with the use or performance of the product or damages with respect to any product or damage to a product caused by...


