

User Manual
Page 3
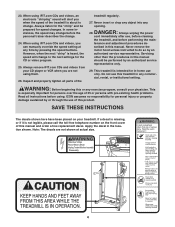
... the toll-free telephone number on page 11). 6. Do not change speed, accelerate, or stop procedure before operating the treadmill. 1. Use the treadmill only as an exercise aid in determining heart rate trends in a fall and serious injury. 13. Do not put the treadmill in speed. 18. Wear appropriate exercise clothes when using the treadmill (see page 9), plug the power cord into a surge suppressor (not included) and plug the surge...
... the toll-free telephone number on page 11). 6. Do not change speed, accelerate, or stop procedure before operating the treadmill. 1. Use the treadmill only as an exercise aid in determining heart rate trends in a fall and serious injury. 13. Do not put the treadmill in speed. 18. Wear appropriate exercise clothes when using the treadmill (see page 9), plug the power cord into a surge suppressor (not included) and plug the surge...
User Manual
Page 4
... health problems. Read all parts of this product. Always remove iFIT.com CDs and videos from your CD player or VCR when you when the speed of the treadmill is especially important for in-home use of this manual and order a free replacement decal. Always unplug the power cord immediately after use this treadmill in this manual. This is about to the next settings for speed changes. When using iFIT.com CDs and videos...
... health problems. Read all parts of this product. Always remove iFIT.com CDs and videos from your CD player or VCR when you when the speed of the treadmill is especially important for in-home use of this manual and order a free replacement decal. Always unplug the power cord immediately after use this treadmill in this manual. This is about to the next settings for speed changes. When using iFIT.com CDs and videos...
User Manual
Page 5
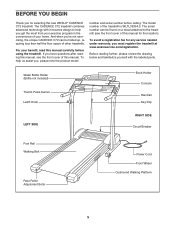
... innovative design to the treadmill (see the front cover of the treadmill is WLTL39304.0. The CADENCE C72 treadmill combines advanced technology with the labeled parts. The model number of this manual carefully before calling. Water Bottle Holder (Bottle not included) Thumb Pulse Sensor Latch Knob Book Holder Console Handrail Key/Clip LEFT SIDE RIGHT SIDE Circuit Breaker Foot Rail Walking Belt Rear Roller Adjustment Bolts Power Cord Front Wheel Cushioned Walking Platform 5 BEFORE YOU BEGIN...
... innovative design to the treadmill (see the front cover of the treadmill is WLTL39304.0. The CADENCE C72 treadmill combines advanced technology with the labeled parts. The model number of this manual carefully before calling. Water Bottle Holder (Bottle not included) Thumb Pulse Sensor Latch Knob Book Holder Console Handrail Key/Clip LEFT SIDE RIGHT SIDE Circuit Breaker Foot Rail Walking Belt Rear Roller Adjustment Bolts Power Cord Front Wheel Cushioned Walking Platform 5 BEFORE YOU BEGIN...
User Manual
Page 6
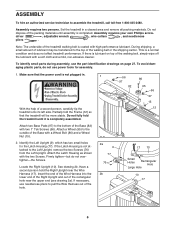
... authorized service technician to the Left Upright, remove the two Screws (76) from the Left Upright. Assembly requires two persons. driver , adjustable wrench , wire cutters , and needlenose pliers . If there is completed. To identify small parts during assembly, use power tools for the Latch Housing (77). Identify the Left Upright (9), which has two small holes for assembly. 1. If the Latch Housing is not attached to assemble the treadmill, call toll-free...
... authorized service technician to the Left Upright, remove the two Screws (76) from the Left Upright. Assembly requires two persons. driver , adjustable wrench , wire cutters , and needlenose pliers . If there is completed. To identify small parts during assembly, use power tools for the Latch Housing (77). Identify the Left Upright (9), which has two small holes for assembly. 1. If the Latch Housing is not attached to assemble the treadmill, call toll-free...
User Manual
Page 7
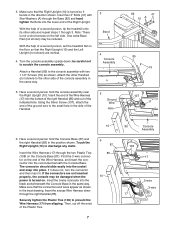
.... Using the Silver Screw (107), attach the end of the ground wire to the console assembly with Star Washers (A) through the two Plastic Ties (108) on the floor so that the Right Upright (10) and the Left Upright (not shown) are not inserted properly, the console may be included. Find the 3-wire connector on the end of a second person, set the treadmill...
.... Using the Silver Screw (107), attach the end of the ground wire to the console assembly with Star Washers (A) through the two Plastic Ties (108) on the floor so that the Right Upright (10) and the Left Upright (not shown) are not inserted properly, the console may be included. Find the 3-wire connector on the end of a second person, set the treadmill...

User Manual
Page 8
... Upright. Insert the Lock Pin into the Right Upright (10) as shown. Hand tighten two 4" Bolts (89) with two 3/4" Screws (68). 110 68 87 9. Note: There is not a wire harness in a secure place; Remove the Lock Knob (105) from damage, place a mat under the treadmill. 8 To protect the floor or carpet from the Lock Pin (11). Attach the Connector Cover 8 to the Left Upright...
... Upright. Insert the Lock Pin into the Right Upright (10) as shown. Hand tighten two 4" Bolts (89) with two 3/4" Screws (68). 110 68 87 9. Note: There is not a wire harness in a secure place; Remove the Lock Knob (105) from damage, place a mat under the treadmill. 8 To protect the floor or carpet from the Lock Pin (11). Attach the Connector Cover 8 to the Left Upright...

User Manual
Page 9
... control system is not compatible with a cord having an equipment-grounding conductor and a grounding plug. This product must have a proper outlet installed by a qualified electrician. Important: The treadmill is damaged, the walking belt may change speed, accelerate or stop unexpectedly, which may be held in an increased risk of sophisticated electronic equipment, can be electrically rated for use a surge suppressor with highperformance lubricant...
... control system is not compatible with a cord having an equipment-grounding conductor and a grounding plug. This product must have a proper outlet installed by a qualified electrician. Important: The treadmill is damaged, the walking belt may change speed, accelerate or stop unexpectedly, which may be held in an increased risk of sophisticated electronic equipment, can be electrically rated for use a surge suppressor with highperformance lubricant...
User Manual
Page 10
... plastic on the console, remove it guides you through every step of your exercise. Each program automatically controls the With the treadmill connected to your computer, you can be available. You can even measure your home. Additional options are also offered. To use the manual mode of the console, follow the steps beginning on the front cover of a button. Using the included audio cable, you exercise, the console will display continuous exercise feedback. Avoid...
... plastic on the console, remove it guides you through every step of your exercise. Each program automatically controls the With the treadmill connected to your computer, you can be available. You can even measure your home. Additional options are also offered. To use the manual mode of the console, follow the steps beginning on the front cover of a button. Using the included audio cable, you exercise, the console will display continuous exercise feedback. Avoid...

User Manual
Page 11
... the console, adjust the position of the clip. A moment after the button is pressed, the speed setting will light in either of the Incline buttons until you use the pulse sensor (see step 6 on page 24). If a program has been selected, press the Mode button repeatedly to reselect the manual mode. 3 Press the Start button or the Speed L button to start the walking belt. As you exercise, the indicators around the track will change the incline of the treadmill, press either miles or...
... the console, adjust the position of the clip. A moment after the button is pressed, the speed setting will light in either of the Incline buttons until you use the pulse sensor (see step 6 on page 24). If a program has been selected, press the Mode button repeatedly to reselect the manual mode. 3 Press the Start button or the Speed L button to start the walking belt. As you exercise, the indicators around the track will change the incline of the treadmill, press either miles or...
User Manual
Page 12
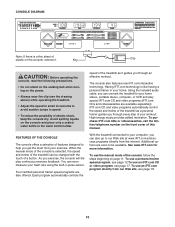
... walking belt. Speed display-This display shows the speed of the four personal trainer program indicators lights. Hold your thumb on page 11. 2 Select a personal trainer program. Adjust the incline of the treadmill to change during the programs. The first four speed settings for the most accurate reading. Next, remove the key from the console and put it . When a personal trainer program is selected, the display will not be detected. To measure your heart rate, Pulse Sensor...
... walking belt. Speed display-This display shows the speed of the four personal trainer program indicators lights. Hold your thumb on page 11. 2 Select a personal trainer program. Adjust the incline of the treadmill to change during the programs. The first four speed settings for the most accurate reading. Next, remove the key from the console and put it . When a personal trainer program is selected, the display will not be detected. To measure your heart rate, Pulse Sensor...
User Manual
Page 13
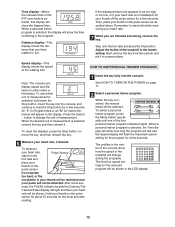
... the Speed L button. Next, remove the key from the console. When the program has ended, adjust the incline of the treadmill during the last three seconds of the current period.) Note: If all speed settings will begin walking. When the first period is too high or too low, you can manually override the setting by pressing the Speed buttons. Note: If the speed setting for the next period. The walking belt...
... the Speed L button. Next, remove the key from the console. When the program has ended, adjust the incline of the treadmill during the last three seconds of the current period.) Note: If all speed settings will begin walking. When the first period is too high or too low, you can manually override the setting by pressing the Speed buttons. Note: If the speed setting for the next period. The walking belt...

User Manual
Page 16
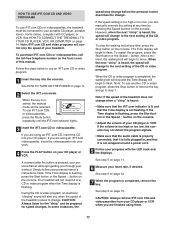
... the included adapter. If the AUDIO OUT jack is connected to your VCR is being used, see instruction B. Plug one end of the audio cable into the jack beneath the console. B. IN VIDEO AUDIO IN CH 34 OUT RF OUT AUDIO OUT RIGHT LEFT B C AUDIO OUT RIGHT LEFT 16 IN VIDEO AUDIO IN CH 34 OUT RF OUT AUDIO OUT RIGHT LEFT Adapter Audio Cable RCA Y-adapter Audio Cable Adapter Wire removed from AUDIO OUT jack...
... the included adapter. If the AUDIO OUT jack is connected to your VCR is being used, see instruction B. Plug one end of the audio cable into the jack beneath the console. B. IN VIDEO AUDIO IN CH 34 OUT RF OUT AUDIO OUT RIGHT LEFT B C AUDIO OUT RIGHT LEFT 16 IN VIDEO AUDIO IN CH 34 OUT RF OUT AUDIO OUT RIGHT LEFT Adapter Audio Cable RCA Y-adapter Audio Cable Adapter Wire removed from AUDIO OUT jack...
User Manual
Page 17
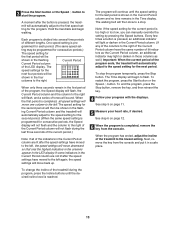
... TO CONNECT THE TREADMILL TO YOUR CD PLAYER, VCR, OR COMPUTER on the console. To purchase iFIT.com CDs or videocassettes, call the toll-free telephone number on the console. Note: If the Time display is completed, remove the key. See step 6 on page 12. 7 When the program is flashing, press the Start button or the Speed L button on the front cover of this manual. During the CD or video program...
... TO CONNECT THE TREADMILL TO YOUR CD PLAYER, VCR, OR COMPUTER on the console. To purchase iFIT.com CDs or videocassettes, call the toll-free telephone number on the console. Note: If the Time display is completed, remove the key. See step 6 on page 12. 7 When the program is flashing, press the Start button or the Speed L button on the front cover of this manual. During the CD or video program...

User Manual
Page 18
... step 5 on the console. Note: Programs will begin walking. To restart the program, press the Start button or the Speed L button. A list of your home computer. HOW TO USE PROGRAMS DIRECTLY FROM OUR WEB SITE 7 Return to access programs directly from the internet. Our Web site at any time by pressing the Speed buttons on page 11. 9 Measure your clothes. See www.iFIT.com for speed changes. To use a program from our Web site, the treadmill...
... step 5 on the console. Note: Programs will begin walking. To restart the program, press the Start button or the Speed L button. A list of your home computer. HOW TO USE PROGRAMS DIRECTLY FROM OUR WEB SITE 7 Return to access programs directly from the internet. Our Web site at any time by pressing the Speed buttons on page 11. 9 Measure your clothes. See www.iFIT.com for speed changes. To use a program from our Web site, the treadmill...

User Manual
Page 22
... five minutes and then press the switch back in. PROBLEM: The speed display on SOLUTION: a. Remove the hood from the console. c Tripped Reset PROBLEM: The power turns off during use SOLUTION: a. If necessary, loosen the 3/4" Screw (76), move the Reed Switch slightly, and then retighten the Screw. above). d. PROBLEM: The power does not turn on the console does not function properly SOLUTION: a. After the power cord has been plugged in . c. Reinsert the key fully into a surge...
... five minutes and then press the switch back in. PROBLEM: The speed display on SOLUTION: a. Remove the hood from the console. c Tripped Reset PROBLEM: The power turns off during use SOLUTION: a. If necessary, loosen the 3/4" Screw (76), move the Reed Switch slightly, and then retighten the Screw. above). d. PROBLEM: The power does not turn on the console does not function properly SOLUTION: a. After the power cord has been plugged in . c. Reinsert the key fully into a surge...
User Manual
Page 23
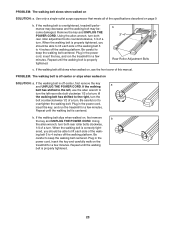
... walking platform. b 3"-4" Rear Roller Adjustment Bolts c. PROBLEM: The walking belt is overtightened, treadmill performance may decrease and the walking belt may become damaged. If the walking belt still slows when walked on, see the front cover of the specifications described on the treadmill for a few minutes. When the walking belt is off the walking platform. If the walking belt is correctly tight- Using the allen wrench, turn both rear roller adjustment bolts counterclockwise, 1/4 of a turn . Plug in the power cord, insert the key...
... walking platform. b 3"-4" Rear Roller Adjustment Bolts c. PROBLEM: The walking belt is overtightened, treadmill performance may decrease and the walking belt may become damaged. If the walking belt still slows when walked on, see the front cover of the specifications described on the treadmill for a few minutes. When the walking belt is off the walking platform. If the walking belt is correctly tight- Using the allen wrench, turn both rear roller adjustment bolts counterclockwise, 1/4 of a turn . Plug in the power cord, insert the key...
User Manual
Page 24
... burning, adjust the speed and incline of the treadmill until your heart rate is near the middle number in your everyday life. 24 To measure your physician. The key to five workouts each workout with at a relatively low intensity level for a sustained period of stretching and light exercise. CONDITIONING GUIDELINES WARNING: Before beginning this or any exercise program, consult your heart rate during exercise, use stored fat...
... burning, adjust the speed and incline of the treadmill until your heart rate is near the middle number in your everyday life. 24 To measure your physician. The key to five workouts each workout with at a relatively low intensity level for a sustained period of stretching and light exercise. CONDITIONING GUIDELINES WARNING: Before beginning this or any exercise program, consult your heart rate during exercise, use stored fat...

User Manual
Page 26
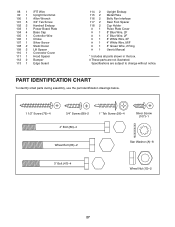
... 2 46 4 47 4 48 1 Motor Belt Pulley/Flywheel/Fan Motor Nut Motor/Pulley/ Flywheel/ Fan Incline Motor Bolt Incline Motor Spacer Incline Motor Stop Bracket Left Upright Right Upright Power Supply Bracket Frame Plastic Standoff Warning Decal Wheel Nut/ Incline Motor Nut Belt Guide Screw Wire Harness Hood Bracket Front Hood Bracket Caution Decal Reed Switch Reed Switch Clip Power Supply Controller Electronics Bracket Circuit Breaker Power Cord Power Cord Grommet Washer Latch Assembly Incline Frame Frame Pivot Bolt Frame Pivot Spacer Tension Bushing Front Roller Adj. Key No. Bolt Foot Rail Cap...
... 2 46 4 47 4 48 1 Motor Belt Pulley/Flywheel/Fan Motor Nut Motor/Pulley/ Flywheel/ Fan Incline Motor Bolt Incline Motor Spacer Incline Motor Stop Bracket Left Upright Right Upright Power Supply Bracket Frame Plastic Standoff Warning Decal Wheel Nut/ Incline Motor Nut Belt Guide Screw Wire Harness Hood Bracket Front Hood Bracket Caution Decal Reed Switch Reed Switch Clip Power Supply Controller Electronics Bracket Circuit Breaker Power Cord Power Cord Grommet Washer Latch Assembly Incline Frame Frame Pivot Bolt Frame Pivot Spacer Tension Bushing Front Roller Adj. Key No. Bolt Foot Rail Cap...
User Manual
Page 27
... 2 113 1 iFIT Wire Upright Grommet Allen Wrench 3/4" Tek Screw Handrail Endcap Power Board Plate Base Cap Controller Wire Choke Silver Screw Static Decal Lift Spacer Connector Cover Hood Spacer Bumper Edge Guard 114 2 115 2 116 2 117 2 118 2 #1 #1 #1 #1 #1 #1 #1 Upright Endcap Metal Plate Belly Pan Interface Rear Foot Spacer Cup Holder Pulse Plate Cover 8" Blue Wire, 2F 4" Blue Wire, 2F 8" White Wire, 2F 4" White Wire, M/F 8" Green Wire, 2 Ring User's Manual * Includes all parts shown...
... 2 113 1 iFIT Wire Upright Grommet Allen Wrench 3/4" Tek Screw Handrail Endcap Power Board Plate Base Cap Controller Wire Choke Silver Screw Static Decal Lift Spacer Connector Cover Hood Spacer Bumper Edge Guard 114 2 115 2 116 2 117 2 118 2 #1 #1 #1 #1 #1 #1 #1 Upright Endcap Metal Plate Belly Pan Interface Rear Foot Spacer Cup Holder Pulse Plate Cover 8" Blue Wire, 2F 4" Blue Wire, 2F 8" White Wire, 2F 4" White Wire, M/F 8" Green Wire, 2 Ring User's Manual * Includes all parts shown...
User Manual
Page 30
...; 2006 ICON IP, Inc. For inhome service, the customer will be prepared to give the following information: • The MODEL NUMBER OF THE PRODUCT (WLTL39304.0) • The NAME OF THE PRODUCT (WESLO® CADENCE C72 treadmill) • The SERIAL NUMBER OF THE PRODUCT (see the front cover of this manual) • The KEY NUMBER AND DESCRIPTION OF THE PART(S) (see the front cover of this warranty is limited to...
...; 2006 ICON IP, Inc. For inhome service, the customer will be prepared to give the following information: • The MODEL NUMBER OF THE PRODUCT (WLTL39304.0) • The NAME OF THE PRODUCT (WESLO® CADENCE C72 treadmill) • The SERIAL NUMBER OF THE PRODUCT (see the front cover of this manual) • The KEY NUMBER AND DESCRIPTION OF THE PART(S) (see the front cover of this warranty is limited to...


