
English Manual
Page 1
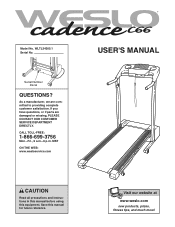
... CUSTOMER SERVICE DEPARTMENT DIRECTLY. CALL TOLL-FREE: 1-866-699-3756 Mon.-Fri., 6 a.m.-6 p.m. Visit our website at www.weslo.com new products, prizes, fitness tips, and much more! Serial Number Decal QUESTIONS? Save this equipment. WLTL34305.1 Serial No. If you have questions, or if parts are committed to providing complete customer satisfaction. Model No. MST ON THE WEB: www.wesloservice.com USER'S MANUAL...
... CUSTOMER SERVICE DEPARTMENT DIRECTLY. CALL TOLL-FREE: 1-866-699-3756 Mon.-Fri., 6 a.m.-6 p.m. Visit our website at www.weslo.com new products, prizes, fitness tips, and much more! Serial Number Decal QUESTIONS? Save this equipment. WLTL34305.1 Serial No. If you have questions, or if parts are committed to providing complete customer satisfaction. Model No. MST ON THE WEB: www.wesloservice.com USER'S MANUAL...
English Manual
Page 2
... using the treadmill. Read, understand, and test the emergency stop unexpectedly, which may change speed, accelerate, or stop procedure before operating the treadmill. 1. When connecting the power cord (see your local Weslo dealer or call the toll-free telephone number on page 9). 2 TABLE OF CONTENTS IMPORTANT PRECAUTIONS 2 BEFORE YOU BEGIN 4 ASSEMBLY 5 OPERATION AND ADJUSTMENT 8 HOW TO FOLD AND MOVE THE TREADMILL 12 TROUBLESHOOTING 13 CONDITIONING GUIDELINES 15 LIMITED WARRANTY Back Cover ORDERING REPLACEMENT PARTS...
... using the treadmill. Read, understand, and test the emergency stop unexpectedly, which may change speed, accelerate, or stop procedure before operating the treadmill. 1. When connecting the power cord (see your local Weslo dealer or call the toll-free telephone number on page 9). 2 TABLE OF CONTENTS IMPORTANT PRECAUTIONS 2 BEFORE YOU BEGIN 4 ASSEMBLY 5 OPERATION AND ADJUSTMENT 8 HOW TO FOLD AND MOVE THE TREADMILL 12 TROUBLESHOOTING 13 CONDITIONING GUIDELINES 15 LIMITED WARRANTY Back Cover ORDERING REPLACEMENT PARTS...
English Manual
Page 3
... an authorized service representative only. 24. When folding or moving the treadmill, make sure that the storage latch is capable of the treadmill regularly. 22. Never remove the motor hood unless instructed to avoid sudden jumps in a commercial, rental, or institutional setting. Do not use of 35 or persons with pre-existing health problems. Read all parts of high speeds. Always unplug the power cord immediately after use only. SAVE...
... an authorized service representative only. 24. When folding or moving the treadmill, make sure that the storage latch is capable of the treadmill regularly. 22. Never remove the motor hood unless instructed to avoid sudden jumps in a commercial, rental, or institutional setting. Do not use of 35 or persons with pre-existing health problems. Read all parts of high speeds. Always unplug the power cord immediately after use only. SAVE...
English Manual
Page 4
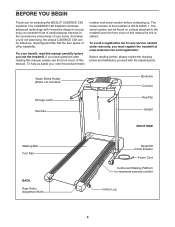
... the front cover of your benefit, read this manual. Water Bottle Holder (Bottle not included) Storage Latch Handrail Bookrack Console Key/Clip Upright RIGHT SIDE Walking Belt Foot Rail BACK Rear Roller Adjustment Bolts Reset/Off Circuit Breaker Power Cord Cushioned Walking Platform for selecting the WESLO® CADENCE C66 treadmill. If you enjoy an excellent form of cardiovascular exercise in the convenience and privacy of this manual for the location). The model number of other treadmills. Before...
... the front cover of your benefit, read this manual. Water Bottle Holder (Bottle not included) Storage Latch Handrail Bookrack Console Key/Clip Upright RIGHT SIDE Walking Belt Foot Rail BACK Rear Roller Adjustment Bolts Reset/Off Circuit Breaker Power Cord Cushioned Walking Platform for selecting the WESLO® CADENCE C66 treadmill. If you enjoy an excellent form of cardiovascular exercise in the convenience and privacy of this manual for the location). The model number of other treadmills. Before...
English Manual
Page 5
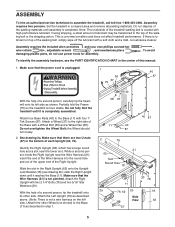
... pinched. Attach four Base Pads (40) to assemble the treadmill, call toll-free 1-800-445-2480. the Wheel should turn freely. 2. Make sure that the power cord is not a wire harness on top of the Right Upright. Do not dispose of the walking belt or the shipping carton. Partially fold the Frame (75) so the treadmill is completed. ASSEMBLY To hire an authorized service technician...
... pinched. Attach four Base Pads (40) to assemble the treadmill, call toll-free 1-800-445-2480. the Wheel should turn freely. 2. Make sure that the power cord is not a wire harness on top of the Right Upright. Do not dispose of the walking belt or the shipping carton. Partially fold the Frame (75) so the treadmill is completed. ASSEMBLY To hire an authorized service technician...
English Manual
Page 6
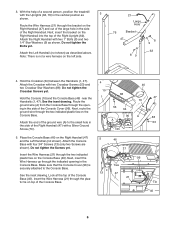
... with four 3/4" Screws (13) (only two Screws are shown). Do not tighten the Bolts yet. Attach the Left Handrail (not shown) as 3 shown. Do not tighten the Crossbar Screws yet. Next, route the ground wire through the bracket on the Right Handrail (47) and out of the large hole in the side of the Right Upright (62). Attach the Console Base with...
... with four 3/4" Screws (13) (only two Screws are shown). Do not tighten the Bolts yet. Attach the Left Handrail (not shown) as 3 shown. Do not tighten the Crossbar Screws yet. Next, route the ground wire through the bracket on the Right Handrail (47) and out of the large hole in the side of the Right Upright (62). Attach the Console Base with...
English Manual
Page 7
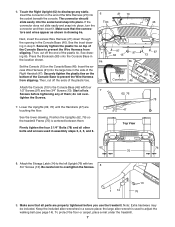
... six 7 Screws before you use the treadmill. Securely tighten the plastic tie on the bottom of the Right Handrail (47). Position the Uprights (62, 76) so the treadmill Frame (75) is used in the side of the Console Base to the left Upright (76) with four 1/2" Screws (97) and two 3/4" Screws (13). Attach the Storage Latch (14) to prevent the Wire Harness from slipping. Keep the...
... six 7 Screws before you use the treadmill. Securely tighten the plastic tie on the bottom of the Right Handrail (47). Position the Uprights (62, 76) so the treadmill Frame (75) is used in the side of the Console Base to the left Upright (76) with four 1/2" Screws (97) and two 3/4" Screws (13). Attach the Storage Latch (14) to prevent the Wire Harness from slipping. Keep the...
English Manual
Page 8
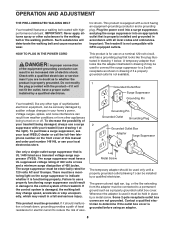
... if the outlet box cover is used to connect the surge suppressor to a 2-pole receptacle as to reduce the risk of this manual and order part number 146148, or see drawing 1 at the right). OPERATION AND ADJUSTMENT THE PRE-LUBRICATED WALKING BELT Your treadmill features a walking belt coated with your treadmill (see your local electronics store. This product is properly installed and grounded in drawing...
... if the outlet box cover is used to connect the surge suppressor to a 2-pole receptacle as to reduce the risk of this manual and order part number 146148, or see drawing 1 at the right). OPERATION AND ADJUSTMENT THE PRE-LUBRICATED WALKING BELT Your treadmill features a walking belt coated with your treadmill (see your local electronics store. This product is properly installed and grounded in drawing...
English Manual
Page 9
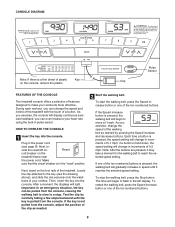
... workouts more effective. Locate the clip attached to move at 1 mph. if a button is held down, the speed setting will gradually increase in pulse sensor. As you can be pulled from the console, causing the walking belt to slow to reach the selected speed setting. you exercise, change the speed and incline of the treadmill with the touch of a button. If one of the ten numbered buttons is pressed, the walking belt will change in the "reset...
... workouts more effective. Locate the clip attached to move at 1 mph. if a button is held down, the speed setting will gradually increase in pulse sensor. As you can be pulled from the console, causing the walking belt to slow to reach the selected speed setting. you exercise, change the speed and incline of the treadmill with the touch of a button. If one of the ten numbered buttons is pressed, the walking belt will change in the "reset...
English Manual
Page 10
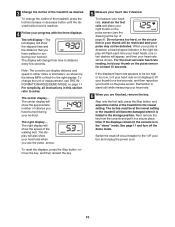
... heart rate when you have walked or run during your progress with the three displays. Note: The console can display distance and speed in the "demo" mode. To change the unit of the treadmill as shown by the letters MPH or Km/H in your thumb will also show the approximate number of the walking belt. The right display- The display will be detected. To reset the displays, press the Stop button, remove the key...
... heart rate when you have walked or run during your progress with the three displays. Note: The console can display distance and speed in the "demo" mode. To change the unit of the treadmill as shown by the letters MPH or Km/H in your thumb will also show the approximate number of the walking belt. The right display- The display will be detected. To reset the displays, press the Stop button, remove the key...
English Manual
Page 11
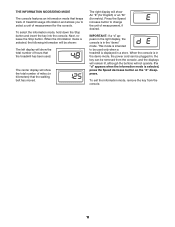
... the information mode is in the demo mode, the power cord can be plugged in, the key can be used . THE INFORMATION MODE/DEMO MODE The console features an information mode that keeps track of treadmill usage information and allows you to select a unit of measurement, if desired. Next, release the Stop button. When the console is selected, press the Speed decrease button so the "d" disappears. To exit the information mode, remove the key from the console, and the displays will...
... the information mode is in the demo mode, the power cord can be plugged in, the key can be used . THE INFORMATION MODE/DEMO MODE The console features an information mode that keeps track of treadmill usage information and allows you to select a unit of measurement, if desired. Next, release the Stop button. When the console is selected, press the Speed decrease button so the "d" disappears. To exit the information mode, remove the key from the console, and the displays will...
English Manual
Page 12
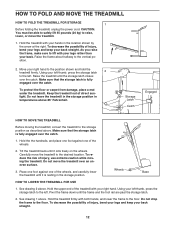
... right hand. HOW TO FOLD AND MOVE THE TREADMILL HOW TO FOLD THE TREADMILL FOR STORAGE 1 Before folding the treadmill, unplug the power cord. To decrease the possibility of the treadmill with your legs rather than your left . Using your back straight. Using your back. Hold the treadmill with both hands, and lower the frame to lift with your hands in the location shown by the arrow...
... right hand. HOW TO FOLD AND MOVE THE TREADMILL HOW TO FOLD THE TREADMILL FOR STORAGE 1 Before folding the treadmill, unplug the power cord. To decrease the possibility of the treadmill with your legs rather than your left . Using your back straight. Using your back. Hold the treadmill with both hands, and lower the frame to lift with your hands in the location shown by the arrow...

English Manual
Page 13
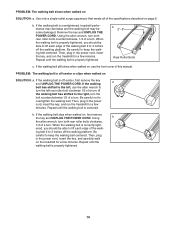
... key from the console. Remove the screws from the hood, and carefully remove the hood. To reset the circuit breaker, wait for a correct speed reading. 1/8" 44 33 Top View 50 45 13 d. If necessary, loosen the Screw (33), move the Reed Switch slightly, and then retighten the Screw. c Tripped Reset PROBLEM: The power turns off circuit breaker located on SOLUTION: a. Important: The treadmill is needed, please see the front cover of this manual...
... key from the console. Remove the screws from the hood, and carefully remove the hood. To reset the circuit breaker, wait for a correct speed reading. 1/8" 44 33 Top View 50 45 13 d. If necessary, loosen the Screw (33), move the Reed Switch slightly, and then retighten the Screw. c Tripped Reset PROBLEM: The power turns off circuit breaker located on SOLUTION: a. Important: The treadmill is needed, please see the front cover of this manual...
English Manual
Page 14
... the walking belt is properly tightened. 14 Using b the allen wrench, turn . b. Then, plug in the power cord, insert the key, and run the treadmill for a few minutes. b 2"-3" Rear Roller Bolts c. b. Repeat until the walking belt is correctly tight- Use only a single-outlet surge suppressor that meets all of a turn both rear roller bolts clockwise, 1/4 of the specifications described on , see the front cover of a turn both rear roller bolts counterclockwise, 1/4 of this manual. Repeat until the walking belt...
... the walking belt is properly tightened. 14 Using b the allen wrench, turn . b. Then, plug in the power cord, insert the key, and run the treadmill for a few minutes. b 2"-3" Rear Roller Bolts c. b. Repeat until the walking belt is correctly tight- Use only a single-outlet surge suppressor that meets all of a turn both rear roller bolts clockwise, 1/4 of the specifications described on , see the front cover of a turn both rear roller bolts counterclockwise, 1/4 of this manual. Repeat until the walking belt...

English Manual
Page 15
... accuracy of the treadmill until your exercise program. For more detailed exercise information, obtain a reputable book or consult your body uses easily accessible carbohydrate calories for 20 to the nearest ten years). The following three parts: A Warm-up increases your training zone. During the first few weeks of time. A proper warm-up -Start each workout with preexisting health problems. The pulse sensor is not a medical...
... accuracy of the treadmill until your exercise program. For more detailed exercise information, obtain a reputable book or consult your body uses easily accessible carbohydrate calories for 20 to the nearest ten years). The following three parts: A Warm-up increases your training zone. During the first few weeks of time. A proper warm-up -Start each workout with preexisting health problems. The pulse sensor is not a medical...
English Manual
Page 16
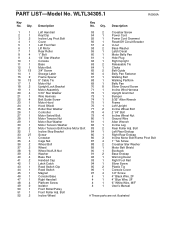
.../Clip Incline Leg Pivot Bolt Cover Left Foot Rail Lift Motor Rear Roller 1" Bolt 1/4" Star Washer Console Base Motor Belt 3/4" Screw Storage Latch Frame Spacer 8" Cable Tie Motor Nut Upright Lock Bracket Motor Assembly 5/16" Star Washer Wire Harness Belt Guide Screw Motor Hood Hood Shield Roller Star Washer Controller Motor Swivel Bolt Motor Tension Nut Motor Star Washer Motor Tension Washer Motor Tension Bolt/Incline Motor Bolt Incline Stop Bracket Screw Crossbar Cage Nut Wheel Bolt Wheel Wheel Nut/Lift Nut Washer Base Pad Handrail Cap Latch Catch Reed Switch Clip Reed Switch Magnet Console...
.../Clip Incline Leg Pivot Bolt Cover Left Foot Rail Lift Motor Rear Roller 1" Bolt 1/4" Star Washer Console Base Motor Belt 3/4" Screw Storage Latch Frame Spacer 8" Cable Tie Motor Nut Upright Lock Bracket Motor Assembly 5/16" Star Washer Wire Harness Belt Guide Screw Motor Hood Hood Shield Roller Star Washer Controller Motor Swivel Bolt Motor Tension Nut Motor Star Washer Motor Tension Washer Motor Tension Bolt/Incline Motor Bolt Incline Stop Bracket Screw Crossbar Cage Nut Wheel Bolt Wheel Wheel Nut/Lift Nut Washer Base Pad Handrail Cap Latch Catch Reed Switch Clip Reed Switch Magnet Console...

English Manual
Page 17
PART IDENTIFICATION CHART Remove this chart and the EXPLODED DRAWING/PART LIST for future reference. 1/2" Screw (97)-4 Silver Ground Screw (70)-1 3/4" Screw (13)-8 Crossbar Screw (53)-2 1" Bolt (8)-4 1" Tek Screw (87)-4 2 1/4" Bolt (78)-4 1/4" Star Washer (9)-4 5/16" Star Washer (20)-4 Wheel Bolt (36)-2 Wheel Nut (38)-2 Crossbar Star Washer (88)-2 Save this chart and use it to identify small parts during assembly.
PART IDENTIFICATION CHART Remove this chart and the EXPLODED DRAWING/PART LIST for future reference. 1/2" Screw (97)-4 Silver Ground Screw (70)-1 3/4" Screw (13)-8 Crossbar Screw (53)-2 1" Bolt (8)-4 1" Tek Screw (87)-4 2 1/4" Bolt (78)-4 1/4" Star Washer (9)-4 5/16" Star Washer (20)-4 Wheel Bolt (36)-2 Wheel Nut (38)-2 Crossbar Star Washer (88)-2 Save this chart and use it to identify small parts during assembly.

English Manual
Page 18
EXPLODED DRAWING-Model No. WLTL34305.1 R0906A 46 90 92 97 4 97 97 71 81 86 31 32 5 49 42 33 48 38 6 75 38 7 84 25 39 83 ...
EXPLODED DRAWING-Model No. WLTL34305.1 R0906A 46 90 92 97 4 97 97 71 81 86 31 32 5 49 42 33 48 38 6 75 38 7 84 25 39 83 ...
English Manual
Page 19
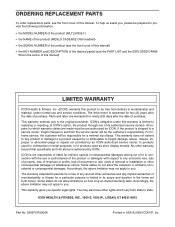
...-authorized by ICON. to the original purchaser. No other warranties and any implied warranties of the desired part(s) (see the front cover of this manual. Accordingly, the above limitation may not apply to provide the following information: • the MODEL NUMBER of the product (WLTL34305.1) • the NAME of the product (WESLO CADENCE C66 treadmill) • the SERIAL NUMBER of the product (see the PART LIST and the...
...-authorized by ICON. to the original purchaser. No other warranties and any implied warranties of the desired part(s) (see the front cover of this manual. Accordingly, the above limitation may not apply to provide the following information: • the MODEL NUMBER of the product (WLTL34305.1) • the NAME of the product (WESLO CADENCE C66 treadmill) • the SERIAL NUMBER of the product (see the PART LIST and the...


