
English Manual
Page 7
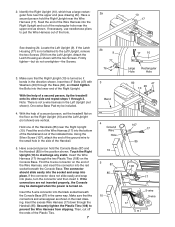
...the Right Upright. Insert the excess Wire Harness (17) down through the Base (82), and hand tighten the Bolts into place, turn the connector and then insert it bends in the position shown. Then, cut off the ends of a second person, tip the treadmill onto its other side and repeat...). If necessary, use needlenose pliers to pull the Wire Harness out of the Wire Harness, and insert the connector into the bottom of the Handrail and out of a second person, set the treadmill flat on the Console Base. Feed the end of the Wire Harness (17) into the red socket beneath the Console ...
...the Right Upright. Insert the excess Wire Harness (17) down through the Base (82), and hand tighten the Bolts into place, turn the connector and then insert it bends in the position shown. Then, cut off the ends of a second person, tip the treadmill onto its other side and repeat...). If necessary, use needlenose pliers to pull the Wire Harness out of the Wire Harness, and insert the connector into the bottom of the Handrail and out of a second person, set the treadmill flat on the Console Base. Feed the end of the Wire Harness (17) into the red socket beneath the Console ...
English Manual
Page 8
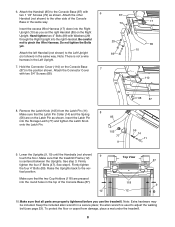
...) down into the round holes in the top of the Console Base in the Left Upright. 7. Make sure that the treadmill Frame (12) is not a wire harness in the same way. Be careful not to adjust the walking belt (see page 23). Remove the Latch Knob (105) from damage, place a mat under ... sure that the two Cup Holders (118) are pressed into the Right Upright (10) as you use the treadmill. the allen wrench is used to pinch the Wire Harness. Make sure that all parts are on the Latch Pin as shown. Hold the Connector Cover (110) on the Right Upright. Firmly tighten the...
...) down into the round holes in the top of the Console Base in the Left Upright. 7. Make sure that the treadmill Frame (12) is not a wire harness in the same way. Be careful not to adjust the walking belt (see page 23). Remove the Latch Knob (105) from damage, place a mat under ... sure that the two Cup Holders (118) are pressed into the Right Upright (10) as you use the treadmill. the allen wrench is used to pinch the Wire Harness. Make sure that all parts are on the Latch Pin as shown. Hold the Connector Cover (110) on the Right Upright. Firmly tighten the...
English Manual
Page 27
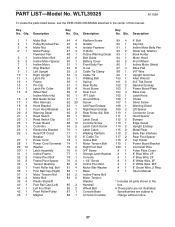
...Edge Guard Upright Endcap Metal Plate Belly Pan Interface Rear Foot Spacer Cup Holder Power Board Bracket Controller Wire Pulse Plate Cover 8" Blue Wire, 2F 4" Blue Wire, 2F 8" White Wire, 2F 4" White Wire, M/F 8" Green Wire, 2 Ring User's Manual * Includes all parts shown in the center of this manual. Description...Bracket Left Upright Right Upright Latch Pin Frame Pin Clip Latch Pin Collar Wheel Nut/ Incline Motor Nut Belt Guide Screw Wire Harness Hood Bracket Front Hood Bracket Warning Decal Reed Switch Reed Switch Clip Power Board Controller Electronics Bracket Reset/Off Circuit Breaker ...
...Edge Guard Upright Endcap Metal Plate Belly Pan Interface Rear Foot Spacer Cup Holder Power Board Bracket Controller Wire Pulse Plate Cover 8" Blue Wire, 2F 4" Blue Wire, 2F 8" White Wire, 2F 4" White Wire, M/F 8" Green Wire, 2 Ring User's Manual * Includes all parts shown in the center of this manual. Description...Bracket Left Upright Right Upright Latch Pin Frame Pin Clip Latch Pin Collar Wheel Nut/ Incline Motor Nut Belt Guide Screw Wire Harness Hood Bracket Front Hood Bracket Warning Decal Reed Switch Reed Switch Clip Power Board Controller Electronics Bracket Reset/Off Circuit Breaker ...


