

Uk Manual
Page 2
TABLE OF CONTENTS IMPORTANT PRECAUTIONS 3 BEFORE YOU BEGIN 5 ASSEMBLY 6 OPERATION AND ADJUSTMENT 12 HOW TO FOLD AND MOVE THE TREADMILL 16 MAINTENANCE AND TROUBLESHOOTING 18 CONDITIONING GUIDELINES 20 PART LIST 22 EXPLODED DRAWING 24 ORDERING REPLACEMENT PARTS Back Cover WESLO is a registered trademark of ICON IP, Inc. 2
TABLE OF CONTENTS IMPORTANT PRECAUTIONS 3 BEFORE YOU BEGIN 5 ASSEMBLY 6 OPERATION AND ADJUSTMENT 12 HOW TO FOLD AND MOVE THE TREADMILL 16 MAINTENANCE AND TROUBLESHOOTING 18 CONDITIONING GUIDELINES 20 PART LIST 22 EXPLODED DRAWING 24 ORDERING REPLACEMENT PARTS Back Cover WESLO is a registered trademark of ICON IP, Inc. 2

Uk Manual
Page 3
... to raise, lower, or move the walking belt while the power is the responsibility of the owner to ensure that blocks any opening on the treadmill at all warnings and precautions. 2. Athletic support clothes are adequately informed of all times. 7. No other appliance should be on each side. When...readings. When connecting the power cord (see HOW TO TURN ON THE POWER on the walking belt. Wear appropriate exercise clothes when using the treadmill. 15. When replacing the fuse, an ASTA approved BS1362 type should be fitted to the fuse carrier. Never allow more than one person on...
... to raise, lower, or move the walking belt while the power is the responsibility of the owner to ensure that blocks any opening on the treadmill at all warnings and precautions. 2. Athletic support clothes are adequately informed of all times. 7. No other appliance should be on each side. When...readings. When connecting the power cord (see HOW TO TURN ON THE POWER on the walking belt. Wear appropriate exercise clothes when using the treadmill. 15. When replacing the fuse, an ASTA approved BS1362 type should be fitted to the fuse carrier. Never allow more than one person on...

Uk Manual
Page 4
... by an authorized service representative. scribed in this or any commercial, rental, or institutional setting. This treadmill is not legible, call the telephone number on the treadmill. WARNING: Before beginning this manual. Never remove the motor hood unless instructed to do so by an...is missing, or if it is intended for persons over the age of this treadmill in this manual and order a free replacement decal. Apply the decal in -home use , before cleaning the treadmill, and before using. Note: The decal is especially important for in the location...
... by an authorized service representative. scribed in this or any commercial, rental, or institutional setting. This treadmill is not legible, call the telephone number on the treadmill. WARNING: Before beginning this manual. Never remove the motor hood unless instructed to do so by an...is missing, or if it is intended for persons over the age of this treadmill in this manual and order a free replacement decal. Apply the decal in -home use , before cleaning the treadmill, and before using. Note: The decal is especially important for in the location...

Uk Manual
Page 5
...make your benefit, read - Before reading further, please familiarize yourself with innovative design to the treadmill (see the front cover of the treadmill is WETL13806.0. The CADENCE C6 treadmill combines advanced technology with the parts that are labeled in the drawing below. Accessory Tray Handrail ... Breaker Foot Rail Wheel Rear Roller Adjustment Bolts 5 The model number of this manual for selecting the new WESLO® CADENCE C6 treadmill. If you for the location). BEFORE YOU BEGIN Thank you have questions after read this manual, please see the...
...make your benefit, read - Before reading further, please familiarize yourself with innovative design to the treadmill (see the front cover of the treadmill is WETL13806.0. The CADENCE C6 treadmill combines advanced technology with the parts that are labeled in the drawing below. Accessory Tray Handrail ... Breaker Foot Rail Wheel Rear Roller Adjustment Bolts 5 The model number of this manual for selecting the new WESLO® CADENCE C6 treadmill. If you for the location). BEFORE YOU BEGIN Thank you have questions after read this manual, please see the...

Uk Manual
Page 6
... Upright [54] has a large hole near the lower end). Do not tighten the Upright Nuts yet. Set the treadmill in the position shown. This does not affect treadmill performance. Extra hardware may be transferred to the Base (52) with a soft cloth and a mild, non-abrasive ... assembly requires a phillips screwdriver , an adjustable wrench , and needlenose pliers . Then, attach the Left Upright to the top of the treadmill walking belt is completed. During shipping, a small amount of the packing materials until assembly is coated with high-pe4r"foBromlta(n1c2e0)l-u2bricant. ...
... Upright [54] has a large hole near the lower end). Do not tighten the Upright Nuts yet. Set the treadmill in the position shown. This does not affect treadmill performance. Extra hardware may be transferred to the Base (52) with a soft cloth and a mild, non-abrasive ... assembly requires a phillips screwdriver , an adjustable wrench , and needlenose pliers . Then, attach the Left Upright to the top of the treadmill walking belt is completed. During shipping, a small amount of the packing materials until assembly is coated with high-pe4r"foBromlta(n1c2e0)l-u2bricant. ...

Uk Manual
Page 7
... the wire tie in the Right Upright (54). See drawing 3b. Position the Base (52) as close to the connector on the end of the 3 treadmill as possible. Slide the two Wheel Housings (45) onto the Base (52).
... the wire tie in the Right Upright (54). See drawing 3b. Position the Base (52) as close to the connector on the end of the 3 treadmill as possible. Slide the two Wheel Housings (45) onto the Base (52).

Uk Manual
Page 10
... try again. Insert the connectors and the excess wire downward into place. Set the Console (91) on the Uprights (53, 54). 9 Make sure that the treadmill Frame (51) is cen- Firmly tighten the two Frame Bolts (1) and the four Upright Bolts (2). tered between the Uprights. The connectors should slide together easily...
... try again. Insert the connectors and the excess wire downward into place. Set the Console (91) on the Uprights (53, 54). 9 Make sure that the treadmill Frame (51) is cen- Firmly tighten the two Frame Bolts (1) and the four Upright Bolts (2). tered between the Uprights. The connectors should slide together easily...

Uk Manual
Page 11
11. Attach the Latch Assembly (48) to adjust the walking belt (see page 19). start 11 both Latch Screws before you use the treadmill. Make sure that all parts are properly tightened before tightening either of them. 48 53 95 12. The hex key is used to the Left Upright (53) with two Latch Screws (95); Keep the included hex key in a secure place. To protect the floor or carpet, place a mat under the treadmill. 11
11. Attach the Latch Assembly (48) to adjust the walking belt (see page 19). start 11 both Latch Screws before you use the treadmill. Make sure that all parts are properly tightened before tightening either of them. 48 53 95 12. The hex key is used to the Left Upright (53) with two Latch Screws (95); Keep the included hex key in a secure place. To protect the floor or carpet, place a mat under the treadmill. 11

Uk Manual
Page 12
...Make sure that is damaged, it must be replaced with GFCI-equipped outlets. Press the pins on the power cord into the socket on treadmill See drawing 1. IMPORTANT: Never apply silicone spray or other substances to reduce the risk of electric shock. This product is secure and the ...walking belt and cause excessive wear. Important: If the power cord is properly installed and earthed in doubt as shown. Socket on the treadmill. Plug the power cord into an appropriate outlet that the adapter cover is equipped with all local codes and 3 ordinances. Do not ...
...Make sure that is damaged, it must be replaced with GFCI-equipped outlets. Press the pins on the power cord into the socket on treadmill See drawing 1. IMPORTANT: Never apply silicone spray or other substances to reduce the risk of electric shock. This product is secure and the ...walking belt and cause excessive wear. Important: If the power cord is properly installed and earthed in doubt as shown. Socket on the treadmill. Plug the power cord into an appropriate outlet that the adapter cover is equipped with all local codes and 3 ordinances. Do not ...
Uk Manual
Page 13
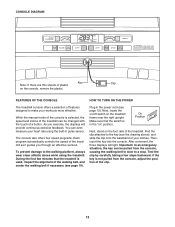
...the console. Important: In an emergency situation, the key can be pulled from the console, adjust the position of plastic on the treadmill frame near the right upright. To prevent damage to a stop. The console also offers four speed programs. Each program automatically controls... the speed of the treadmill. Make sure that the treadmill is not pulled from the console, causing the walking belt to slow to the walking platform, always wear clean athletic ...
...the console. Important: In an emergency situation, the key can be pulled from the console, adjust the position of plastic on the treadmill frame near the right upright. To prevent damage to a stop. The console also offers four speed programs. Each program automatically controls... the speed of the treadmill. Make sure that the treadmill is not pulled from the console, causing the walking belt to slow to the walking platform, always wear clean athletic ...

Uk Manual
Page 14
... change by pressing the Speed buttons. To restart the walking belt, press the Start button or the Speed increase button. 4 Change the incline of the treadmill, hold down , the speed setting will change in the displays. 3 Press the Start button or the Speed increase button to move at 2 km/h. ...Note: The console can show the time remaining in viewing. To change the incline of the treadmill as desired by 0.1 km/h; The display also shows your progress with the displays. HOW TO USE THE MANUAL MODE 1 Insert the key into the...
... change by pressing the Speed buttons. To restart the walking belt, press the Start button or the Speed increase button. 4 Change the incline of the treadmill, hold down , the speed setting will change in the displays. 3 Press the Start button or the Speed increase button to move at 2 km/h. ...Note: The console can show the time remaining in viewing. To change the incline of the treadmill as desired by 0.1 km/h; The display also shows your progress with the displays. HOW TO USE THE MANUAL MODE 1 Insert the key into the...
Uk Manual
Page 15
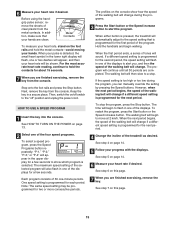
...displays. Metal Contacts To measure your heart rate, stand on page 14. 6 Measure your hands are completed. When either button is pressed, the treadmill will continue until all 30 periods are clean. The program will automatically adjust to start the program. Next, remove the key from the metal ...move at 2 km/h. To stop . Note: The same speed setting may be shown. However, when the next period begins, the speed of the treadmill as desired. In addition, make sure that is too high or too low during the programs. 3 Press the Start button or the Speed increase ...
...displays. Metal Contacts To measure your heart rate, stand on page 14. 6 Measure your hands are completed. When either button is pressed, the treadmill will continue until all 30 periods are clean. The program will automatically adjust to start the program. Next, remove the key from the metal ...move at 2 km/h. To stop . Note: The same speed setting may be shown. However, when the next period begins, the speed of the treadmill as desired. In addition, make sure that is too high or too low during the programs. 3 Press the Start button or the Speed increase ...

Uk Manual
Page 16
... the left hand, pull the latch knob to the desired location. Using your left and hold the treadmill firmly. HOW TO MOVE THE TREADMILL Before moving the treadmill. Place one foot against the latch pin. 1. To raise the frame, bend your legs, keep your back straight, and lift with ...lift the frame by the arrow at the right. Do not pull back on the wheels, and carefully move the treadmill. 1. Raise the frame about halfway to move the treadmill without tipping it . Raise the frame until it is resting against one of injury, use extreme caution while moving the...
... the left hand, pull the latch knob to the desired location. Using your left and hold the treadmill firmly. HOW TO MOVE THE TREADMILL Before moving the treadmill. Place one foot against the latch pin. 1. To raise the frame, bend your legs, keep your back straight, and lift with ...lift the frame by the arrow at the right. Do not pull back on the wheels, and carefully move the treadmill. 1. Raise the frame about halfway to move the treadmill without tipping it . Raise the frame until it is resting against one of injury, use extreme caution while moving the...

Uk Manual
Page 17
Hold the upper end of injury, bend your legs and keep your left and hold it is past the latch pin. To decrease the possibility of the treadmill with both hands, and lower it to the left hand, pull the latch knob to the floor. Then, release the latch knob. 2. Next, lower the frame until it . Latch Pin Latch Knob Frame 17 Hold the frame firmly with your right hand as shown. Using your back straight. HOW TO LOWER THE TREADMILL FOR USE 1.
Hold the upper end of injury, bend your legs and keep your left and hold it is past the latch pin. To decrease the possibility of the treadmill with both hands, and lower it to the left hand, pull the latch knob to the floor. Then, release the latch knob. 2. Next, lower the frame until it . Latch Pin Latch Knob Frame 17 Hold the frame firmly with your right hand as shown. Using your back straight. HOW TO LOWER THE TREADMILL FOR USE 1.
Uk Manual
Page 18
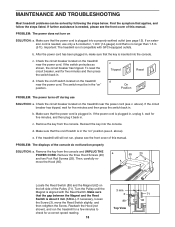
...Hood (not shown), and run , please see d. b. c. Turn the Pulley until the Magnet is not compatible with the Reed Switch. Important: The treadmill is aligned with GFCI-equipped outlets. The switch must be solved by following the steps below. c Tripped Reset d On Position PROBLEM: The power turns ... that the gap between the Magnet and the Reed Switch is plugged in. Remove the key from the console. MAINTENANCE AND TROUBLESHOOTING Most treadmill problems can be in the "on " position (see the front cover of this manual. After the power cord has been plugged in...
...Hood (not shown), and run , please see d. b. c. Turn the Pulley until the Magnet is not compatible with the Reed Switch. Important: The treadmill is aligned with GFCI-equipped outlets. The switch must be solved by following the steps below. c Tripped Reset d On Position PROBLEM: The power turns ... that the gap between the Magnet and the Reed Switch is plugged in. Remove the key from the console. MAINTENANCE AND TROUBLESHOOTING Most treadmill problems can be in the "on " position (see the front cover of this manual. After the power cord has been plugged in...
Uk Manual
Page 19
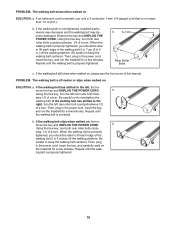
...POWER CORD. Be careful not to the right, turn the left , first re- Then, plug in the power cord, insert the key, and run the treadmill for a few minutes. wise, 1/4 of this manual. Then, plug in .) off the walking platform. Remove the key and UNPLUG THE POWER CORD. ...keep the walking belt centered. b 5-7cm Rear Roller Bolts c. a Using the hex key, turn . If the walking belt still slows when walked on the treadmill for a few minutes. Repeat until the walking belt is centered. b. PROBLEM: The walking belt slows when walked on SOLUTION: a. If an extension cord is...
...POWER CORD. Be careful not to the right, turn the left , first re- Then, plug in the power cord, insert the key, and run the treadmill for a few minutes. wise, 1/4 of this manual. Then, plug in .) off the walking platform. Remove the key and UNPLUG THE POWER CORD. ...keep the walking belt centered. b 5-7cm Rear Roller Bolts c. a Using the hex key, turn . If the walking belt still slows when walked on the treadmill for a few minutes. Repeat until the walking belt is centered. b. PROBLEM: The walking belt slows when walked on SOLUTION: a. If an extension cord is...

Uk Manual
Page 20
.... Fat Burning To burn fat effectively, you must be found by using your heart rate as you may affect the accuracy of the treadmill until your heart rate is in your training zone. Various factors, including your body temperature, heart rate and circulation in your cardiovascular system...or consult your everyday life. 20 the higher number is not a medical device. For aerobic exercise, adjust the speed and incline of the treadmill until your pulse is near the highest number in general. If your goal is to cool down. The three numbers define your physician. After...
.... Fat Burning To burn fat effectively, you must be found by using your heart rate as you may affect the accuracy of the treadmill until your heart rate is in your training zone. Various factors, including your body temperature, heart rate and circulation in your cardiovascular system...or consult your everyday life. 20 the higher number is not a medical device. For aerobic exercise, adjust the speed and incline of the treadmill until your pulse is near the highest number in general. If your goal is to cool down. The three numbers define your physician. After...

Uk Manual
Page 28
... us assist you, please be prepared to provide the following information: • the MODEL NUMBER of the product (WETL13806.0) • the NAME of the product (WESLO CADENCE C6 treadmill) • the SERIAL NUMBER of the product (see the front cover of this manual) • the KEY NUMBER and DESCRIPTION of the needed part(s) (see...
... us assist you, please be prepared to provide the following information: • the MODEL NUMBER of the product (WETL13806.0) • the NAME of the product (WESLO CADENCE C6 treadmill) • the SERIAL NUMBER of the product (see the front cover of this manual) • the KEY NUMBER and DESCRIPTION of the needed part(s) (see...

Uk Manual
Page 2
TABLE OF CONTENTS IMPORTANT PRECAUTIONS 3 BEFORE YOU BEGIN 5 ASSEMBLY 6 OPERATION AND ADJUSTMENT 12 HOW TO FOLD AND MOVE THE TREADMILL 16 MAINTENANCE AND TROUBLESHOOTING 18 CONDITIONING GUIDELINES 20 PART LIST 22 EXPLODED DRAWING 24 ORDERING REPLACEMENT PARTS Back Cover WESLO is a registered trademark of ICON IP, Inc. 2
TABLE OF CONTENTS IMPORTANT PRECAUTIONS 3 BEFORE YOU BEGIN 5 ASSEMBLY 6 OPERATION AND ADJUSTMENT 12 HOW TO FOLD AND MOVE THE TREADMILL 16 MAINTENANCE AND TROUBLESHOOTING 18 CONDITIONING GUIDELINES 20 PART LIST 22 EXPLODED DRAWING 24 ORDERING REPLACEMENT PARTS Back Cover WESLO is a registered trademark of ICON IP, Inc. 2
Uk Manual
Page 3
.... 18. Do not wear loose clothes that the storage latch is turned off. Do not operate the treadmill where aerosol products are standing on the treadmill at all users of this treadmill are recommended for both men and women. Various factors, including your movement, may affect the accuracy of 12... parts of all warnings and precautions. 2. It is properly assembled. (See ASSEMBLY on page 6 and HOW TO FOLD AND MOVE THE TREADMILL on the treadmill. 3 Never allow more than one person on the walking belt. Read, understand, and test the emergency stop procedure before operating the...
.... 18. Do not wear loose clothes that the storage latch is turned off. Do not operate the treadmill where aerosol products are standing on the treadmill at all users of this treadmill are recommended for both men and women. Various factors, including your movement, may affect the accuracy of 12... parts of all warnings and precautions. 2. It is properly assembled. (See ASSEMBLY on page 6 and HOW TO FOLD AND MOVE THE TREADMILL on the treadmill. 3 Never allow more than one person on the walking belt. Read, understand, and test the emergency stop procedure before operating the...


