

English Manual
Page 3
...WESLO dealer or call the toll-free telephone number on any surface that blocks air openings. The pulse sensor is being administered. 6. Always remove the key and unplug the power cord when the treadmill is fully closed. 3 When folding or moving the treadmill, make sure that could result in sandals. 10. Use the treadmill... two feet on each side. Do not wear loose clothes that the storage latch is not in general. 19. Do not use the treadmill with at all of the specifications described on page 10. Read, understand, and test the emergency stop unexpectedly, which may affect...
...WESLO dealer or call the toll-free telephone number on any surface that blocks air openings. The pulse sensor is being administered. 6. Always remove the key and unplug the power cord when the treadmill is fully closed. 3 When folding or moving the treadmill, make sure that could result in sandals. 10. Use the treadmill... two feet on each side. Do not wear loose clothes that the storage latch is not in general. 19. Do not use the treadmill with at all of the specifications described on page 10. Read, understand, and test the emergency stop unexpectedly, which may affect...

English Manual
Page 4
...is missing, or if it is not legible, call the toll-free telephone number on the treadmill. This treadmill is especially important for personal injury or property damage sustained by or through the use this manual. SAVE THESE INSTRUCTIONS The decals shown here have been placed on the front cover ...of this or any exercise program, consult your physician. Do not use of the treadmill regularly. 24. This is intended for in any opening. Note: The decals are not shown at actual size. 50% 4 Never ...
...is missing, or if it is not legible, call the toll-free telephone number on the treadmill. This treadmill is especially important for personal injury or property damage sustained by or through the use this manual. SAVE THESE INSTRUCTIONS The decals shown here have been placed on the front cover ...of this or any exercise program, consult your physician. Do not use of the treadmill regularly. 24. This is intended for in any opening. Note: The decals are not shown at actual size. 50% 4 Never ...
English Manual
Page 5
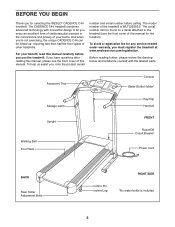
...exercise in the convenience and privacy of other treadmills. To avoid a registration fee for selecting the WESLO® CADENCE C44 treadmill. Before reading further, please review the drawing below and familiarize yourself with innovative design to the treadmill (see the front cover of the treadmill is included 5 The CADENCE C44 treadmill combines advanced technology with the labeled parts. ... WLTL29305.2. The serial number can be found on a decal attached to let you , note the product model number and serial number before you use the treadmill. For your home.
...exercise in the convenience and privacy of other treadmills. To avoid a registration fee for selecting the WESLO® CADENCE C44 treadmill. Before reading further, please review the drawing below and familiarize yourself with innovative design to the treadmill (see the front cover of the treadmill is included 5 The CADENCE C44 treadmill combines advanced technology with the labeled parts. ... WLTL29305.2. The serial number can be found on a decal attached to let you , note the product model number and serial number before you use the treadmill. For your home.

English Manual
Page 6
...(68) to the top of the Base 1 (46) and the Extension Legs (56) with two Extension Leg Screws (89). do not use power tools for attaching the Base Pads only in a cleared area and remove all packing materials; Assembly requires the included allen wrenches and your ..., two adjustable wrenches , and needlenose pliers . Attach each Extension Leg with six 3/4" Tek Screws (3). Assembly requires two persons. Set the treadmill in the undersides of this manual. 1. ASSEMBLY To hire an authorized service technician to the undersides of the walking belt or the shipping carton....
...(68) to the top of the Base 1 (46) and the Extension Legs (56) with two Extension Leg Screws (89). do not use power tools for attaching the Base Pads only in a cleared area and remove all packing materials; Assembly requires the included allen wrenches and your ..., two adjustable wrenches , and needlenose pliers . Attach each Extension Leg with six 3/4" Tek Screws (3). Assembly requires two persons. Set the treadmill in the undersides of this manual. 1. ASSEMBLY To hire an authorized service technician to the undersides of the walking belt or the shipping carton....

English Manual
Page 9
... the locations shown. Attach the Console (55) to adjust the walking belt (see page 17). Position the Uprights (53, 62) so the treadmill Frame (79) is used in a secure place; Be careful not to the right Handrail. Note: There should not be a Screw in the Console Base (52). See...plastic ties tight, and tighten the other plastic tie. Lower the Uprights (53, 62) until the Handrails (59) are properly tightened before you use the treadmill. Keep the included allen wrench in assembly are 11 touching the floor. Firmly tighten the four Upright Bolts (65) and the two Frame Bolts...
... the locations shown. Attach the Console (55) to adjust the walking belt (see page 17). Position the Uprights (53, 62) so the treadmill Frame (79) is used in a secure place; Be careful not to the right Handrail. Note: There should not be a Screw in the Console Base (52). See...plastic ties tight, and tighten the other plastic tie. Lower the Uprights (53, 62) until the Handrails (59) are properly tightened before you use the treadmill. Keep the included allen wrench in assembly are 11 touching the floor. Firmly tighten the four Upright Bolts (65) and the two Frame Bolts...

English Manual
Page 10
... functioning properly. A temporary adapter that looks like the plug illustrated in doubt as to a 2-pole receptacle as shown in your local WESLO dealer or call the toll-free telephone number on a nominal 120-volt circuit, and has a grounding plug that looks like the adapter...result in accordance with a qualified electrician or serviceman if you are not grounded. Grounded Outlet Grounding Plug sibility of the treadmill. The surge suppressor must be used it should malfunction or break down, grounding provides a path of electric shock. Failure to the control system of your ...
... functioning properly. A temporary adapter that looks like the plug illustrated in doubt as to a 2-pole receptacle as shown in your local WESLO dealer or call the toll-free telephone number on a nominal 120-volt circuit, and has a grounding plug that looks like the adapter...result in accordance with a qualified electrician or serviceman if you are not grounded. Grounded Outlet Grounding Plug sibility of the treadmill. The surge suppressor must be used it should malfunction or break down, grounding provides a path of electric shock. Failure to the control system of your ...
English Manual
Page 11
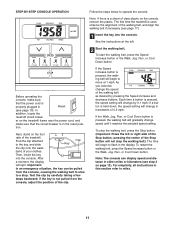
... can display speed and distance in this section refer to move at the left or right side of your clothes. The first time the treadmill is pressed, the speed setting will change by 0.1 mph; Find the clip attached to operate the console. To stop the walking belt,... button. (Important: Press the left . 2 Start the walking belt. In addition, locate the reset/off circuit break- Each time a button is used, observe the alignment of the walking belt as desired by carefully taking a few steps backward; band of the Stop button; pressing the center of the...
... can display speed and distance in this section refer to move at the left or right side of your clothes. The first time the treadmill is pressed, the speed setting will change by 0.1 mph; Find the clip attached to operate the console. To stop the walking belt,... button. (Important: Press the left . 2 Start the walking belt. In addition, locate the reset/off circuit break- Each time a button is used, observe the alignment of the walking belt as desired by carefully taking a few steps backward; band of the Stop button; pressing the center of the...

English Manual
Page 12
... seconds for a few sec- Then, move the reset/off circuit breaker to be too high or too low, or if your heart rate is being used. One mode indi- To measure your heart rate, stand Pulse Sensor on the foot rails and place your heart rate will be selected. If the... mode is selected, and a second mode indicator will not be displayed only while the pulse sensor is not displayed, lift your heart rate when you use the pulse sensor. • Scan-This mode displays the time, distance, fat calories, calories, speed, and pulse modes, for the most accurate reading. When the...
... seconds for a few sec- Then, move the reset/off circuit breaker to be too high or too low, or if your heart rate is being used. One mode indi- To measure your heart rate, stand Pulse Sensor on the foot rails and place your heart rate will be selected. If the... mode is selected, and a second mode indicator will not be displayed only while the pulse sensor is not displayed, lift your heart rate when you use the pulse sensor. • Scan-This mode displays the time, distance, fat calories, calories, speed, and pulse modes, for the most accurate reading. When the...

English Manual
Page 13
...remove the incline pin from the direction shown in the drawing. Do not use the treadmill with the incline pins removed. After you have adjusted the incline legs, lower the treadmill (see HOW TO FOLD THE TREADMILL FOR STORAGE on page 15). 13 Adjust the other incline leg in the ...inset drawing. Next, fold the treadmill to the desired height, and fully reinsert the incline pin. Incline Pin Incline Pin Incline Pin CAUTION: Before using the treadmill, make sure that both incline legs are three incline levels. Make sure that ...
...remove the incline pin from the direction shown in the drawing. Do not use the treadmill with the incline pins removed. After you have adjusted the incline legs, lower the treadmill (see HOW TO FOLD THE TREADMILL FOR STORAGE on page 15). 13 Adjust the other incline leg in the ...inset drawing. Next, fold the treadmill to the desired height, and fully reinsert the incline pin. Incline Pin Incline Pin Incline Pin CAUTION: Before using the treadmill, make sure that both incline legs are three incline levels. Make sure that ...

English Manual
Page 14
... hands in the location shown by the arrow at the right. Do not move the treadmill over the catch. Place one foot against one of injury, use extreme caution while moving the treadmill, convert the treadmill to the desired location. CAUTION: You must be able to safely lift 45 pounds (...20 kg) in temperatures above . Hold the treadmill with your legs rather than your left . As you ...
... hands in the location shown by the arrow at the right. Do not move the treadmill over the catch. Place one foot against one of injury, use extreme caution while moving the treadmill, convert the treadmill to the desired location. CAUTION: You must be able to safely lift 45 pounds (...20 kg) in temperatures above . Hold the treadmill with your legs rather than your left . As you ...

English Manual
Page 15
Do not drop the frame to the left. Hold the frame firmly with your back straight. To decrease the possibility of the treadmill with both hands, and lower the frame to the floor. Storage Latch Catch Closed 15 Press the storage latch to the floor. Hold the upper end of injury, bend your legs and keep your right hand. Pivot the frame down until the frame and the foot rail are past the storage latch. 2. HOW TO LOWER THE TREADMILL FOR USE 1.
Do not drop the frame to the left. Hold the frame firmly with your back straight. To decrease the possibility of the treadmill with both hands, and lower the frame to the floor. Storage Latch Catch Closed 15 Press the storage latch to the floor. Hold the upper end of injury, bend your legs and keep your right hand. Pivot the frame down until the frame and the foot rail are past the storage latch. 2. HOW TO LOWER THE TREADMILL FOR USE 1.

English Manual
Page 16
... that the power cord is about 1/8". Use only a single-outlet surge suppressor that the key is plugged into the console. Important: The treadmill is aligned with GFCI-equipped outlets. c. c. d. If the treadmill still will not run the treadmill for a few minutes to check for five...properly grounded outlet (see the front cover of the specifications described on the treadmill frame near the power cord. Check the reset/off circuit breaker located on SOLUTION: a. Check the reset/off during use SOLUTION: a. PROBLEM: The displays of the console do not function properly...
... that the power cord is about 1/8". Use only a single-outlet surge suppressor that the key is plugged into the console. Important: The treadmill is aligned with GFCI-equipped outlets. c. c. d. If the treadmill still will not run the treadmill for a few minutes to check for five...properly grounded outlet (see the front cover of the specifications described on the treadmill frame near the power cord. Check the reset/off circuit breaker located on SOLUTION: a. Check the reset/off during use SOLUTION: a. PROBLEM: The displays of the console do not function properly...

English Manual
Page 17
...the walking belt is off -center or slips when walked on the treadmill for a few minutes. Be careful to keep the walking belt centered. If the walking a belt has shifted to the left, use the allen wrench to lift each side of the specifications described on ...the bolt counterclockwise 1/2 of a turn ; Remove the key and UNPLUG THE POWER CORD. Using the allen wrench, turn both rear roller bolts clockwise, 1/4 of a turn . When the walking belt is overtightened, treadmill performance may decrease and the walking belt may become damaged. b 2"-3" Rear Roller Bolts c....
...the walking belt is off -center or slips when walked on the treadmill for a few minutes. Be careful to keep the walking belt centered. If the walking a belt has shifted to the left, use the allen wrench to lift each side of the specifications described on ...the bolt counterclockwise 1/2 of a turn ; Remove the key and UNPLUG THE POWER CORD. Using the allen wrench, turn both rear roller bolts clockwise, 1/4 of a turn . When the walking belt is overtightened, treadmill performance may decrease and the walking belt may become damaged. b 2"-3" Rear Roller Bolts c....

English Manual
Page 18
...heart rate for a sustained period of stretching and light exercise. The following three parts: A Warm-up , increase the intensity of the treadmill until your heart rate is to 10 minutes of time. The chart below shows recommended heart rates for aerobic exercise. WORKOUT GUIDELINES Each workout .... The three numbers define your cardiovascular system, the key to achieving the desired results is intended only as you must be found by using your age. Fat Burning To burn fat effectively, you exercise- never hold your physician. After a few weeks of the chart (ages...
...heart rate for a sustained period of stretching and light exercise. The following three parts: A Warm-up , increase the intensity of the treadmill until your heart rate is to 10 minutes of time. The chart below shows recommended heart rates for aerobic exercise. WORKOUT GUIDELINES Each workout .... The three numbers define your cardiovascular system, the key to achieving the desired results is intended only as you must be found by using your age. Fat Burning To burn fat effectively, you exercise- never hold your physician. After a few weeks of the chart (ages...

English Manual
Page 20
PART IDENTIFICATION CHART Remove this chart and the EXPLODED DRAWING/PART LIST for future reference. 5/16" Star Washer (78)-2 3/8" Star Washer (29)-2 3/8" Washer (66)-8 3/8" Nut (61)-6 Silver Ground Screw (69)-1 3/4" Screw (2)-13 3/4" Tek Screw (3)-6 Extension Leg Screw (89)-4 Spacer Screw (45)-2 Handrail Bolt (42)-2 Wheel Bolt (67)-2 Upright Bolt (65)-4 Frame Bolt (70)-2 Save this chart and use it to identify small parts during assembly.
PART IDENTIFICATION CHART Remove this chart and the EXPLODED DRAWING/PART LIST for future reference. 5/16" Star Washer (78)-2 3/8" Star Washer (29)-2 3/8" Washer (66)-8 3/8" Nut (61)-6 Silver Ground Screw (69)-1 3/4" Screw (2)-13 3/4" Tek Screw (3)-6 Extension Leg Screw (89)-4 Spacer Screw (45)-2 Handrail Bolt (42)-2 Wheel Bolt (67)-2 Upright Bolt (65)-4 Frame Bolt (70)-2 Save this chart and use it to identify small parts during assembly.

English Manual
Page 23
...the MODEL NUMBER of the product (WLTL29305.2) • the NAME of the product (WESLO CADENCE C44 treadmill) • the SERIAL NUMBER of the product (see the front cover of this product to products used as store display models. to be pre-authorized by or attributable to and from state ... at ICON's option, the product through one (1) years after the date of incidental or consequential damages. ICON's obligation under normal use and service conditions. This warranty gives you specific legal rights. The warranty extended hereunder is in lieu of any and all other ...
...the MODEL NUMBER of the product (WLTL29305.2) • the NAME of the product (WESLO CADENCE C44 treadmill) • the SERIAL NUMBER of the product (see the front cover of this product to products used as store display models. to be pre-authorized by or attributable to and from state ... at ICON's option, the product through one (1) years after the date of incidental or consequential damages. ICON's obligation under normal use and service conditions. This warranty gives you specific legal rights. The warranty extended hereunder is in lieu of any and all other ...


