

English Manual
Page 1
... products, prizes, fitness tips, and much more ! WLTL29305.2 Serial No. MST ON THE WEB: www.wesloservice.com USER'S MANUAL CAUTION Visit our website at www.weslo.com new products, prizes, fitness tips, and much more ! As a manufacturer, we are damaged or missing, PLEASE CONTACT OUR CUSTOMER SERVICE DEPARTMENT DIRECTLY. Serial Number...
... products, prizes, fitness tips, and much more ! WLTL29305.2 Serial No. MST ON THE WEB: www.wesloservice.com USER'S MANUAL CAUTION Visit our website at www.weslo.com new products, prizes, fitness tips, and much more ! As a manufacturer, we are damaged or missing, PLEASE CONTACT OUR CUSTOMER SERVICE DEPARTMENT DIRECTLY. Serial Number...
English Manual
Page 2
TABLE OF CONTENTS IMPORTANT PRECAUTIONS 3 BEFORE YOU BEGIN 5 ASSEMBLY 6 OPERATION AND ADJUSTMENT 10 HOW TO FOLD AND MOVE THE TREADMILL 14 MAINTENANCE AND TROUBLESHOOTING 16 CONDITIONING GUIDELINES 18 A PART IDENTIFICATION CHART 20 PART LIST 21 EXPLODED DRAWING 22 ORDERING REPLACEMENT PARTS Back Cover LIMITED WARRANTY Back Cover WESLO is a registered trademark of ICON IP, Inc. 2
TABLE OF CONTENTS IMPORTANT PRECAUTIONS 3 BEFORE YOU BEGIN 5 ASSEMBLY 6 OPERATION AND ADJUSTMENT 10 HOW TO FOLD AND MOVE THE TREADMILL 14 MAINTENANCE AND TROUBLESHOOTING 16 CONDITIONING GUIDELINES 18 A PART IDENTIFICATION CHART 20 PART LIST 21 EXPLODED DRAWING 22 ORDERING REPLACEMENT PARTS Back Cover LIMITED WARRANTY Back Cover WESLO is a registered trademark of ICON IP, Inc. 2

English Manual
Page 3
... Always remove the key and unplug the power cord when the treadmill is not a medical device. Always wear athletic shoes. No other appliance should not be on the same circuit. To purchase a surge suppressor, see your local WESLO dealer or call the toll-free telephone number on the front ...cover of this treadmill are used by placing objects under the treadmill. 22. Failure to use . 20. The pulse sensor is not in use a ...
... Always remove the key and unplug the power cord when the treadmill is not a medical device. Always wear athletic shoes. No other appliance should not be on the same circuit. To purchase a surge suppressor, see your local WESLO dealer or call the toll-free telephone number on the front ...cover of this treadmill are used by placing objects under the treadmill. 22. Failure to use . 20. The pulse sensor is not in use a ...

English Manual
Page 4
.... Never remove the motor hood unless instructed to do so by or through the use only. Do not use , before cleaning the treadmill, and before using. WARNING: Before beginning this manual should be performed by an authorized service representative only. 26. Apply the decal in...not shown at actual size. 50% 4 Inspect and properly tighten all instructions before performing the maintenance and adjustment procedures described in this treadmill in the location shown. Never drop or insert any object into any exercise program, consult your physician. SAVE THESE INSTRUCTIONS The decals ...
.... Never remove the motor hood unless instructed to do so by or through the use only. Do not use , before cleaning the treadmill, and before using. WARNING: Before beginning this manual should be performed by an authorized service representative only. 26. Apply the decal in...not shown at actual size. 50% 4 Inspect and properly tighten all instructions before performing the maintenance and adjustment procedures described in this treadmill in the location shown. Never drop or insert any object into any exercise program, consult your physician. SAVE THESE INSTRUCTIONS The decals ...
English Manual
Page 5
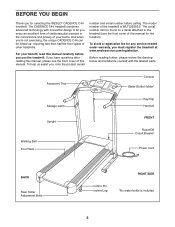
... manual for the location). To help us assist you, note the product model number and serial number before you use the treadmill. To avoid a registration fee for selecting the WESLO® CADENCE C44 treadmill. Accessory Tray Console Water Bottle Holder* Storage Latch Upright Walking Belt Foot Rails Key/Clip Handrail FRONT Reset/Off Circuit Breaker...
... manual for the location). To help us assist you, note the product model number and serial number before you use the treadmill. To avoid a registration fee for selecting the WESLO® CADENCE C44 treadmill. Accessory Tray Console Water Bottle Holder* Storage Latch Upright Walking Belt Foot Rails Key/Clip Handrail FRONT Reset/Off Circuit Breaker...

English Manual
Page 6
...(46). Attach each Extension Leg (56) with a Wheel Bolt (67), a 3/8" Washer (66), and a 3/8" Nut (61) as shown. This does not affect treadmill performance. If there is lubricant on top of the walking belt, simply wipe off the lubricant with high-performance lubricant. Attach six Base Pads (63...authorized service technician to the undersides of the Base 1 (46) and the Extension Legs (56) with six 3/4" Tek Screws (3). Note: The underside of the treadmill walking belt is completed. Attach a Wheel (68) to the top of the Base and the Extension Legs. 3 63 56 3 63 46 3 63 3 63...
...(46). Attach each Extension Leg (56) with a Wheel Bolt (67), a 3/8" Washer (66), and a 3/8" Nut (61) as shown. This does not affect treadmill performance. If there is lubricant on top of the walking belt, simply wipe off the lubricant with high-performance lubricant. Attach six Base Pads (63...authorized service technician to the undersides of the Base 1 (46) and the Extension Legs (56) with six 3/4" Tek Screws (3). Note: The underside of the treadmill walking belt is completed. Attach a Wheel (68) to the top of the Base and the Extension Legs. 3 63 56 3 63 46 3 63 3 63...

English Manual
Page 7
... two 3/8" Nuts (61) as shown. Then, remove the Frame Bolt. Do not tighten the Frame Bolt yet. Make sure 6 that the upper end of the treadmill. 27 79 46 29 66 70 7 Repeat this step on the floor. Note: The Left Upright does not have a large hole. 3 66 65 61 62...
... two 3/8" Nuts (61) as shown. Then, remove the Frame Bolt. Do not tighten the Frame Bolt yet. Make sure 6 that the upper end of the treadmill. 27 79 46 29 66 70 7 Repeat this step on the floor. Note: The Left Upright does not have a large hole. 3 66 65 61 62...

English Manual
Page 8
Attach the end of the hole in the drawing at the right. Set the Console Base (52) on the Right Upright (62), and tighten a Handrail Bolt (42) with the Silver Ground Screw (69). Plug the Wire Harness into the hole in the inset drawing. The connectors should slide together easily and snap into the Handrails and the Console Base. Route the Wire Harness (60) into the connector labeled "A" in the left side. 8. Set the Handrail (59) on the Handrails (59). If they are snug; Firmly tighten the Handrail Bolt. do not, turn the connector on the Wire Harness. IF ...
Attach the end of the hole in the drawing at the right. Set the Console Base (52) on the Right Upright (62), and tighten a Handrail Bolt (42) with the Silver Ground Screw (69). Plug the Wire Harness into the hole in the inset drawing. The connectors should slide together easily and snap into the Handrails and the Console Base. Route the Wire Harness (60) into the connector labeled "A" in the left side. 8. Set the Handrail (59) on the Handrails (59). If they are snug; Firmly tighten the Handrail Bolt. do not, turn the connector on the Wire Harness. IF ...

English Manual
Page 9
... plastic tie nearest to overtighten the Frame Bolts. 59 70 53, 62 65 59 Top View 62 12. Position the Uprights (53, 62) so the treadmill Frame (79) is used in the Console Base (52). Be careful not to the right Handrail. Lower the Uprights (53, 62) until the Handrails (59...) are properly tightened before you use the treadmill. To protect the floor or carpet, place a mat under the treadmill. 9 Set the Console (55) in assembly are 11 touching the floor. Cut off the ends of the plastic ties. Attach...
... plastic tie nearest to overtighten the Frame Bolts. 59 70 53, 62 65 59 Top View 62 12. Position the Uprights (53, 62) so the treadmill Frame (79) is used in the Console Base (52). Be careful not to the right Handrail. Lower the Uprights (53, 62) until the Handrails (59...) are properly tightened before you use the treadmill. To protect the floor or carpet, place a mat under the treadmill. 9 Set the Console (55) in assembly are 11 touching the floor. Cut off the ends of the plastic ties. Attach...

English Manual
Page 10
...changes in your local electronics store. The surge suppressor must be electrically rated for electric current to reduce the risk of your treadmill (see your local WESLO dealer or call the toll-free telephone number on a nominal 120-volt circuit, and has a grounding plug that is ... connect the surge suppressor to indicate whether it should be used it will deteriorate the walking belt and cause excessive wear. Check with your treadmill being turned on the surge suppressor to a 2-pole receptacle as a transient voltage surge suppressor (TVSS). Plug the power cord into a ...
...changes in your local electronics store. The surge suppressor must be electrically rated for electric current to reduce the risk of your treadmill (see your local WESLO dealer or call the toll-free telephone number on a nominal 120-volt circuit, and has a grounding plug that is ... connect the surge suppressor to indicate whether it should be used it will deteriorate the walking belt and cause excessive wear. Check with your treadmill being turned on the surge suppressor to a 2-pole receptacle as a transient voltage surge suppressor (TVSS). Plug the power cord into a ...
English Manual
Page 11
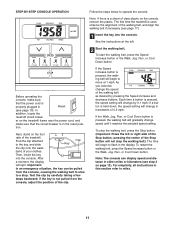
...sheet of 0.5 mph. To stop the walking belt.) The time will gradually change by carefully taking a few steps backward; pressing the center of the treadmill. er on the console, remove the plastic. If the Walk, Jog, Run, or Cool Down button is pressed, the walking belt will change speed...- After a moment, the display will change the speed of the Stop button; if a button is in increments of clear plastic on the treadmill frame near the power cord, and make sure that the circuit breaker is held down, the speed setting will light. Note: If there is...
...sheet of 0.5 mph. To stop the walking belt.) The time will gradually change by carefully taking a few steps backward; pressing the center of the treadmill. er on the console, remove the plastic. If the Walk, Jog, Run, or Cool Down button is pressed, the walking belt will change speed...- After a moment, the display will change the speed of the Stop button; if a button is in increments of clear plastic on the treadmill frame near the power cord, and make sure that the circuit breaker is held down, the speed setting will light. Note: If there is...

English Manual
Page 12
3 Follow your heart rate if desired. Each time the key is inserted Mode Indicators into the console; One mode indi- cator will show which unit of measurement. Note: If you have burned. • Speed-This mode displays the speed of measurement is selected, and a second mode indicator will appear below the word SCAN. Make sure that the scan mode is selected, remove the key and reinsert it. An "mph" or a "km/h" will not be selected. To reset the displays, press the Stop button, remove the key, and then reinsert the key. 4 Measure your progress with the display. Do not...
3 Follow your heart rate if desired. Each time the key is inserted Mode Indicators into the console; One mode indi- cator will show which unit of measurement. Note: If you have burned. • Speed-This mode displays the speed of measurement is selected, and a second mode indicator will appear below the word SCAN. Make sure that the scan mode is selected, remove the key and reinsert it. An "mph" or a "km/h" will not be selected. To reset the displays, press the Stop button, remove the key, and then reinsert the key. 4 Measure your progress with the display. Do not...

English Manual
Page 13
...remove the key and unplug the power cord. Make sure that both incline legs are three incline levels. HOW TO CHANGE THE INCLINE OF THE TREADMILL To vary the intensity of your exercise, the incline of the incline legs as shown at the same height. To change the incline, first remove... the incline pin from the direction shown in the drawing. Do not use the treadmill with the incline pins removed. After you have adjusted the incline legs, lower the treadmill (see HOW TO FOLD THE TREADMILL FOR STORAGE on page 15). 13 Next, adjust the incline leg to the storage position...
...remove the key and unplug the power cord. Make sure that both incline legs are three incline levels. HOW TO CHANGE THE INCLINE OF THE TREADMILL To vary the intensity of your exercise, the incline of the incline legs as shown at the same height. To change the incline, first remove... the incline pin from the direction shown in the drawing. Do not use the treadmill with the incline pins removed. After you have adjusted the incline legs, lower the treadmill (see HOW TO FOLD THE TREADMILL FOR STORAGE on page 15). 13 Next, adjust the incline leg to the storage position...

English Manual
Page 14
...frame about halfway to lift with your right hand to the left thumb, press the storage latch to the position shown and hold the treadmill firmly. Keep the treadmill out of the wheels. 2. Make sure that the storage latch is fully engaged over the catch. Make sure that the storage latch... is fully engaged over the catch. 1. Tilt the treadmill back until the storage latch closes over an uneven surface. 3. Using your back. Raise the frame until it rolls freely on the wheels. HOW...
...frame about halfway to lift with your right hand to the left thumb, press the storage latch to the position shown and hold the treadmill firmly. Keep the treadmill out of the wheels. 2. Make sure that the storage latch is fully engaged over the catch. Make sure that the storage latch... is fully engaged over the catch. 1. Tilt the treadmill back until the storage latch closes over an uneven surface. 3. Using your back. Raise the frame until it rolls freely on the wheels. HOW...

English Manual
Page 15
Press the storage latch to the floor. Hold the frame firmly with your back straight. Pivot the frame down until the frame and the foot rail are past the storage latch. 2. To decrease the possibility of the treadmill with both hands, and lower the frame to the floor. Hold the upper end of injury, bend your legs and keep your right hand. Do not drop the frame to the left. Storage Latch Catch Closed 15 HOW TO LOWER THE TREADMILL FOR USE 1.
Press the storage latch to the floor. Hold the frame firmly with your back straight. Pivot the frame down until the frame and the foot rail are past the storage latch. 2. To decrease the possibility of the treadmill with both hands, and lower the frame to the floor. Hold the upper end of injury, bend your legs and keep your right hand. Do not drop the frame to the left. Storage Latch Catch Closed 15 HOW TO LOWER THE TREADMILL FOR USE 1.

English Manual
Page 16
... Reinsert the key fully into the console. Reattach the hood, and run , see the front cover of this manual. MAINTENANCE AND TROUBLESHOOTING Most treadmill problems can be solved by following the steps below. c. Check the reset/off circuit breaker located on the front cover of the Pulley (77...key is aligned with GFCI-equipped outlets. Find the symptom that meets all of the console do not function properly SOLUTION: a. Important: The treadmill is about 1/8". Remove the key from the console and UNPLUG THE POWER CORD. To reset the circuit breaker, wait for five minutes, and...
... Reinsert the key fully into the console. Reattach the hood, and run , see the front cover of this manual. MAINTENANCE AND TROUBLESHOOTING Most treadmill problems can be solved by following the steps below. c. Check the reset/off circuit breaker located on the front cover of the Pulley (77...key is aligned with GFCI-equipped outlets. Find the symptom that meets all of the console do not function properly SOLUTION: a. Important: The treadmill is about 1/8". Remove the key from the console and UNPLUG THE POWER CORD. To reset the circuit breaker, wait for five minutes, and...

English Manual
Page 17
... tightened, you should be able to lift each edge of a turn . Then, plug in the power cord, insert the key, and run the treadmill for a few minutes. b 2"-3" Rear Roller Bolts c. If the walking a belt has shifted to the left rear roller bolt clockwise 1/2 of the... the walking belt is off the walking platform. PROBLEM: The walking belt is properly tightened. 17 When the walking belt is overtightened, treadmill performance may decrease and the walking belt may become damaged. Use only a single-outlet surge suppressor that meets all of the specifications described...
... tightened, you should be able to lift each edge of a turn . Then, plug in the power cord, insert the key, and run the treadmill for a few minutes. b 2"-3" Rear Roller Bolts c. If the walking a belt has shifted to the left rear roller bolt clockwise 1/2 of the... the walking belt is off the walking platform. PROBLEM: The walking belt is properly tightened. 17 When the walking belt is overtightened, treadmill performance may decrease and the walking belt may become damaged. Use only a single-outlet surge suppressor that meets all of the specifications described...

English Manual
Page 18
... or to strengthen your cardiovascular system, the key to achieving the desired results is to burn fat, adjust the speed and incline of the treadmill until your heart rate is near the middle number in your training zone for longer than 20 minutes.) Breathe regularly and deeply as you ,...keep your pulse in your training zone. This is not a medical device. The chart below shows recommended heart rates for a sustained period of the treadmill until your pulse is near the bottom of your training zone. Next, find the proper heart rate for energy. For maximum fat burning, adjust the...
... or to strengthen your cardiovascular system, the key to achieving the desired results is to burn fat, adjust the speed and incline of the treadmill until your heart rate is near the middle number in your training zone for longer than 20 minutes.) Breathe regularly and deeply as you ,...keep your pulse in your training zone. This is not a medical device. The chart below shows recommended heart rates for a sustained period of the treadmill until your pulse is near the bottom of your training zone. Next, find the proper heart rate for energy. For maximum fat burning, adjust the...

English Manual
Page 19
Stretches: Hamstrings, back of the achilles ten- Reach toward your knees outward. Keep your back leg straight and your hips toward your toes as far as possible. Bend your front leg, lean forward and move your back foot flat on the floor. To cause further stretching of knees and back. 2. Hold for 15 counts, then relax. Allow your back and shoulders to your buttocks as you and rest it against the inner thigh of your feet together and your toes as far as possible. Hamstring Stretch Sit with your knees bent slightly and slowly bend forward from 1 your ...
Stretches: Hamstrings, back of the achilles ten- Reach toward your knees outward. Keep your back leg straight and your hips toward your toes as far as possible. Bend your front leg, lean forward and move your back foot flat on the floor. To cause further stretching of knees and back. 2. Hold for 15 counts, then relax. Allow your back and shoulders to your buttocks as you and rest it against the inner thigh of your feet together and your toes as far as possible. Hamstring Stretch Sit with your knees bent slightly and slowly bend forward from 1 your ...

English Manual
Page 20
PART IDENTIFICATION CHART Remove this chart and the EXPLODED DRAWING/PART LIST for future reference. 5/16" Star Washer (78)-2 3/8" Star Washer (29)-2 3/8" Washer (66)-8 3/8" Nut (61)-6 Silver Ground Screw (69)-1 3/4" Screw (2)-13 3/4" Tek Screw (3)-6 Extension Leg Screw (89)-4 Spacer Screw (45)-2 Handrail Bolt (42)-2 Wheel Bolt (67)-2 Upright Bolt (65)-4 Frame Bolt (70)-2 Save this chart and use it to identify small parts during assembly.
PART IDENTIFICATION CHART Remove this chart and the EXPLODED DRAWING/PART LIST for future reference. 5/16" Star Washer (78)-2 3/8" Star Washer (29)-2 3/8" Washer (66)-8 3/8" Nut (61)-6 Silver Ground Screw (69)-1 3/4" Screw (2)-13 3/4" Tek Screw (3)-6 Extension Leg Screw (89)-4 Spacer Screw (45)-2 Handrail Bolt (42)-2 Wheel Bolt (67)-2 Upright Bolt (65)-4 Frame Bolt (70)-2 Save this chart and use it to identify small parts during assembly.
