

Canadian English Manual
Page 1
Serial Number Decal QUESTIONS? www.proform.com Visit our website at Visit our website at www.weslo.com Visit our website at for future reference. Model No. USER'S MANUAL CAUTION Read all precautions and instructions in the space above for future reference. ...
Serial Number Decal QUESTIONS? www.proform.com Visit our website at Visit our website at www.weslo.com Visit our website at for future reference. Model No. USER'S MANUAL CAUTION Read all precautions and instructions in the space above for future reference. ...
Canadian English Manual
Page 2
... could become caught in damage to persons, read the following important precautions and information before operating the treadmill. 1. Wear appropriate exercise clothing when using the treadmill. 2 IMPORTANT PRECAUTIONS WARNING: To reduce the risk of burns, fire, electric shock, or injury...TABLE OF CONTENTS IMPORTANT PRECAUTIONS 2 BEFORE YOU BEGIN 4 ASSEMBLY 5 OPERATION AND ADJUSTMENT 7 HOW TO FOLD AND MOVE THE TREADMILL 10 MAINTENANCE AND TROUBLE-SHOOTING 12 CONDITIONING GUIDELINES 14 ORDERING REPLACEMENT PARTS Back Cover LIMITED WARRANTY Back Cover Note: A PART IDENTIFICATION...
... could become caught in damage to persons, read the following important precautions and information before operating the treadmill. 1. Wear appropriate exercise clothing when using the treadmill. 2 IMPORTANT PRECAUTIONS WARNING: To reduce the risk of burns, fire, electric shock, or injury...TABLE OF CONTENTS IMPORTANT PRECAUTIONS 2 BEFORE YOU BEGIN 4 ASSEMBLY 5 OPERATION AND ADJUSTMENT 7 HOW TO FOLD AND MOVE THE TREADMILL 10 MAINTENANCE AND TROUBLE-SHOOTING 12 CONDITIONING GUIDELINES 14 ORDERING REPLACEMENT PARTS Back Cover LIMITED WARRANTY Back Cover Note: A PART IDENTIFICATION...
Canadian English Manual
Page 3
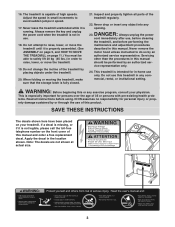
...telephone number on your physician. SAVE THESE INSTRUCTIONS The decals shown here have been placed on the front cover of the treadmill by an authorized service representative. Adjust the speed in small increments to avoid sudden jumps in order to raise, lower, or move the... treadmill. 19. Never leave the treadmill unattended while it is especially important for personal injury or property damage sustained by an authorized ser- Inspect and properly tighten ...
...telephone number on your physician. SAVE THESE INSTRUCTIONS The decals shown here have been placed on the front cover of the treadmill by an authorized service representative. Adjust the speed in small increments to avoid sudden jumps in order to raise, lower, or move the... treadmill. 19. Never leave the treadmill unattended while it is especially important for personal injury or property damage sustained by an authorized ser- Inspect and properly tighten ...
Canadian English Manual
Page 4
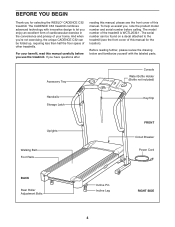
...let you 're not exercising, the unique CADENCE C32 can be folded up, requiring less than half the floor space of your benefit, read this manual for selecting the WESLO® CADENCE C32 treadmill. BEFORE YOU BEGIN Thank you use the treadmill. And when you enjoy an excellent form... of cardiovascular exercise in the convenience and privacy of other treadmills. Before reading further, please review the drawing ...
...let you 're not exercising, the unique CADENCE C32 can be folded up, requiring less than half the floor space of your benefit, read this manual for selecting the WESLO® CADENCE C32 treadmill. BEFORE YOU BEGIN Thank you use the treadmill. And when you enjoy an excellent form... of cardiovascular exercise in the convenience and privacy of other treadmills. Before reading further, please review the drawing ...
Canadian English Manual
Page 5
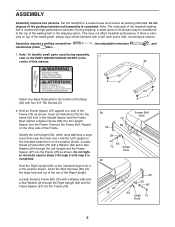
...mild, non-abrasive cleaner. Insert a Frame Bolt (70) into the Frame (79) as shown. ASSEMBLY Assembly requires two persons. This does not affect treadmill performance. Repeat on top of the packing materials until step 5 is coated with four 3/4" Tek Screws (3). 191291 2. Hold the Right Upright (62)... 2 through the Right Upright (62) and the Frame Spacer (27) into the large hole and out of the top of the treadmill walking belt is completed. Note: The underside of the Right Upright. Note: To identify small parts used in the position shown. Remove...
...mild, non-abrasive cleaner. Insert a Frame Bolt (70) into the Frame (79) as shown. ASSEMBLY Assembly requires two persons. This does not affect treadmill performance. Repeat on top of the packing materials until step 5 is coated with four 3/4" Tek Screws (3). 191291 2. Hold the Right Upright (62)... 2 through the Right Upright (62) and the Frame Spacer (27) into the large hole and out of the top of the treadmill walking belt is completed. Note: The underside of the Right Upright. Note: To identify small parts used in the position shown. Remove...
Canadian English Manual
Page 6
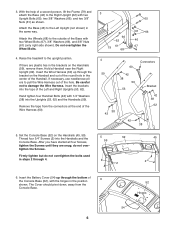
... the help of the Handrail. Attach the Base (46) to pull the Wire Harness out of the Left and Right Uprights (53, 62). Raise the treadmill to damage the Wire Harness. If there are snug; Insert the Wire Harness (60) up through 4. 5 52 59 2 45 2 6. Insert the brackets into the tops...
... the help of the Handrail. Attach the Base (46) to pull the Wire Harness out of the Left and Right Uprights (53, 62). Raise the treadmill to damage the Wire Harness. If there are snug; Insert the Wire Harness (60) up through 4. 5 52 59 2 45 2 6. Insert the brackets into the tops...
Canadian English Manual
Page 7
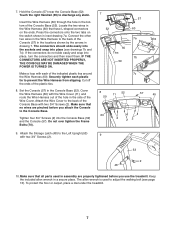
... on the ends. Tighten four 3/4" Screws (2) into place, turn the connectors and then insert them. To protect the floor or carpet, place a mat under the treadmill. 7 Hold the Console (57) near the Console Base (52). Connect the other two wires in the bottom of the Wire Cover. Make a loop with the...the Console (57) in the locations shown by the arrows in the Wire Harness (60) that no wires are properly tightened before you use the treadmill. Attach the Wire Cover to adjust the walking belt (see drawings 7b and 7c). Keep the included allen wrench in the Console Base (52).
... on the ends. Tighten four 3/4" Screws (2) into place, turn the connectors and then insert them. To protect the floor or carpet, place a mat under the treadmill. 7 Hold the Console (57) near the Console Base (52). Connect the other two wires in the bottom of the Wire Cover. Make a loop with the...the Console (57) in the locations shown by the arrows in the Wire Harness (60) that no wires are properly tightened before you use the treadmill. Attach the Wire Cover to adjust the walking belt (see drawings 7b and 7c). Keep the included allen wrench in the Console Base (52).
Canadian English Manual
Page 8
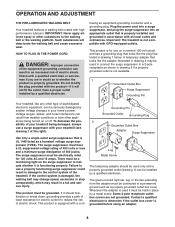
...pole receptacle outlet box covers are in place by a qualified electrician. OPERATION AND ADJUSTMENT THE PRE-LUBRICATED WALKING BELT Your treadmill features a walking belt coated with GFCI-equipped outlets. IMPORTANT: Never apply silicone spray or other appliances being damaged, always...Suppressor Lug Metal Screw The temporary adapter should malfunction or break down, grounding provides a path of electric shock. Important: The treadmill is properly grounded. This product is functioning properly. Voltage surges, spikes, and noise interference can be seriously damaged by a qualified...
...pole receptacle outlet box covers are in place by a qualified electrician. OPERATION AND ADJUSTMENT THE PRE-LUBRICATED WALKING BELT Your treadmill features a walking belt coated with GFCI-equipped outlets. IMPORTANT: Never apply silicone spray or other appliances being damaged, always...Suppressor Lug Metal Screw The temporary adapter should malfunction or break down, grounding provides a path of electric shock. Important: The treadmill is properly grounded. This product is functioning properly. Voltage surges, spikes, and noise interference can be seriously damaged by a qualified...
Canadian English Manual
Page 9
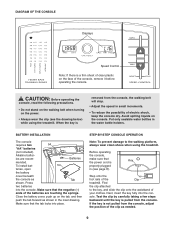
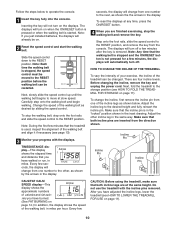
... shown. sole. DIAGRAM OF THE CONSOLE Displays Speed Control Note: If there is properly plugged in (see the drawing below) while using the treadmill. When the key is pulled from the console. Batteries mended. To install bat- 54 teries, open the battery cover beneath the console as ...water bottle holders. Press two batteries into the con- Find the clip attached to the walking platform, always wear clean shoes when using the treadmill. Avoid spilling liquids on the power. • Always wear the clip (see page 8). Make sure that the tab locks into place. Next...
... shown. sole. DIAGRAM OF THE CONSOLE Displays Speed Control Note: If there is properly plugged in (see the drawing below) while using the treadmill. When the key is pulled from the console. Batteries mended. To install bat- 54 teries, open the battery cover beneath the console as ...water bottle holders. Press two batteries into the con- Find the clip attached to the walking platform, always wear clean shoes when using the treadmill. Avoid spilling liquids on the power. • Always wear the clip (see page 8). Make sure that the tab locks into place. Next...
Canadian English Manual
Page 10
... started. Before changing the incline, remove the key and unplug the power cord. Adjust the incline leg to the RESET position. Do not use the treadmill with the displays. Step onto the foot rails, slide the speed control to the next, as desired by the arrows in miles. The displays will... console. To change from one of the walking belt as shown the the arrows in the same way. HOW TO CHANGE THE INCLINE OF THE TREADMILL To vary the intensity of calories and fat calo- Follow the steps below . Inserting the key will change the incline, first remove the incline pin...
... started. Before changing the incline, remove the key and unplug the power cord. Adjust the incline leg to the RESET position. Do not use the treadmill with the displays. Step onto the foot rails, slide the speed control to the next, as desired by the arrows in miles. The displays will... console. To change from one of the walking belt as shown the the arrows in the same way. HOW TO CHANGE THE INCLINE OF THE TREADMILL To vary the intensity of calories and fat calo- Follow the steps below . Inserting the key will change the incline, first remove the incline pin...
Canadian English Manual
Page 11
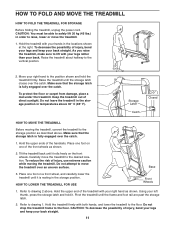
...legs rather than your back. Make sure that the storage latch is fully engaged over an uneven surface. Hold the treadmill firmly with your back straight. Do not drop the treadmill frame to the position shown and hold it rolls freely on one foot on the front wheels. CAUTION: To ... the power cord. Using your right hand to the floor. Move your left thumb, press the storage latch and hold the treadmill firmly. Raise the treadmill until the frame and foot rail are past the storage latch. 2. To reduce the risk of the front wheels as described above . Do not...
...legs rather than your back. Make sure that the storage latch is fully engaged over an uneven surface. Hold the treadmill firmly with your back straight. Do not drop the treadmill frame to the position shown and hold it rolls freely on one foot on the front wheels. CAUTION: To ... the power cord. Using your right hand to the floor. Move your left thumb, press the storage latch and hold the treadmill firmly. Raise the treadmill until the frame and foot rail are past the storage latch. 2. To reduce the risk of the front wheels as described above . Do not...
Canadian English Manual
Page 12
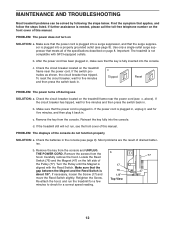
...protrudes as shown, the circuit breaker has tripped. Reinsert the key fully into a properly grounded outlet (see page 9). If the treadmill still will not run the treadmill for a few minutes to check for five minutes and then press the switch back in , make sure that applies, and follow... back in the console (see page 8). To reset the circuit breaker, wait for a correct speed reading. MAINTENANCE AND TROUBLESHOOTING Most treadmill problems can be solved by following the steps below. c. Check the circuit breaker located on the left side of this manual. b.
...protrudes as shown, the circuit breaker has tripped. Reinsert the key fully into a properly grounded outlet (see page 9). If the treadmill still will not run the treadmill for a few minutes to check for five minutes and then press the switch back in , make sure that applies, and follow... back in the console (see page 8). To reset the circuit breaker, wait for a correct speed reading. MAINTENANCE AND TROUBLESHOOTING Most treadmill problems can be solved by following the steps below. c. Check the circuit breaker located on the left side of this manual. b.
Canadian English Manual
Page 13
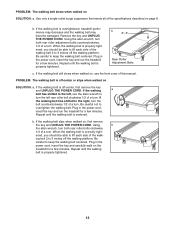
... 1/2 of a turn . Using the allen wrench, turn both rear roller bolts clockwise, 1/4 of this manual. If the walking belt is overtightened, treadmill performance may decrease and the walking belt may become damaged. if the walking belt has shifted to keep the walking belt centered. If the walking... belt still slows when walked on page 8. Plug in the power cord, insert the key and run the treadmill for a few minutes. Use only a single-outlet surge suppressor that meets all of the specifications described on , see the front cover of a...
... 1/2 of a turn . Using the allen wrench, turn both rear roller bolts clockwise, 1/4 of this manual. If the walking belt is overtightened, treadmill performance may decrease and the walking belt may become damaged. if the walking belt has shifted to keep the walking belt centered. If the walking... belt still slows when walked on page 8. Plug in the power cord, insert the key and run the treadmill for a few minutes. Use only a single-outlet surge suppressor that meets all of the specifications described on , see the front cover of a...
Canadian English Manual
Page 14
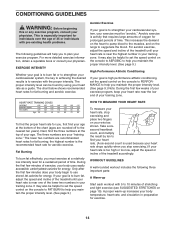
...your heart rate is activity that requires large amounts of oxygen for fat burning; For aerobic exercise, adjust the speed and incline of the treadmill until your heart rate as shown. The chart below shows recommended heart rates for you, first find your heart rate. (A six-second...in your goal is especially important for individuals over the age of the chart (ages are recommended heart rates for prolonged periods of the treadmill accordingly. Fat Burning To burn fat effectively, you must be helpful to set the speed control on your exercise program. The three ...
...your heart rate is activity that requires large amounts of oxygen for fat burning; For aerobic exercise, adjust the speed and incline of the treadmill until your heart rate as shown. The chart below shows recommended heart rates for you, first find your heart rate. (A six-second...in your goal is especially important for individuals over the age of the chart (ages are recommended heart rates for prolonged periods of the treadmill accordingly. Fat Burning To burn fat effectively, you must be helpful to set the speed control on your exercise program. The three ...
Canadian English Manual
Page 15
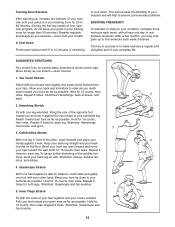
Allow your back and shoulders to prevent post-exercise problems. EXERCISE FREQUENCY To maintain or improve your condition, complete three workouts each week, with your other , reach forward and place your hands against a wall. Hold for 15 counts, then relax. Stretches: Hamstrings, lower back, and groin. 3 3. Hold for 15 counts, then relax. Quadriceps Stretch With one hand against the inner thigh of your muscles and will increase the flexibility of your extended leg. Bring your heel as close to five workouts each leg. This will help to relax as you reach down . ...
Allow your back and shoulders to prevent post-exercise problems. EXERCISE FREQUENCY To maintain or improve your condition, complete three workouts each week, with your other , reach forward and place your hands against a wall. Hold for 15 counts, then relax. Stretches: Hamstrings, lower back, and groin. 3 3. Hold for 15 counts, then relax. Quadriceps Stretch With one hand against the inner thigh of your muscles and will increase the flexibility of your extended leg. Bring your heel as close to five workouts each leg. This will help to relax as you reach down . ...

Canadian English Manual
Page 16
Save this chart and use it to identify small parts during assembly. Spacer Screw (89)-2 3/4" Screw (2)-12 3/4" Tek Screw (3)-4 Star Washer (29)-2 Handrail Bolt (42)-4 Upright Bolt (65)-4 Wheel Bolt (67)-2 1/4" Washer (38)-4 Frame Bolt (70)-2 3/8" Washer (66)-8 3/8" Nut (61)-6 PART IDENTIFICATION CHART Remove this chart and the EXPLODED DRAWING/PART LIST for future reference.
Save this chart and use it to identify small parts during assembly. Spacer Screw (89)-2 3/4" Screw (2)-12 3/4" Tek Screw (3)-4 Star Washer (29)-2 Handrail Bolt (42)-4 Upright Bolt (65)-4 Wheel Bolt (67)-2 1/4" Washer (38)-4 Frame Bolt (70)-2 3/8" Washer (66)-8 3/8" Nut (61)-6 PART IDENTIFICATION CHART Remove this chart and the EXPLODED DRAWING/PART LIST for future reference.

Canadian English Manual
Page 17
Qty. 1 1 2 14 3 13 4 5 5 1 6 1 7 1 8 1 9 2 10 2 11 1 12 2 13 1 14 2 15 4 16 1 17 1 18 2 19 1 20 1 21* 1 22 1 23 1 24 1 25 1 26 1 27 2 28 1 29 2 30 1 31 1 32 6 33 1 34 2 35 1 36 1 37 2 38 3 39 1 40 4 41 1 42 4 43 4 44 2 45 1 46 1 47 1 48 1 Description Motor Hood 3/4" Screw 3/4" Tek Screw 8" Cable Tie Cable Tie Clamp Screw Cable Tie Clamp Left Foot Rail Front Isolator Front Platform Screw Wire Cover Incline Leg Washer Catch Belt Guide Belt Guide Screw Reed Switch Clip Reed Switch Screw Hood Anchor ...
Qty. 1 1 2 14 3 13 4 5 5 1 6 1 7 1 8 1 9 2 10 2 11 1 12 2 13 1 14 2 15 4 16 1 17 1 18 2 19 1 20 1 21* 1 22 1 23 1 24 1 25 1 26 1 27 2 28 1 29 2 30 1 31 1 32 6 33 1 34 2 35 1 36 1 37 2 38 3 39 1 40 4 41 1 42 4 43 4 44 2 45 1 46 1 47 1 48 1 Description Motor Hood 3/4" Screw 3/4" Tek Screw 8" Cable Tie Cable Tie Clamp Screw Cable Tie Clamp Left Foot Rail Front Isolator Front Platform Screw Wire Cover Incline Leg Washer Catch Belt Guide Belt Guide Screw Reed Switch Clip Reed Switch Screw Hood Anchor ...

Canadian English Manual
Page 18
... are made must be prepared to give the following information: • The MODEL NUMBER of the product (WCTL2532.1) • The NAME of the product (WESLO® CADENCE C32 treadmill) • The SERIAL NUMBER of the product (see the front cover of this manual) • The KEY NUMBER and DESCRIPTION of the desired part(s) (see...
... are made must be prepared to give the following information: • The MODEL NUMBER of the product (WCTL2532.1) • The NAME of the product (WESLO® CADENCE C32 treadmill) • The SERIAL NUMBER of the product (see the front cover of this manual) • The KEY NUMBER and DESCRIPTION of the desired part(s) (see...
Canadian English Manual
Page 19
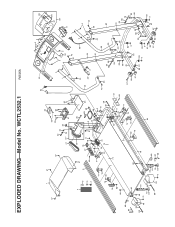
WCTL2532.1 R0505A 52 51 33 1 57 57 32 57 32 32 22 24 25 32 41 21* 23 31 80 64 38 86 49 4 20 57 5 8 76 19 3 27 17 16 7 89 47 61 14 15 78 40 10 3 9 34 77 43 72 26 29 30 35 3 18 28 36 3 18 39 38 3 44 45 48 42 38 13 74 90 88 85 40 81 3 12 38 82 86 83 88 40 81 12 3 82 79 80 32 50 10 73 27 3 43 34 89 3 9 14 75 40 15 78 67 68 37 84 2 2 69 87 2 2 2 54 42 38 56 57 55* 11 60 2 53 2 42 38 91 44 59 70 66 29 65 66 46 65 66 42 38 63 3 61 66 61 63 3 65 63 3 61 66 37 68 62 91 29 66 70 65 60 58 66 66 63 3 61 67 ...
WCTL2532.1 R0505A 52 51 33 1 57 57 32 57 32 32 22 24 25 32 41 21* 23 31 80 64 38 86 49 4 20 57 5 8 76 19 3 27 17 16 7 89 47 61 14 15 78 40 10 3 9 34 77 43 72 26 29 30 35 3 18 28 36 3 18 39 38 3 44 45 48 42 38 13 74 90 88 85 40 81 3 12 38 82 86 83 88 40 81 12 3 82 79 80 32 50 10 73 27 3 43 34 89 3 9 14 75 40 15 78 67 68 37 84 2 2 69 87 2 2 2 54 42 38 56 57 55* 11 60 2 53 2 42 38 91 44 59 70 66 29 65 66 46 65 66 42 38 63 3 61 66 61 63 3 65 63 3 61 66 37 68 62 91 29 66 70 65 60 58 66 66 63 3 61 67 ...
English Manual
Page 1
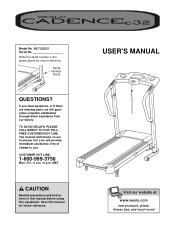
The trained technicians on our Customer Hot Line will guarantee complete satisfaction through direct assistance from our factory. USER'S MANUAL Visit our website at www.weslo.com new products, prizes, fitness tips, and much more! Serial Number Decal QUESTIONS? CUSTOMER HOT LINE: 1-800-999-3756 Mon.-Fri., 6 a.m.-6 p.m. Save this equipment. If ...
The trained technicians on our Customer Hot Line will guarantee complete satisfaction through direct assistance from our factory. USER'S MANUAL Visit our website at www.weslo.com new products, prizes, fitness tips, and much more! Serial Number Decal QUESTIONS? CUSTOMER HOT LINE: 1-800-999-3756 Mon.-Fri., 6 a.m.-6 p.m. Save this equipment. If ...