
Canadian English Manual
Page 2
... walking belt may change speed, accelerate, or stop unexpectedly, which may result in damage to use the treadmill with a 1 mm2 (14-gauge) cord of 1.5 m (5 ft.) or less in length. Always hold the handrails while using the treadmill. TABLE OF CONTENTS IMPORTANT PRECAUTIONS 2 BEFORE YOU BEGIN 4 ASSEMBLY 5 OPERATION AND ADJUSTMENT 7 HOW TO FOLD AND MOVE THE TREADMILL 10 MAINTENANCE AND TROUBLE-SHOOTING 12 CONDITIONING GUIDELINES 14 ORDERING REPLACEMENT PARTS Back Cover LIMITED WARRANTY...
... walking belt may change speed, accelerate, or stop unexpectedly, which may result in damage to use the treadmill with a 1 mm2 (14-gauge) cord of 1.5 m (5 ft.) or less in length. Always hold the handrails while using the treadmill. TABLE OF CONTENTS IMPORTANT PRECAUTIONS 2 BEFORE YOU BEGIN 4 ASSEMBLY 5 OPERATION AND ADJUSTMENT 7 HOW TO FOLD AND MOVE THE TREADMILL 10 MAINTENANCE AND TROUBLE-SHOOTING 12 CONDITIONING GUIDELINES 14 ORDERING REPLACEMENT PARTS Back Cover LIMITED WARRANTY...
Canadian English Manual
Page 3
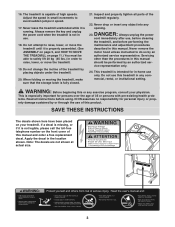
... use of the treadmill by an authorized service representative. The treadmill is not in -home use . 18. Do not change the incline of this manual and order a free replacement decal. Never remove the motor hood unless instructed to raise, lower, or move the treadmill until it is especially important for persons over the age of 35 or persons with pre-existing health problems. Read all parts of this product. SAVE THESE INSTRUCTIONS...
... use of the treadmill by an authorized service representative. The treadmill is not in -home use . 18. Do not change the incline of this manual and order a free replacement decal. Never remove the motor hood unless instructed to raise, lower, or move the treadmill until it is especially important for persons over the age of 35 or persons with pre-existing health problems. Read all parts of this product. SAVE THESE INSTRUCTIONS...
Canadian English Manual
Page 4
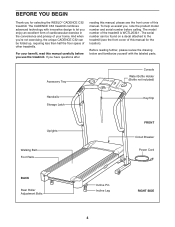
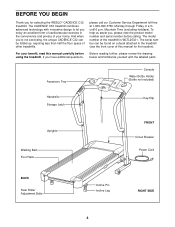
... manual for selecting the WESLO® CADENCE C32 treadmill. And when you for the location). BEFORE YOU BEGIN Thank you 're not exercising, the unique CADENCE C32 can be folded up, requiring less than half the floor space of other treadmills. The model number of the treadmill is WCTL2532.1. Accessory Tray Console Water Bottle Holder (Bottle not included) Handrails Storage Latch Key/Clip Uprights Walking Belt Foot Rails FRONT Circuit Breaker Power Cord BACK Rear Roller Adjustment Bolts Incline Pin Incline Leg...
... manual for selecting the WESLO® CADENCE C32 treadmill. And when you for the location). BEFORE YOU BEGIN Thank you 're not exercising, the unique CADENCE C32 can be folded up, requiring less than half the floor space of other treadmills. The model number of the treadmill is WCTL2532.1. Accessory Tray Console Water Bottle Holder (Bottle not included) Handrails Storage Latch Key/Clip Uprights Walking Belt Foot Rails FRONT Circuit Breaker Power Cord BACK Rear Roller Adjustment Bolts Incline Pin Incline Leg...
Canadian English Manual
Page 7
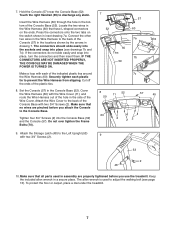
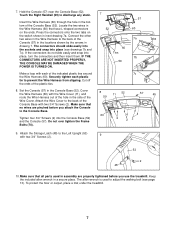
... the treadmill. 7 Cut off the ends of the Wire Cover. Attach the Storage Latch (48) to the Left Upright (53) with each plastic tie to adjust the walking belt (see drawings 7b and 7c). Hold the Console (57) near the Console Base (52). Locate the two wires in the Wire Harness (60) that all parts used to prevent the Wire Harness from slipping. Connect the other two wires in the Wire Harness...
... the treadmill. 7 Cut off the ends of the Wire Cover. Attach the Storage Latch (48) to the Left Upright (53) with each plastic tie to adjust the walking belt (see drawings 7b and 7c). Hold the Console (57) near the Console Base (52). Locate the two wires in the Wire Harness (60) that all parts used to prevent the Wire Harness from slipping. Connect the other two wires in the Wire Harness...
Canadian English Manual
Page 8
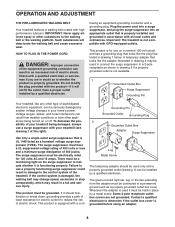
... or other type of your treadmill being turned on a nominal 120-volt circuit, and has a grounding plug that is damaged, the walking belt may change speed, accelerate or stop unexpectedly, which may result in drawing 2 may be used to connect the surge suppressor to determine if the outlet box cover is functioning properly. Check with your home's power. Plug the power cord into a surge suppressor, and...
... or other type of your treadmill being turned on a nominal 120-volt circuit, and has a grounding plug that is damaged, the walking belt may change speed, accelerate or stop unexpectedly, which may result in drawing 2 may be used to connect the surge suppressor to determine if the outlet box cover is functioning properly. Check with your home's power. Plug the power cord into a surge suppressor, and...
Canadian English Manual
Page 10
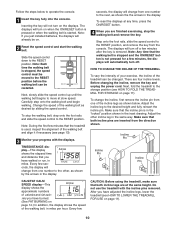
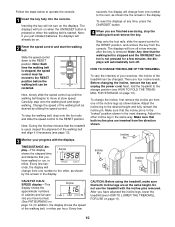
... exercising, stop the walking belt, step onto the foot rails and slide the speed control to the RESET position before the walking belt can be on when the ON/RESET button is pressed or when the walking belt is used, inspect the alignment of the walking belt, in the inset drawing. seconds, the display will change from the console. The displays will turn off . Before changing the incline, remove the key and unplug the power cord. After you just installed batteries...
... exercising, stop the walking belt, step onto the foot rails and slide the speed control to the RESET position before the walking belt can be on when the ON/RESET button is pressed or when the walking belt is used, inspect the alignment of the walking belt, in the inset drawing. seconds, the display will change from the console. The displays will turn off . Before changing the incline, remove the key and unplug the power cord. After you just installed batteries...
Canadian English Manual
Page 12
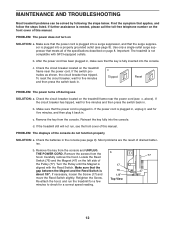
... sure that applies, and follow the steps listed. b. Remove the key from the console and UNPLUG THE POWER CORD. MAINTENANCE AND TROUBLESHOOTING Most treadmill problems can be solved by following the steps below. PROBLEM: The displays of this manual. b. After the power cord has been plugged in . c. c. PROBLEM: The power does not turn on the treadmill frame near the power cord (see page 9). b. Remove the screws from the hood. Retighten the Screw. b 17 76 1/8" Top View 77 47...
... sure that applies, and follow the steps listed. b. Remove the key from the console and UNPLUG THE POWER CORD. MAINTENANCE AND TROUBLESHOOTING Most treadmill problems can be solved by following the steps below. PROBLEM: The displays of this manual. b. After the power cord has been plugged in . c. c. PROBLEM: The power does not turn on the treadmill frame near the power cord (see page 9). b. Remove the screws from the hood. Retighten the Screw. b 17 76 1/8" Top View 77 47...
Canadian English Manual
Page 14
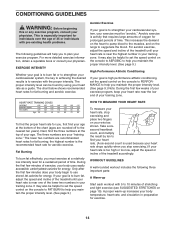
... muscles, and on page 15). A proper warm-up Start each workout with pre-existing health problems. The following three important parts: A Warm-up increases your "training zone." For aerobic exercise, adjust the speed and incline of the treadmill until your exercise program. It may also be helpful to set the speed control on your training zone. The lower two numbers are rounded off to help you maintain the proper...
... muscles, and on page 15). A proper warm-up Start each workout with pre-existing health problems. The following three important parts: A Warm-up increases your "training zone." For aerobic exercise, adjust the speed and incline of the treadmill until your exercise program. It may also be helpful to set the speed control on your training zone. The lower two numbers are rounded off to help you maintain the proper...
Canadian English Manual
Page 17
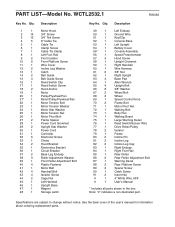
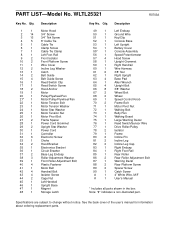
... Upright Battery Cover Console Assembly Speed Potentiometer Hood Screw Upright Grommet Right Handrail Wire Harness 3/8" Nut Right Upright Base Pad Allen Wrench Upright Bolt 3/8" Washer Wheel Bolt Wheel Speed Control Knob Frame Bolt Motor Pivot Nut Walking Belt Belly Pan Walking Board Large Warning Decal Reed Switch/Sensor Wire Drive Roller/Pulley Isolator Frame Incline Pin Incline Leg Incline Leg Cap Right Endcap Right Foot Rail Rear Roller Rear Roller Adjustment Bolt Warning Decal Rear Platform Screw Spacer Screw Catch Screw Insert Nut 4" White Wire, M/F User's Manual * Includes all parts...
... Upright Battery Cover Console Assembly Speed Potentiometer Hood Screw Upright Grommet Right Handrail Wire Harness 3/8" Nut Right Upright Base Pad Allen Wrench Upright Bolt 3/8" Washer Wheel Bolt Wheel Speed Control Knob Frame Bolt Motor Pivot Nut Walking Belt Belly Pan Walking Board Large Warning Decal Reed Switch/Sensor Wire Drive Roller/Pulley Isolator Frame Incline Pin Incline Leg Incline Leg Cap Right Endcap Right Foot Rail Rear Roller Rear Roller Adjustment Bolt Warning Decal Rear Platform Screw Spacer Screw Catch Screw Insert Nut 4" White Wire, M/F User's Manual * Includes all parts...
Canadian English Manual
Page 18
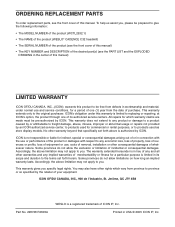
... of the product (WESLO® CADENCE C32 treadmill) • The SERIAL NUMBER of the product (see the front cover of this manual) • The KEY NUMBER and DESCRIPTION of the desired part(s) (see the front cover of whatsoever nature. ICON's obligation under this product to you . Accordingly, the above limitation may not apply to be free from defects in connection with the use or performance of the...
... of the product (WESLO® CADENCE C32 treadmill) • The SERIAL NUMBER of the product (see the front cover of this manual) • The KEY NUMBER and DESCRIPTION of the desired part(s) (see the front cover of whatsoever nature. ICON's obligation under this product to you . Accordingly, the above limitation may not apply to be free from defects in connection with the use or performance of the...
English Manual
Page 2
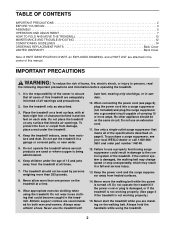
..., or near water. 5. Never use an extension cord. 11. TABLE OF CONTENTS IMPORTANT PRECAUTIONS 2 BEFORE YOU BEGIN 4 ASSEMBLY 5 OPERATION AND ADJUSTMENT 7 HOW TO FOLD AND MOVE THE TREADMILL 10 MAINTENANCE AND TROUBLE-SHOOTING 12 CONDITIONING GUIDELINES 14 ORDERING REPLACEMENT PARTS Back Cover LIMITED WARRANTY Back Cover Note: A PART IDENTIFICATION CHART, an EXPLODED DRAWING, and a PART LIST are attached in the center of this treadmill are adequately informed of all warnings and precautions...
..., or near water. 5. Never use an extension cord. 11. TABLE OF CONTENTS IMPORTANT PRECAUTIONS 2 BEFORE YOU BEGIN 4 ASSEMBLY 5 OPERATION AND ADJUSTMENT 7 HOW TO FOLD AND MOVE THE TREADMILL 10 MAINTENANCE AND TROUBLE-SHOOTING 12 CONDITIONING GUIDELINES 14 ORDERING REPLACEMENT PARTS Back Cover LIMITED WARRANTY Back Cover Note: A PART IDENTIFICATION CHART, an EXPLODED DRAWING, and a PART LIST are attached in the center of this treadmill are adequately informed of all warnings and precautions...
English Manual
Page 3
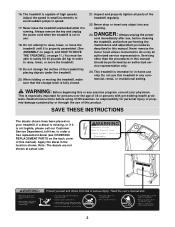
Always unplug the power cord immediately after use, before cleaning the treadmill, and before performing the maintenance and adjustment procedures described in the location shown. Never remove the motor hood unless instructed to avoid sudden jumps in use this treadmill in this manual). Apply the decal in this manual. The treadmill is not legible, please call our Customer Service Department, toll-free, to order a free replacement decal (see ORDERING REPLACEMENT PARTS on the...
Always unplug the power cord immediately after use, before cleaning the treadmill, and before performing the maintenance and adjustment procedures described in the location shown. Never remove the motor hood unless instructed to avoid sudden jumps in use this treadmill in this manual). Apply the decal in this manual. The treadmill is not legible, please call our Customer Service Department, toll-free, to order a free replacement decal (see ORDERING REPLACEMENT PARTS on the...
English Manual
Page 4
For your home. And when you're not exercising, the unique CADENCE C32 can be folded up, requiring less than half the floor space of other treadmills. The model number of your benefit, read this manual for selecting the WESLO® CADENCE C32 treadmill. If you for the location). Accessory Tray Console Water Bottle Holder (Bottle not included) Handrails Storage Latch Key/Clip Uprights Walking Belt Foot Rails FRONT Circuit Breaker Power Cord BACK Rear Roller Adjustment Bolts Incline Pin Incline Leg RIGHT...
For your home. And when you're not exercising, the unique CADENCE C32 can be folded up, requiring less than half the floor space of other treadmills. The model number of your benefit, read this manual for selecting the WESLO® CADENCE C32 treadmill. If you for the location). Accessory Tray Console Water Bottle Holder (Bottle not included) Handrails Storage Latch Key/Clip Uprights Walking Belt Foot Rails FRONT Circuit Breaker Power Cord BACK Rear Roller Adjustment Bolts Incline Pin Incline Leg RIGHT...
English Manual
Page 7
... drawing 7. Make sure that have L-shaped connectors on the switch shown in assembly are pinched before you attach the Console to adjust the walking belt (see drawings 7b and 7c). Attach the Storage Latch (48) to prevent the Wire Harness from slipping. To protect the floor or carpet, place a mat under the treadmill. 7 Touch the Right Handrail (59) to the back of the...
... drawing 7. Make sure that have L-shaped connectors on the switch shown in assembly are pinched before you attach the Console to adjust the walking belt (see drawings 7b and 7c). Attach the Storage Latch (48) to prevent the Wire Harness from slipping. To protect the floor or carpet, place a mat under the treadmill. 7 Touch the Right Handrail (59) to the back of the...

English Manual
Page 8
... order part number 146148. Such substances will not fit the outlet, have a UL suppressed voltage rating of 400 volts or less and a minimum surge dissipation of 450 joules. Plug the power cord into a surge suppressor, and plug the surge suppressor into an appropriate outlet that is damaged, the walking belt may change speed or stop unexpectedly, which may be used it should be used only...
... order part number 146148. Such substances will not fit the outlet, have a UL suppressed voltage rating of 400 volts or less and a minimum surge dissipation of 450 joules. Plug the power cord into a surge suppressor, and plug the surge suppressor into an appropriate outlet that is damaged, the walking belt may change speed or stop unexpectedly, which may be used it should be used only...
English Manual
Page 10
... ON/RESET button is pressed or when the walking belt is removed. Do not use the treadmill with the displays. seconds, the display will automatically turn on . 2 Reset the speed control and start the walking belt. Next, fold the treadmill to the other incline leg in the display. There are finished exercising, stop the walking belt, step onto the foot rails and slide the speed control to the RESET position before the walking belt can be changed. Before changing the incline, remove the key and unplug the power cord...
... ON/RESET button is pressed or when the walking belt is removed. Do not use the treadmill with the displays. seconds, the display will automatically turn on . 2 Reset the speed control and start the walking belt. Next, fold the treadmill to the other incline leg in the display. There are finished exercising, stop the walking belt, step onto the foot rails and slide the speed control to the RESET position before the walking belt can be changed. Before changing the incline, remove the key and unplug the power cord...
English Manual
Page 13
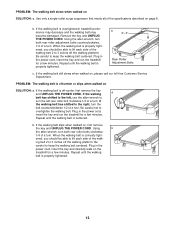
..., turn the bolt counterclockwise 1/2 of a turn . Using the allen wrench, turn both rear roller bolts clockwise, 1/4 of a turn ; When the walking belt is properly tightened. 13 If the walking belt is overtightened, treadmill performance may decrease and the walking belt may become damaged. if the walking belt has shifted to 3 inches off -center or slips when walked on the treadmill for a few minutes. If the walking belt slips when walked on page 8. Plug in the power cord, insert the key...
..., turn the bolt counterclockwise 1/2 of a turn . Using the allen wrench, turn both rear roller bolts clockwise, 1/4 of a turn ; When the walking belt is properly tightened. 13 If the walking belt is overtightened, treadmill performance may decrease and the walking belt may become damaged. if the walking belt has shifted to 3 inches off -center or slips when walked on the treadmill for a few minutes. If the walking belt slips when walked on page 8. Plug in the power cord, insert the key...

English Manual
Page 14
... exercise, adjust the speed and incline of your training zone. A proper warm-up Start each workout with the proper intensity. HOW TO MEASURE YOUR HEART RATE To find your wrist as a guide. It may also be "aerobic." During the first few weeks of your exercise program, keep your heart rate near the low end of the treadmill until your heart rate is near the highest number in your body...
... exercise, adjust the speed and incline of your training zone. A proper warm-up Start each workout with the proper intensity. HOW TO MEASURE YOUR HEART RATE To find your wrist as a guide. It may also be "aerobic." During the first few weeks of your exercise program, keep your heart rate near the low end of the treadmill until your heart rate is near the highest number in your body...
English Manual
Page 17
... Left Upright Battery Cover Console Assembly Speed Potentiometer Hood Screw Upright Grommet Right Handrail Wire Harness 3/8" Nut Right Upright Base Pad Allen Wrench Upright Bolt 3/8" Washer Wheel Bolt Wheel Speed Control Knob Frame Bolt Motor Pivot Nut Walking Belt Belly Pan Walking Board Large Warning Decal Reed Switch/Sensor Wire Drive Roller/Pulley Isolator Frame Incline Pin Incline Leg Incline Leg Cap Right Endcap Right Foot Rail Rear Roller Rear Roller Adjustment Bolt Warning Decal Rear Platform Screw Spacer Screw Catch Screw 4" White Wire, M/F User's Manual * Includes all parts shown...
... Left Upright Battery Cover Console Assembly Speed Potentiometer Hood Screw Upright Grommet Right Handrail Wire Harness 3/8" Nut Right Upright Base Pad Allen Wrench Upright Bolt 3/8" Washer Wheel Bolt Wheel Speed Control Knob Frame Bolt Motor Pivot Nut Walking Belt Belly Pan Walking Board Large Warning Decal Reed Switch/Sensor Wire Drive Roller/Pulley Isolator Frame Incline Pin Incline Leg Incline Leg Cap Right Endcap Right Foot Rail Rear Roller Rear Roller Adjustment Bolt Warning Decal Rear Platform Screw Spacer Screw Catch Screw 4" White Wire, M/F User's Manual * Includes all parts shown...
English Manual
Page 19
... product (WESLO® CADENCE C32 treadmill) • The SERIAL NUMBER of the product (see the front cover of this manual) • The KEY NUMBER and DESCRIPTION of the desired part(s) (see the PART LIST and the EXPLODED DRAWING in the center of this manual) WESLO is a registered trademark of merchantability or fitness for a period of ninety (90) days from defects in its authorized service centers. ICON is limited in...
... product (WESLO® CADENCE C32 treadmill) • The SERIAL NUMBER of the product (see the front cover of this manual) • The KEY NUMBER and DESCRIPTION of the desired part(s) (see the PART LIST and the EXPLODED DRAWING in the center of this manual) WESLO is a registered trademark of merchantability or fitness for a period of ninety (90) days from defects in its authorized service centers. ICON is limited in...


