
English Manual
Page 2
... surge suppressor could become caught in sandals. 10. Keep children under the age of the treadmill. Never allow more than 250 pounds. 8. When connecting the power cord (see your local WESLO dealer or call 1-800-8063651 and order part number 146148. 12. Use only a single...-outlet surge suppressor that blocks air openings. Never move the walking belt while the power is being administered. 6. Wear appropriate exercise clothing when using the treadmill. 2 Keep the...
... surge suppressor could become caught in sandals. 10. Keep children under the age of the treadmill. Never allow more than 250 pounds. 8. When connecting the power cord (see your local WESLO dealer or call 1-800-8063651 and order part number 146148. 12. Use only a single...-outlet surge suppressor that blocks air openings. Never move the walking belt while the power is being administered. 6. Wear appropriate exercise clothing when using the treadmill. 2 Keep the...
English Manual
Page 4
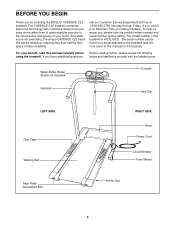
...included) Console Handrail Key/Clip LEFT SIDE Grip Tape Walking Belt RIGHT SIDE Hood Power Cord Circuit Breaker Front Wheel Rear Roller Adjustment Bolt Incline Leg 4 If you 're not exercising, the unique CADENCE C22 treadmill can be folded up, requiring less than half the floor ... an excellent form of cardiovascular exercise in the convenience and privacy of your benefit, read this manual for selecting the WESLO® CADENCE C22 treadmill. Mountain Time (excluding holidays). call our Customer Service Department toll-free at 1-800-999-3756, Monday through Friday, 6 ...
...included) Console Handrail Key/Clip LEFT SIDE Grip Tape Walking Belt RIGHT SIDE Hood Power Cord Circuit Breaker Front Wheel Rear Roller Adjustment Bolt Incline Leg 4 If you 're not exercising, the unique CADENCE C22 treadmill can be folded up, requiring less than half the floor ... an excellent form of cardiovascular exercise in the convenience and privacy of your benefit, read this manual for selecting the WESLO® CADENCE C22 treadmill. Mountain Time (excluding holidays). call our Customer Service Department toll-free at 1-800-999-3756, Monday through Friday, 6 ...
English Manual
Page 5
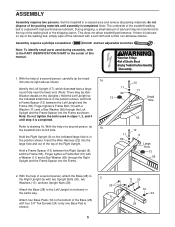
... Upright (not shown) in a cleared area and remove all packing materials; During shipping, a small amount of a second person, carefully tip the treadmill onto its left side. Assembly requires a phillips screwdriver and two adjustable wrenches . Identify the Left Upright (17), which does not have a large...the Frame (55). Note: To identify small parts used in the center of this manual. •Hazardous Voltage •Risk of the treadmill walking belt is completed. Refer to the PART IDENTIFICATION CHART in steps 1, 2, and 4 until assembly is lubricant on the Uprights.) Hold the ...
... Upright (not shown) in a cleared area and remove all packing materials; During shipping, a small amount of a second person, carefully tip the treadmill onto its left side. Assembly requires a phillips screwdriver and two adjustable wrenches . Identify the Left Upright (17), which does not have a large...the Frame (55). Note: To identify small parts used in the center of this manual. •Hazardous Voltage •Risk of the treadmill walking belt is completed. Refer to the PART IDENTIFICATION CHART in steps 1, 2, and 4 until assembly is lubricant on the Uprights.) Hold the ...
English Manual
Page 7
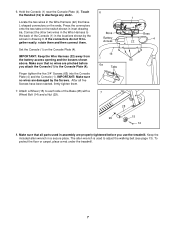
Connect the other two wires in the Wire Harness to adjust the walking belt (see page 13). After all parts used to the back of the Base (28) with a Wheel Bolt (14) and a Nut (29). 6 Boss Battery Access 16 ... the battery access opening and the bosses shown above. To protect the floor or carpet, place a mat under the treadmill. 7 Locate the two wires in assembly are properly tightened before you use the treadmill. Press the connectors onto the two tabs on the Console Plate (4). Touch the Handrail (16) to the Console...
Connect the other two wires in the Wire Harness to adjust the walking belt (see page 13). After all parts used to the back of the Base (28) with a Wheel Bolt (14) and a Nut (29). 6 Boss Battery Access 16 ... the battery access opening and the bosses shown above. To protect the floor or carpet, place a mat under the treadmill. 7 Locate the two wires in assembly are properly tightened before you use the treadmill. Press the connectors onto the two tabs on the Console Plate (4). Touch the Handrail (16) to the Console...
English Manual
Page 8
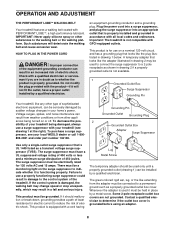
... with your local WESLO dealer or call 1-800- 806-3651 and order part number 146148. If it should be used it must be installed by a qualified electrician. OPERATION AND ADJUSTMENT THE PERFORMANT LUBETM WALKING BELT Your treadmill features a walking belt coated with the ...product-if it will deteriorate the walking belt and cause excessive wear. Grounding Pin Grounded Outlet Grounding Plug Grounded Outlet Box Adapter ...
... with your local WESLO dealer or call 1-800- 806-3651 and order part number 146148. If it should be used it must be installed by a qualified electrician. OPERATION AND ADJUSTMENT THE PERFORMANT LUBETM WALKING BELT Your treadmill features a walking belt coated with the ...product-if it will deteriorate the walking belt and cause excessive wear. Grounding Pin Grounded Outlet Grounding Plug Grounded Outlet Box Adapter ...
English Manual
Page 9
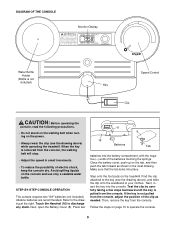
...Batteries Tab batteries into the console. Test the clip by carefully taking a few steps backward until the key is removed from the console, the walking belt will stop. • Adjust the speed in the inset drawing. Then, remove the key from the console. Next, open the Battery Cover (8). ...BY-STEP CONSOLE OPERATION The console requires two "AA" batteries (not included). When the key is pulled from the console. Avoid spilling liquids on the treadmill. Touch the Handrail (16) to the drawing at the right. Follow the steps on the power. • Always wear the clip (see the...
...Batteries Tab batteries into the console. Test the clip by carefully taking a few steps backward until the key is removed from the console, the walking belt will stop. • Adjust the speed in the inset drawing. Then, remove the key from the console. Next, open the Battery Cover (8). ...BY-STEP CONSOLE OPERATION The console requires two "AA" batteries (not included). When the key is pulled from the console. Avoid spilling liquids on the treadmill. Touch the Handrail (16) to the drawing at the right. Follow the steps on the power. • Always wear the clip (see the...
English Manual
Page 10
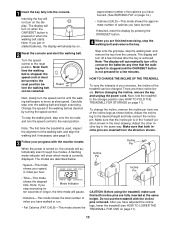
...Pin Incline Pin • Speed-This mode shows your progress with the incline pins removed. Carefully step onto the walking belt and begin exercising. Note: The first time the treadmill is not pressed for ten seconds or longer, the time mode will already be changed. Inserting the key will not ...turn the speed control to the reset position. Make sure that the walking belt is stopped and the ON/RESET button is used, inspect the alignment of the treadmill can be turned to the desired height and fully reinsert the incline pin. There are fully inserted ...
...Pin Incline Pin • Speed-This mode shows your progress with the incline pins removed. Carefully step onto the walking belt and begin exercising. Note: The first time the treadmill is not pressed for ten seconds or longer, the time mode will already be changed. Inserting the key will not ...turn the speed control to the reset position. Make sure that the walking belt is stopped and the ON/RESET button is used, inspect the alignment of the treadmill can be turned to the desired height and fully reinsert the incline pin. There are fully inserted ...
English Manual
Page 13
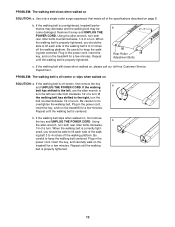
...turn both rear roller bolts clockwise, 1/4 of a turn. Plug in the power cord, insert the key, and run the treadmill for a few minutes. PROBLEM: The walking belt is off -center or slips when walked on page 8. Plug in the power cord, insert the key, and carefully walk on...that meets all of the walk- When the walking belt is centered. ing belt 3 to keep the walking belt centered. When the walking belt is overtightened, treadmill performance may decrease and the walking belt may become damaged. Repeat until the walking belt is properly tightened, you should be able to the ...
...turn both rear roller bolts clockwise, 1/4 of a turn. Plug in the power cord, insert the key, and run the treadmill for a few minutes. PROBLEM: The walking belt is off -center or slips when walked on page 8. Plug in the power cord, insert the key, and carefully walk on...that meets all of the walk- When the walking belt is centered. ing belt 3 to keep the walking belt centered. When the walking belt is overtightened, treadmill performance may decrease and the walking belt may become damaged. Repeat until the walking belt is properly tightened, you should be able to the ...


