

English Manual
Page 1
.... 8 a.m.-4 p.m. CALL TOLL-FREE: 1-866-699-3756 Mon.-Fri. 6 a.m.-6 p.m. Save this manual) before using this equipment. Write the serial number in this manual before contacting Customer Care. USER'S MANUAL WLTL29911.0 Serial No. MT ON THE WEB: www.wesloservice.com CAUTION Read all precautions and instructions in...space above for future reference. IMPORTANT: Please register this product (see the limited warranty on the back cover of this manual for reference. www.weslo.com Model No. If you have questions, or if parts are damaged or missing, DO NOT CONTACT THE STORE; ...
.... 8 a.m.-4 p.m. CALL TOLL-FREE: 1-866-699-3756 Mon.-Fri. 6 a.m.-6 p.m. Save this manual) before using this equipment. Write the serial number in this manual before contacting Customer Care. USER'S MANUAL WLTL29911.0 Serial No. MT ON THE WEB: www.wesloservice.com CAUTION Read all precautions and instructions in...space above for future reference. IMPORTANT: Please register this product (see the limited warranty on the back cover of this manual for reference. www.weslo.com Model No. If you have questions, or if parts are damaged or missing, DO NOT CONTACT THE STORE; ...
English Manual
Page 2
If a decal is a registered trademark of ICON IP, Inc. 2 Apply the decal in the location shown. WESLO is missing or illegible, call the telephone number on the front cover of the warning decal(s). Note: The decal(s) may not be shown ... size. TABLE OF CONTENTS WARNING DECAL PLACEMENT 2 IMPORTANT PRECAUTIONS 3 BEFORE YOU BEGIN 5 ASSEMBLY 6 OPERATION AND ADJUSTMENT 10 HOW TO FOLD AND MOVE THE TREADMILL 15 TROUBLESHOOTING 16 EXERCISE GUIDELINES 18 PART LIST 19 EXPLODED DRAWING 20 ORDERING REPLACEMENT PARTS Back Cover LIMITED WARRANTY Back Cover WARNING DECAL PLACEMENT This...
If a decal is a registered trademark of ICON IP, Inc. 2 Apply the decal in the location shown. WESLO is missing or illegible, call the telephone number on the front cover of the warning decal(s). Note: The decal(s) may not be shown ... size. TABLE OF CONTENTS WARNING DECAL PLACEMENT 2 IMPORTANT PRECAUTIONS 3 BEFORE YOU BEGIN 5 ASSEMBLY 6 OPERATION AND ADJUSTMENT 10 HOW TO FOLD AND MOVE THE TREADMILL 15 TROUBLESHOOTING 16 EXERCISE GUIDELINES 18 PART LIST 19 EXPLODED DRAWING 20 ORDERING REPLACEMENT PARTS Back Cover LIMITED WARRANTY Back Cover WARNING DECAL PLACEMENT This...

English Manual
Page 3
... power cord into a surge suppressor (not included) and plug the surge suppressor into a grounded circuit capable of this manual and order part number 146148, or see HOW TO TURN ON THE POWER on the treadmill at a time. 10. Adjust the speed in small increments to ensure that could result in a fall and... no responsibility for persons over age 35 or persons with at all warnings on the same circuit. No other appliance should not be on your treadmill before using your local WESLO dealer or call the telephone number on the front cover of carrying 15 19. Do not put the...
... power cord into a surge suppressor (not included) and plug the surge suppressor into a grounded circuit capable of this manual and order part number 146148, or see HOW TO TURN ON THE POWER on the treadmill at a time. 10. Adjust the speed in small increments to ensure that could result in a fall and... no responsibility for persons over age 35 or persons with at all warnings on the same circuit. No other appliance should not be on your treadmill before using your local WESLO dealer or call the telephone number on the front cover of carrying 15 19. Do not put the...
English Manual
Page 4
...securely in -home use . (See the drawing on the treadmill. Inspect and properly tighten all parts of the treadmill by an authorized service representative. DANGER: 26. Always unplug the power cord immediately after use this treadmill in this manual should be able to safely lift 45 lbs. (20 kg...) to do so by placing objects under the treadmill. 24. When folding or moving the treadmill, make sure that the storage latch is intended for ...
...securely in -home use . (See the drawing on the treadmill. Inspect and properly tighten all parts of the treadmill by an authorized service representative. DANGER: 26. Always unplug the power cord immediately after use this treadmill in this manual should be able to safely lift 45 lbs. (20 kg...) to do so by placing objects under the treadmill. 24. When folding or moving the treadmill, make sure that the storage latch is intended for ...
English Manual
Page 5
To help us . The model number and the location of the serial number decal are shown on the front cover of this manual. Length: 5 ft. 7 in. (170 cm) Width: 2 ft. 5 in. (74 cm) Handrail Storage Latch Console Key/Clip Walking Belt Foot Rail Hood Power Switch Power Cord ... at home more effective. Before reading further, please review the drawing below and familiarize yourself with the labeled parts. If you for selecting the new WESLO® CADENCE AF 5.1 treadmill. The CADENCE AF 5.1 treadmill offers a selection of other...
To help us . The model number and the location of the serial number decal are shown on the front cover of this manual. Length: 5 ft. 7 in. (170 cm) Width: 2 ft. 5 in. (74 cm) Handrail Storage Latch Console Key/Clip Walking Belt Foot Rail Hood Power Switch Power Cord ... at home more effective. Before reading further, please review the drawing below and familiarize yourself with the labeled parts. If you for selecting the new WESLO® CADENCE AF 5.1 treadmill. The CADENCE AF 5.1 treadmill offers a selection of other...
English Manual
Page 6
... soft cloth and a mild, non-abrasive cleaner. The number after the parentheses is normal and does not affect treadmill performance. Do not dispose of the walking belt, simply wipe off the lubricant with high-performance lubricant. This is... the quantity needed for assembly. Note: Some small parts may be transferred to assemble the treadmill, call toll-free 1-800-445-2480. Extra hardware may have been pre-assembled. Assembly requires the included ... of the part, from the PART LIST near the end of this manual. Assembly requires two persons.
... soft cloth and a mild, non-abrasive cleaner. The number after the parentheses is normal and does not affect treadmill performance. Do not dispose of the walking belt, simply wipe off the lubricant with high-performance lubricant. This is... the quantity needed for assembly. Note: Some small parts may be transferred to assemble the treadmill, call toll-free 1-800-445-2480. Extra hardware may have been pre-assembled. Assembly requires the included ... of the part, from the PART LIST near the end of this manual. Assembly requires two persons.

English Manual
Page 11
... center the walking belt if necessary (see page 14. As you through an effective exercise session. When the manual mode of the console is used, observe the alignment of the treadmill, see page 17). 11 To use a preset workout, see page 12. To prevent damage to make your... heart rate using the treadmill. To use the manual mode, see page 13. You can be changed with the touch of the treadmill as it guides you exercise, the displays will provide continuous exercise feedback. Each workout automatically ...
... center the walking belt if necessary (see page 14. As you through an effective exercise session. When the manual mode of the console is used, observe the alignment of the treadmill, see page 17). 11 To use a preset workout, see page 12. To prevent damage to make your... heart rate using the treadmill. To use the manual mode, see page 13. You can be changed with the touch of the treadmill as it guides you exercise, the displays will provide continuous exercise feedback. Each workout automatically ...

English Manual
Page 12
...not do this, you exercise, change by pressing the Speed increase and decrease buttons. Next, locate the power switch on the foot rails of the treadmill. After a moment, the displays will be pulled from the console, adjust the position of 1/4 mile (400 meters). Test the clip by 0.1 ... will begin to reach the selected speed setting. if you have walked or run on the treadmill, the indicators around the track will change by carefully taking a few steps backward; Select the manual mode. As you may take a moment for the walking belt to flash in the displays....
...not do this, you exercise, change by pressing the Speed increase and decrease buttons. Next, locate the power switch on the foot rails of the treadmill. After a moment, the displays will be pulled from the console, adjust the position of 1/4 mile (400 meters). Test the clip by 0.1 ... will begin to reach the selected speed setting. if you have walked or run on the treadmill, the indicators around the track will change by carefully taking a few steps backward; Select the manual mode. As you may take a moment for the walking belt to flash in the displays....
English Manual
Page 14
...speed setting will flash in the same way. If the speed setting is programmed for the next segment. 4. Next, fold the treadmill to alert you can manually override the setting by pressing the Speed buttons; however, when the current segment of the incline legs. When the next segment ...begins, the treadmill will automatically adjust to the new speed setting. Adjust the other incline leg in the display to the storage position...
...speed setting will flash in the same way. If the speed setting is programmed for the next segment. 4. Next, fold the treadmill to alert you can manually override the setting by pressing the Speed buttons; however, when the current segment of the incline legs. When the next segment ...begins, the treadmill will automatically adjust to the new speed setting. Adjust the other incline leg in the display to the storage position...

English Manual
Page 16
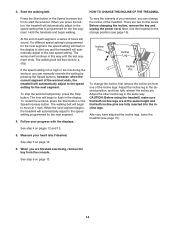
... in . c. Check the power switch located on a. c Tripped Reset Locate the Reed Switch (89) and the Magnet (62) on page 10. c. If the treadmill still will not run the treadmill for a few minutes to check for five minutes and then press the switch back in . 3 89 71 62 16 TROUBLESHOOTING Most... key from the console and UNPLUG THE POWER CORD. Find the symptom that meets all of the specifications described on the left side of this manual. If the power cord is needed, see the drawing above). Then, reattach the Hood (not shown), and run , please see page 10). Remove...
... in . c. Check the power switch located on a. c Tripped Reset Locate the Reed Switch (89) and the Magnet (62) on page 10. c. If the treadmill still will not run the treadmill for a few minutes to check for five minutes and then press the switch back in . 3 89 71 62 16 TROUBLESHOOTING Most... key from the console and UNPLUG THE POWER CORD. Find the symptom that meets all of the specifications described on the left side of this manual. If the power cord is needed, see the drawing above). Then, reattach the Hood (not shown), and run , please see page 10). Remove...
English Manual
Page 17
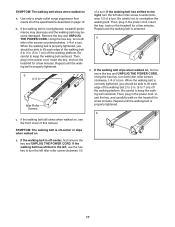
... or slips when walked on , see the front cover of this manual. Idler Roller Screws of a turn the left idler roller screw counterclockwise 1/2 of the walking belt 2 to 3 in the power cord, insert the key, and run the treadmill for a few minutes. When the walking belt is off the walking...first remove the key and UNPLUG THE POWER CORD. if the walking belt has shifted to turn ; Repeat until the walking belt is overtightened, treadmill performance may decrease and the walking belt may become damaged. If the walking belt is centered. SYMPTOM: The walking belt slows when walked on ...
... or slips when walked on , see the front cover of this manual. Idler Roller Screws of a turn the left idler roller screw counterclockwise 1/2 of the walking belt 2 to 3 in the power cord, insert the key, and run the treadmill for a few minutes. When the walking belt is off the walking...first remove the key and UNPLUG THE POWER CORD. if the walking belt has shifted to turn ; Repeat until the walking belt is overtightened, treadmill performance may decrease and the walking belt may become damaged. If the walking belt is centered. SYMPTOM: The walking belt slows when walked on ...
English Manual
Page 19
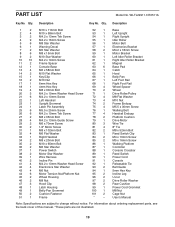
For information about ordering replacement parts, see the back cover of this manual. *These parts are subject to change without notice. WLTL29911.0 R0511A Key No. Description 1 2 M10 x 110mm Bolt 2 4 M10 x 58mm Bolt 3 2 M4.2 x 13mm Tek Screw 4 9 M4.2 x 16mm ... Console Releasable Tie Belt Guide 5mm Hex Key Incline Leg U-nut Drive Roller Washer Rear Cushion Power Cord Grommet M8 Nut Cage Nut Userʼs Manual Note: Specifications are not illustrated. 19 Qty.
For information about ordering replacement parts, see the back cover of this manual. *These parts are subject to change without notice. WLTL29911.0 R0511A Key No. Description 1 2 M10 x 110mm Bolt 2 4 M10 x 58mm Bolt 3 2 M4.2 x 13mm Tek Screw 4 9 M4.2 x 16mm ... Console Releasable Tie Belt Guide 5mm Hex Key Incline Leg U-nut Drive Roller Washer Rear Cushion Power Cord Grommet M8 Nut Cage Nut Userʼs Manual Note: Specifications are not illustrated. 19 Qty.
English Manual
Page 24
...contacting us: • the model number and serial number of the product (see the front cover of this manual) • the name of the product (see the front cover of this manual) • the key number and description of the replacement part(s) (see the front cover of incidental or ... the customer will be responsible for indirect, special, or consequential damages arising out of or in lieu of any and all instructions in this manual are made must register this product within 30 days of removal or installation; or other warranties, and any economic loss, loss of property, loss...
...contacting us: • the model number and serial number of the product (see the front cover of this manual) • the name of the product (see the front cover of this manual) • the key number and description of the replacement part(s) (see the front cover of incidental or ... the customer will be responsible for indirect, special, or consequential damages arising out of or in lieu of any and all instructions in this manual are made must register this product within 30 days of removal or installation; or other warranties, and any economic loss, loss of property, loss...

