

English Manual
Page 1
CAUTION Read all precautions and instructions in this manual before using this product. Model No. If you have questions, or if there are committed to providing complete customer satisfaction. WETL17105.0 Serial No. As a manufacturer, we are missing or damaged parts, please contact the establishment where you purchased this equipment. Serial Number Decal USER'S MANUAL QUESTIONS? Save this manual for future reference.
CAUTION Read all precautions and instructions in this manual before using this product. Model No. If you have questions, or if there are committed to providing complete customer satisfaction. WETL17105.0 Serial No. As a manufacturer, we are missing or damaged parts, please contact the establishment where you purchased this equipment. Serial Number Decal USER'S MANUAL QUESTIONS? Save this manual for future reference.

English Manual
Page 2
WESLO is a registered trademark of this manual. TABLE OF CONTENTS IMPORTANT PRECAUTIONS 3 BEFORE YOU BEGIN 5 ASSEMBLY 6 OPERATION AND ADJUSTMENT 9 HOW TO FOLD AND MOVE THE TREADMILL 12 MAINTENANCE AND TROUBLESHOOTING 13 CONDITIONING GUIDELINES 15 ORDERING REPLACEMENT PARTS Back Cover Note: A PART IDENTIFICATION CHART, an EXPLODED DRAWING, and a PART LIST are attached in the center of ICON IP, Inc. 2
WESLO is a registered trademark of this manual. TABLE OF CONTENTS IMPORTANT PRECAUTIONS 3 BEFORE YOU BEGIN 5 ASSEMBLY 6 OPERATION AND ADJUSTMENT 9 HOW TO FOLD AND MOVE THE TREADMILL 12 MAINTENANCE AND TROUBLESHOOTING 13 CONDITIONING GUIDELINES 15 ORDERING REPLACEMENT PARTS Back Cover Note: A PART IDENTIFICATION CHART, an EXPLODED DRAWING, and a PART LIST are attached in the center of ICON IP, Inc. 2
English Manual
Page 4
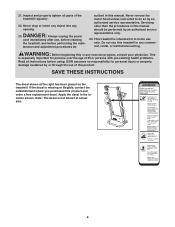
...parts of 35 or persons with pre-existing health problems. Read all instructions before performing the main- Always unplug the power cord immediately after use this product. SAVE THESE INSTRUCTIONS The decal shown at actual size. 50% 4 If the decal is not shown at the right has been placed on the treadmill...damage sustained by an authorized service representative. DANGER: 23. Apply the decal in -home use of this treadmill in any opening. This treadmill is especially important for in the location shown. This is intended for persons over the age of the...
...parts of 35 or persons with pre-existing health problems. Read all instructions before performing the main- Always unplug the power cord immediately after use this product. SAVE THESE INSTRUCTIONS The decal shown at actual size. 50% 4 If the decal is not shown at the right has been placed on the treadmill...damage sustained by an authorized service representative. DANGER: 23. Apply the decal in -home use of this treadmill in any opening. This treadmill is especially important for in the location shown. This is intended for persons over the age of the...
English Manual
Page 5
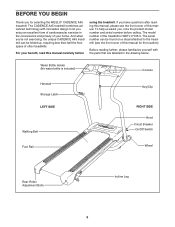
...cardiovascular exercise in the drawing below. Water Bottle Holder (No water bottle is WETL17105.0. The CADENCE A45 treadmill combines advanced technology with the parts that are labelled in the convenience and privacy of your benefit, read this manual carefully ...before calling. For your home. Before reading further, please familiarize yourself with innovative design to the treadmill (see the front cover of this manual for selecting the WESLO® CADENCE A45 treadmill...
...cardiovascular exercise in the drawing below. Water Bottle Holder (No water bottle is WETL17105.0. The CADENCE A45 treadmill combines advanced technology with the parts that are labelled in the convenience and privacy of your benefit, read this manual carefully ...before calling. For your home. Before reading further, please familiarize yourself with innovative design to the treadmill (see the front cover of this manual for selecting the WESLO® CADENCE A45 treadmill...
English Manual
Page 6
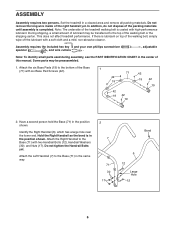
... 7 71 30 17 Bend 6 12 Large Hole 12 6 Attach the Right Handrail to the Base (71) in the position shown. This does not affect treadmill performance. Attach the Left Handrail (7) to the Base (71) with six Base Pad Screws (42). 42 19 71 42 19 42 19 42 19 42.... Assembly requires the included hex key and your own phillips screwdriver spanner , and wire cutters . , adjustable Note: To identify small parts used during assembly, see the PART IDENTIFICATION CHART in the center of the walking belt or the shipping carton. Identify the Right Handrail (6), which has a large hole near...
... 7 71 30 17 Bend 6 12 Large Hole 12 6 Attach the Right Handrail to the Base (71) in the position shown. This does not affect treadmill performance. Attach the Left Handrail (7) to the Base (71) with six Base Pad Screws (42). 42 19 71 42 19 42 19 42 19 42.... Assembly requires the included hex key and your own phillips screwdriver spanner , and wire cutters . , adjustable Note: To identify small parts used during assembly, see the PART IDENTIFICATION CHART in the center of the walking belt or the shipping carton. Identify the Right Handrail (6), which has a large hole near...
English Manual
Page 8
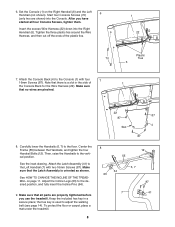
...Adjust the Incline Legs (63) to the vertical position. Start four Console Screws (70) 6 (only two are properly tightened before you have started all parts are shown) into the Right Handrail (6). Then, raise the Handrails to the desired position, and fully insert the Incline Pins (64). 9. To protect ...63 7 87 41 Set the Console (1) on page 11. See HOW TO CHANGE THE INCLINE OF THE TREADMILL on the Right Handrail (6) and the Left Handrail (not shown). After you use the treadmill. Tighten the three plastic ties around the Wire Harness, and then cut off the ends of 1 the Console...
...Adjust the Incline Legs (63) to the vertical position. Start four Console Screws (70) 6 (only two are properly tightened before you have started all parts are shown) into the Right Handrail (6). Then, raise the Handrails to the desired position, and fully insert the Incline Pins (64). 9. To protect ...63 7 87 41 Set the Console (1) on page 11. See HOW TO CHANGE THE INCLINE OF THE TREADMILL on the Right Handrail (6) and the Left Handrail (not shown). After you use the treadmill. Tighten the three plastic ties around the Wire Harness, and then cut off the ends of 1 the Console...
English Manual
Page 15
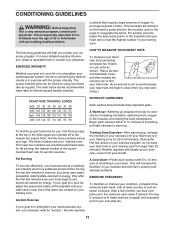
... to cool down. During the first few minutes does your training zone. For aerobic exercise, adjust the speed and incline of the treadmill until your heart rate is to strengthen your cardiovascular system, your heart rate will help you may complete up prepares the body for... WARNING: Before beginning this or any exercise program, consult your heart rate, stop exercising.) WORKOUT GUIDELINES Each workout should include three important parts: To find the three numbers below shows recommended heart rates for fat burning and aerobic exercise. The key to the muscles, and raising...
... to cool down. During the first few minutes does your training zone. For aerobic exercise, adjust the speed and incline of the treadmill until your heart rate is to strengthen your cardiovascular system, your heart rate will help you may complete up prepares the body for... WARNING: Before beginning this or any exercise program, consult your heart rate, stop exercising.) WORKOUT GUIDELINES Each workout should include three important parts: To find the three numbers below shows recommended heart rates for fat burning and aerobic exercise. The key to the muscles, and raising...

English Manual
Page 16
Handrail Washer (30)-6 16mm Screw (87)-6 Handrail Star Washer (60)-2 Console Screw (70)-4 Nut (17)-6 Base Pad Screw (42)-6 Wheel Bolt (14)-2 Handrail Bolt (12)-4 Ha Frame Bolt (10)-2 2 3/4" Bolt (47)-4 Star Washer (81)-4 PART IDENTIFICATION CHART Washer (29)-4 Handrail Washer (11)-2 Remove this chart and the EXPLODED DRAWING/PART LIST for future reference. Save this chart an4d" Buoslet (i1t 2to0)i-d2entify small parts during assembly.
Handrail Washer (30)-6 16mm Screw (87)-6 Handrail Star Washer (60)-2 Console Screw (70)-4 Nut (17)-6 Base Pad Screw (42)-6 Wheel Bolt (14)-2 Handrail Bolt (12)-4 Ha Frame Bolt (10)-2 2 3/4" Bolt (47)-4 Star Washer (81)-4 PART IDENTIFICATION CHART Washer (29)-4 Handrail Washer (11)-2 Remove this chart and the EXPLODED DRAWING/PART LIST for future reference. Save this chart an4d" Buoslet (i1t 2to0)i-d2entify small parts during assembly.
English Manual
Page 17
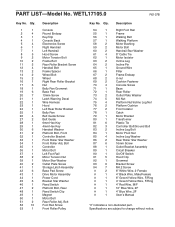
... 8" Green/Yellow Wire, F/Ring 4" Green/Yellow Wire, F/Ring 4" Red Wire, M/F 10" Blue Wire, 2F 4" Blue Wire, 2F User's Manual "#" indicates a non-illustrated part. Bolt Foot Rail Screw Front Roller/Pulley Key No. Specifications are subject to change without notice. Qty. 1 1 2 4 3 1 4 1 5 4 6 1 7 1 8... 1 30 6 31 2 32 1 33 1 34 1 35 1 36 1 37 1 38 2 39 1 40 2 41 1 42 6 43 1 44 1 45 6 46 1 47 2 48 1 49 1 50 1 51 2 52 10 53 1 Description Console Round Endcap Key/Clip Console Back Electronics Screw Right Handrail Left Handrail ...
... 8" Green/Yellow Wire, F/Ring 4" Green/Yellow Wire, F/Ring 4" Red Wire, M/F 10" Blue Wire, 2F 4" Blue Wire, 2F User's Manual "#" indicates a non-illustrated part. Bolt Foot Rail Screw Front Roller/Pulley Key No. Specifications are subject to change without notice. Qty. 1 1 2 4 3 1 4 1 5 4 6 1 7 1 8... 1 30 6 31 2 32 1 33 1 34 1 35 1 36 1 37 1 38 2 39 1 40 2 41 1 42 6 43 1 44 1 45 6 46 1 47 2 48 1 49 1 50 1 51 2 52 10 53 1 Description Console Round Endcap Key/Clip Console Back Electronics Screw Right Handrail Left Handrail ...

English Manual
Page 19
ORDERING REPLACEMENT PARTS To order replacement parts, please contact the establishment where you , be prepared to provide the following information: • the MODEL NUMBER of the product (WETL17105.0) • the NAME of the product (WESLO CADENCE A45 treadmill) • the SERIAL NUMBER of the product (see the front cover of this manual) • the KEY NUMBER and DESCRIPTION of the part(s) (see the PART LIST and EXPLODED DRAWING in China © 2007 ICON IP, Inc. To help us assist you purchased this manual) Part No. 244453 R0107B Printed in the center of this product.
ORDERING REPLACEMENT PARTS To order replacement parts, please contact the establishment where you , be prepared to provide the following information: • the MODEL NUMBER of the product (WETL17105.0) • the NAME of the product (WESLO CADENCE A45 treadmill) • the SERIAL NUMBER of the product (see the front cover of this manual) • the KEY NUMBER and DESCRIPTION of the part(s) (see the PART LIST and EXPLODED DRAWING in China © 2007 ICON IP, Inc. To help us assist you purchased this manual) Part No. 244453 R0107B Printed in the center of this product.


