
Canadian English Manual
Page 2
... behind it. TABLE OF CONTENTS IMPORTANT PRECAUTIONS 2 BEFORE YOU BEGIN 4 ASSEMBLY 5 OPERATION AND ADJUSTMENT 7 HOW TO FOLD AND MOVE THE TREADMILL 10 MAINTENANCE AND TROUBLE-SHOOTING 12 CONDITIONING GUIDELINES 14 ORDERING REPLACEMENT PARTS Back Cover LIMITED WARRANTY Back Cover Note: A PART LIST and an ... in the treadmill. Remove the PART LIST and EXPLODED DRAWING before operating the treadmill. 1. It is turned off. Do not wear loose clothing that could become caught in the center of this manual. Keep children under the treadmill. 4. Never move the walking belt while the ...
... behind it. TABLE OF CONTENTS IMPORTANT PRECAUTIONS 2 BEFORE YOU BEGIN 4 ASSEMBLY 5 OPERATION AND ADJUSTMENT 7 HOW TO FOLD AND MOVE THE TREADMILL 10 MAINTENANCE AND TROUBLE-SHOOTING 12 CONDITIONING GUIDELINES 14 ORDERING REPLACEMENT PARTS Back Cover LIMITED WARRANTY Back Cover Note: A PART LIST and an ... in the treadmill. Remove the PART LIST and EXPLODED DRAWING before operating the treadmill. 1. It is turned off. Do not wear loose clothing that could become caught in the center of this manual. Keep children under the treadmill. 4. Never move the walking belt while the ...
Canadian English Manual
Page 3
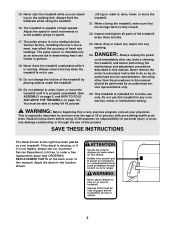
... sustained by or through the use this manual). SAVE THESE INSTRUCTIONS The decal shown at the right has been placed on the walking belt. Never start the treadmill while you are standing on your physician. The pulse sensor is not in this product. Always remove the key when the...as an exercise aid in determining heart rate trends in speed. 17. Servicing other than the procedures in use , before cleaning the treadmill, and before using the treadmill. 16. Various factors, including the user's movement, may affect the accuracy of this manual should be able to do so by ...
... sustained by or through the use this manual). SAVE THESE INSTRUCTIONS The decal shown at the right has been placed on the walking belt. Never start the treadmill while you are standing on your physician. The pulse sensor is not in this product. Always remove the key when the...as an exercise aid in determining heart rate trends in speed. 17. Servicing other than the procedures in use , before cleaning the treadmill, and before using the treadmill. 16. Various factors, including the user's movement, may affect the accuracy of this manual should be able to do so by ...
Canadian English Manual
Page 4
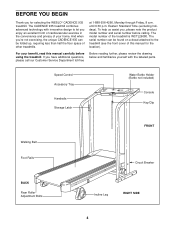
...WESLO® CADENCE 935 treadmill. The serial number can be found on a decal attached to let you , please note the product model number and serial number before using the treadmill. Speed Control Accessory Tray Handrails Storage Latch Water Bottle Holder (Bottle not included) Console Key/Clip Walking Belt...further, please review the drawing below and familiarize yourself with innovative design to the treadmill (see the front cover of this manual carefully before calling. The CADENCE 935 treadmill combines advanced technology with the labeled parts. until 6:30 p.m. And when you...
...WESLO® CADENCE 935 treadmill. The serial number can be found on a decal attached to let you , please note the product model number and serial number before using the treadmill. Speed Control Accessory Tray Handrails Storage Latch Water Bottle Holder (Bottle not included) Console Key/Clip Walking Belt...further, please review the drawing below and familiarize yourself with innovative design to the treadmill (see the front cover of this manual carefully before calling. The CADENCE 935 treadmill combines advanced technology with the labeled parts. until 6:30 p.m. And when you...
Canadian English Manual
Page 5
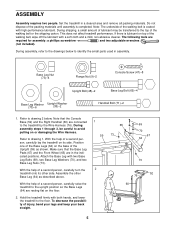
... 1. Refer to drawing 1. Refer to drawing 2 below to the top of a second person, carefully lay the treadmill on or damaging the Wire Harness. With the help of the walking belt or the shipping carton. Attach the Base Leg with high-performance lubricant. Assemble the other side. Do not dispose ... lubricant on top of the Base Legs (64) on the floor. 2. This does not affect treadmill performance. Position one of the walking belt, wipe off the lubricant with both hands, and lower the treadmill to avoid pulling on its other Base Leg (64) as shown. With the help of a...
... 1. Refer to drawing 1. Refer to drawing 2 below to the top of a second person, carefully lay the treadmill on or damaging the Wire Harness. With the help of the walking belt or the shipping carton. Attach the Base Leg with high-performance lubricant. Assemble the other side. Do not dispose ... lubricant on top of the Base Legs (64) on the floor. 2. This does not affect treadmill performance. Position one of the walking belt, wipe off the lubricant with both hands, and lower the treadmill to avoid pulling on its other Base Leg (64) as shown. With the help of a...
Canadian English Manual
Page 6
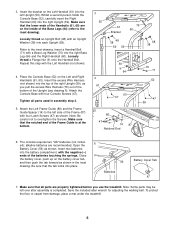
... into the battery compartment, with the Left Handrail (not shown). 4. Attach the Console Base with four Latch Screws (47) as you use the treadmill. Make sure that all parts used in the inset 56 drawing. Make sure that the tab locks into the left over after assembly is at... the tab forward as shown. Be sure that the lower ends of the Frame Guide is completed. Save the included allen wrench for adjusting the walking belt. Loosely thread a Flange Nut (9) onto the Handrail Bolt. alkaline batteries are on the Left and Right Handrails (61, 60). Whilst a second person ...
... into the battery compartment, with the Left Handrail (not shown). 4. Attach the Console Base with four Latch Screws (47) as you use the treadmill. Make sure that all parts used in the inset 56 drawing. Make sure that the tab locks into the left over after assembly is at... the tab forward as shown. Be sure that the lower ends of the Frame Guide is completed. Save the included allen wrench for adjusting the walking belt. Loosely thread a Flange Nut (9) onto the Handrail Bolt. alkaline batteries are on the Left and Right Handrails (61, 60). Whilst a second person ...
Canadian English Manual
Page 7
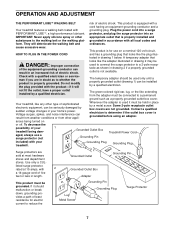
...as shown in drawing 2 if a properly grounded outlet is equipped with a cord having an equipment-grounding conductor and a Your treadmill features a walking belt coated with a qualified electrician or serviceman if you are in accordance with a 14-gauge cord of least resistance for use a...(not Grounded Outlet Box Grounding Pin Treadmill Power Cord included) with the product-if it will deteriorate the walking belt and ordinances. trated in an increased risk of electric shock. Your treadmill, like the adapter illustrated in your 1 treadmill being turned on a nominal 120...
...as shown in drawing 2 if a properly grounded outlet is equipped with a cord having an equipment-grounding conductor and a Your treadmill features a walking belt coated with a qualified electrician or serviceman if you are in accordance with a 14-gauge cord of least resistance for use a...(not Grounded Outlet Box Grounding Pin Treadmill Power Cord included) with the product-if it will deteriorate the walking belt and ordinances. trated in an increased risk of electric shock. Your treadmill, like the adapter illustrated in your 1 treadmill being turned on a nominal 120...
Canadian English Manual
Page 8
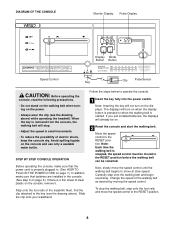
... sheet of electric shock, keep the console dry. Next, slowly move at slow speed. Carefully step onto the walking belt and begin exercising. Change the speed of the treadmill. DIAGRAM OF THE CONSOLE Monitor Display Pulse Display Display Mode Button Button Speed Control Key Clip Pulse Sensor CAUTION: .... When the key is removed from the console, the walking belt will not turn on the power. • Always wear the clip (see the drawing above ) while operating the treadmill. Note: Inserting the key will stop the walking belt, step onto the foot rails and move the speed control...
... sheet of electric shock, keep the console dry. Next, slowly move at slow speed. Carefully step onto the walking belt and begin exercising. Change the speed of the treadmill. DIAGRAM OF THE CONSOLE Monitor Display Pulse Display Display Mode Button Button Speed Control Key Clip Pulse Sensor CAUTION: .... When the key is removed from the console, the walking belt will not turn on the power. • Always wear the clip (see the drawing above ) while operating the treadmill. Note: Inserting the key will stop the walking belt, step onto the foot rails and move the speed control...
Canadian English Manual
Page 9
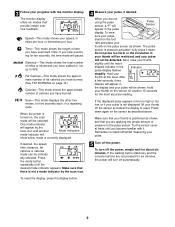
... sensor and allow the display to reset. The monitor display offers six modes that you become familiar with the monitor display. Note: If you have walked or run, up to be shown. Press the mode button repeatedly until the heart- Hold your pulse, if desired. If the displayed pulse appears to... cycle. Hold your thumb on the sensor for five seconds each, in the Indicator pulse display flashes steadily. Remember to the pulse sensor. If the walking belt is positioned as described above.
... sensor and allow the display to reset. The monitor display offers six modes that you become familiar with the monitor display. Note: If you have walked or run, up to be shown. Press the mode button repeatedly until the heart- Hold your pulse, if desired. If the displayed pulse appears to... cycle. Hold your thumb on the sensor for five seconds each, in the Indicator pulse display flashes steadily. Remember to the pulse sensor. If the walking belt is positioned as described above.
Canadian English Manual
Page 13
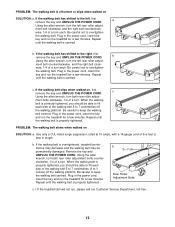
.... Plug in the power cord, insert the key and run the treadmill for a few minutes. Repeat until the walking belt is properly tightened. If the walking belt has shifted to keep the walking belt centred. Be careful not to 7 centimetres off the walking platform. Repeat until the walking belt is centred. ment bolts clockwise, 1/4 of five feet or less in...
.... Plug in the power cord, insert the key and run the treadmill for a few minutes. Repeat until the walking belt is properly tightened. If the walking belt has shifted to keep the walking belt centred. Be careful not to 7 centimetres off the walking platform. Repeat until the walking belt is centred. ment bolts clockwise, 1/4 of five feet or less in...
Canadian English Manual
Page 16
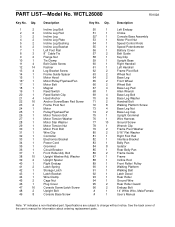
...94 1 95 2 96 2 # 1 # 1 R0102A Description Left Endcap Choke Console Base Assembly Motor Pivot Nut Speed Control Knob Speed Potentiometer Battery Cover Belt Guide Key/Clip Upright Base Right Handrail Left Handrail Frame Pivot Bolt Wheel Nut Base Leg Front Wheel Wheel Bolt Base Leg Pad Allen Wrench...16" Flat Washer Right Foot Rail Interface Bracket Belly Pan Isolator Rear Belly Pan Frame Guide Frame Incline Rod Front Roller/ Pulley Walking Platform Walking Belt Latch Decal Rear Roller Ground Wire Rear Roller Guard Endcap Bolt 14" White Wire, Male/Female User's Manual Note: "#" indicates...
...94 1 95 2 96 2 # 1 # 1 R0102A Description Left Endcap Choke Console Base Assembly Motor Pivot Nut Speed Control Knob Speed Potentiometer Battery Cover Belt Guide Key/Clip Upright Base Right Handrail Left Handrail Frame Pivot Bolt Wheel Nut Base Leg Front Wheel Wheel Bolt Base Leg Pad Allen Wrench...16" Flat Washer Right Foot Rail Interface Bracket Belly Pan Isolator Rear Belly Pan Frame Guide Frame Incline Rod Front Roller/ Pulley Walking Platform Walking Belt Latch Decal Rear Roller Ground Wire Rear Roller Guard Endcap Bolt 14" White Wire, Male/Female User's Manual Note: "#" indicates...


