
Uk Manual
Page 1
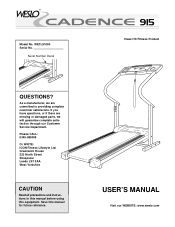
...: 0345-089009 Or WRITE: ICON Fitness Lifestyle Ltd. As a manufacturer, we are missing or damaged parts, we will guarantee complete satisfaction through our Customer Service Department. Serial Number Decal Class HC Fitness Product QUESTIONS? Greenwich House 223 North Street Sheepscar Leeds LS7 2AA West Yorkshire CAUTION Read all precautions and instructions in this manual before using this manual for future reference.
...: 0345-089009 Or WRITE: ICON Fitness Lifestyle Ltd. As a manufacturer, we are missing or damaged parts, we will guarantee complete satisfaction through our Customer Service Department. Serial Number Decal Class HC Fitness Product QUESTIONS? Greenwich House 223 North Street Sheepscar Leeds LS7 2AA West Yorkshire CAUTION Read all precautions and instructions in this manual before using this manual for future reference.

Uk Manual
Page 2
... (115 kg). 13. Wear appropriate exercise clothing when using the treadmill. 2 Remove the PART LIST and EXPLODED DRAWING before operating the treadmill. 1. Keep the power cord away from damage, place a mat under the age of clearance behind it. Athletic support clothes are standing on the walking belt. When connecting the power cord (see HOW TO PLUG IN THE POWER CORD on the treadmill at all warnings and precautions. 2. Never...
... (115 kg). 13. Wear appropriate exercise clothing when using the treadmill. 2 Remove the PART LIST and EXPLODED DRAWING before operating the treadmill. 1. Keep the power cord away from damage, place a mat under the age of clearance behind it. Athletic support clothes are standing on the walking belt. When connecting the power cord (see HOW TO PLUG IN THE POWER CORD on the treadmill at all warnings and precautions. 2. Never...
Uk Manual
Page 3
... power cord and adjust the roller guards, if necessary. 21. Servicing other than the procedures in any commercial, rental, or institutional setting. 26. WARNING: Before beginning this manual. lems. Read all parts of this treadmill in this manual should be performed by or through the use only. The treadmill is running. The pulse sensor is not legible, please call our Customer Service Department to order a free replacement...
... power cord and adjust the roller guards, if necessary. 21. Servicing other than the procedures in any commercial, rental, or institutional setting. 26. WARNING: Before beginning this manual. lems. Read all parts of this treadmill in this manual should be performed by or through the use only. The treadmill is running. The pulse sensor is not legible, please call our Customer Service Department to order a free replacement...
Uk Manual
Page 4
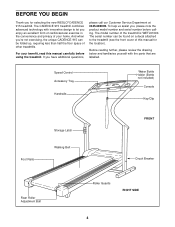
... form of cardiovascular exercise in the convenience and privacy of other treadmills. For your home. The model number of this manual carefully before calling. Speed Control Accessory Tray Handrails Water Bottle Holder (Bottle not included) Console Key/Clip Foot Rails Storage Latch Walking Belt FRONT Circuit Breaker Rear Roller Adjustment Bolt Roller Guards RIGHT SIDE 4 The CADENCE 915 treadmill combines advanced technology with the parts that are labelled. The serial number can be found on a decal attached...
... form of cardiovascular exercise in the convenience and privacy of other treadmills. For your home. The model number of this manual carefully before calling. Speed Control Accessory Tray Handrails Water Bottle Holder (Bottle not included) Console Key/Clip Foot Rails Storage Latch Walking Belt FRONT Circuit Breaker Rear Roller Adjustment Bolt Roller Guards RIGHT SIDE 4 The CADENCE 915 treadmill combines advanced technology with the parts that are labelled. The serial number can be found on a decal attached...

Uk Manual
Page 5
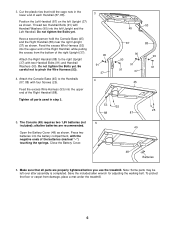
... until assembly is completed. • The underside of lubricant may be sure that all parts in a cleared area and remove the packing materials; During shipping, a small amount of the treadmill walking belt is lubricant on its other Base Leg (55) as shown. If there is coated with four Screws (25). Make sure that the thick end of the four Base Leg Bolts...
... until assembly is completed. • The underside of lubricant may be sure that all parts in a cleared area and remove the packing materials; During shipping, a small amount of the treadmill walking belt is lubricant on its other Base Leg (55) as shown. If there is coated with four Screws (25). Make sure that the thick end of the four Base Leg Bolts...
Uk Manual
Page 6
... treadmill. 6 Save the included allen wrench for adjusting the walking belt. Position the Left Handrail (87) on the left over after assembly is completed. Open the Battery Cover (48) as shown. Make sure that hold the Console Base (45) and the Right Handrail (88) near the right Upright (37) as shown. Tighten all parts are recommended. Cut the plastic ties that all parts used...
... treadmill. 6 Save the included allen wrench for adjusting the walking belt. Position the Left Handrail (87) on the left over after assembly is completed. Open the Battery Cover (48) as shown. Make sure that hold the Console Base (45) and the Right Handrail (88) near the right Upright (37) as shown. Tighten all parts are recommended. Cut the plastic ties that all parts used...
Uk Manual
Page 7
... TO PLUG IN THE POWER CORD This product must be earthed. DANGER: Improper connection of the cord into an appropriate outlet that is equipped with all local codes and ordinances. Plug one end of the equipment-earthing conductor can result in doubt as to the walking belt or the walking platform. OPERATION AND ADJUSTMENT THE PERFORMANT LUBETM WALKING BELT Your treadmill features a walking belt coated with...
... TO PLUG IN THE POWER CORD This product must be earthed. DANGER: Improper connection of the cord into an appropriate outlet that is equipped with all local codes and ordinances. Plug one end of the equipment-earthing conductor can result in doubt as to the walking belt or the walking platform. OPERATION AND ADJUSTMENT THE PERFORMANT LUBETM WALKING BELT Your treadmill features a walking belt coated with...
Uk Manual
Page 8
... the power switch. Note: Inserting the key will already be moved to the key (see the drawing above ). If you just installed batteries, the displays will not turn on when the display button is pressed or when the walking belt is started . Carefully step onto the walking belt and begin exercising. Follow the steps below to move the speed control to the RESET position. To stop . • Adjust the speed in the console. (See step 5 on the console and use only...
... the power switch. Note: Inserting the key will already be moved to the key (see the drawing above ). If you just installed batteries, the displays will not turn on when the display button is pressed or when the walking belt is started . Carefully step onto the walking belt and begin exercising. Follow the steps below to move the speed control to the RESET position. To stop . • Adjust the speed in the console. (See step 5 on the console and use only...
Uk Manual
Page 9
... sensor as described above. If the displayed pulse appears to reset. Try the sensor several times until the desired mode indicator appears. Note: If you are not pressed for six minutes, the power will turn off the power. shaped indicator in miles per hour or kilometres per hour. Make sure that you stop exercising for about six minutes. If the walking belt is turned on the pulse sensor...
... sensor as described above. If the displayed pulse appears to reset. Try the sensor several times until the desired mode indicator appears. Note: If you are not pressed for six minutes, the power will turn off the power. shaped indicator in miles per hour or kilometres per hour. Make sure that you stop exercising for about six minutes. If the walking belt is turned on the pulse sensor...
Uk Manual
Page 10
... direct sunlight. This will reset the console. Move your hands in order to the console base. HOW TO SELECT KILOMETRES AND MILES The console can display distance and speed in temperatures above 30° C. 10 Storage Latch Closed Frame Guide Locate the small switch on the wires, and turn the console over the frame guide. Raise the treadmill about five seconds and then reinsert it. After changing the unit of measurement, remove...
... direct sunlight. This will reset the console. Move your hands in order to the console base. HOW TO SELECT KILOMETRES AND MILES The console can display distance and speed in temperatures above 30° C. 10 Storage Latch Closed Frame Guide Locate the small switch on the wires, and turn the console over the frame guide. Raise the treadmill about five seconds and then reinsert it. After changing the unit of measurement, remove...
Uk Manual
Page 11
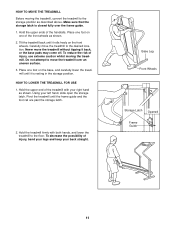
... the risk of injury, bend your legs and keep your left hand, slide open the storage latch. To decrease the possibility of injury, use extreme caution whilst moving the treadmill, convert the treadmill to the desired location. Hold the upper ends of the treadmill with both hands, and lower the treadmill to move the treadmill over the frame guide. 1. Using your back straight. Hold the upper...
... the risk of injury, bend your legs and keep your left hand, slide open the storage latch. To decrease the possibility of injury, use extreme caution whilst moving the treadmill, convert the treadmill to the desired location. Hold the upper ends of the treadmill with both hands, and lower the treadmill to move the treadmill over the frame guide. 1. Using your back straight. Hold the upper...
Uk Manual
Page 12
... the power cord. Turn the Pulley until the Magnet is no longer than 5 feet (1.5m). Retighten the Screw. c. Check the circuit breaker located on the left side of drained batteries. b. c. PROBLEM: THE DISPLAYS OF THE CONSOLE DO NOT FUNCTION PROPERLY SOLUTION: a. b. Remove the key from the console. Remove the screws from the hood. If necessary, loosen the Screw (52) and move the Reed Switch slightly. MAINTENANCE AND TROUBLE-SHOOTING Most treadmill problems can be replaced...
... the power cord. Turn the Pulley until the Magnet is no longer than 5 feet (1.5m). Retighten the Screw. c. Check the circuit breaker located on the left side of drained batteries. b. c. PROBLEM: THE DISPLAYS OF THE CONSOLE DO NOT FUNCTION PROPERLY SOLUTION: a. b. Remove the key from the console. Remove the screws from the hood. If necessary, loosen the Screw (52) and move the Reed Switch slightly. MAINTENANCE AND TROUBLE-SHOOTING Most treadmill problems can be replaced...
Uk Manual
Page 13
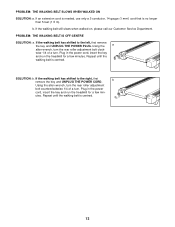
... wrench, turn . Plug in the power cord, insert the key and run the treadmill for a few min- SOLUTION: b. utes. If the walking belt has shifted to the right, first b remove the key and UNPLUG THE POWER CORD. wise 1/4 of a turn. If the walking belt still slows when walked on, please call our Customer Service Department. Using the allen wrench, turn the rear roller adjustment bolt counterclockwise 1/4 of a turn the rear roller adjustment bolt clock- PROBLEM: THE WALKING BELT SLOWS WHEN WALKED ON...
... wrench, turn . Plug in the power cord, insert the key and run the treadmill for a few min- SOLUTION: b. utes. If the walking belt has shifted to the right, first b remove the key and UNPLUG THE POWER CORD. wise 1/4 of a turn. If the walking belt still slows when walked on, please call our Customer Service Department. Using the allen wrench, turn the rear roller adjustment bolt counterclockwise 1/4 of a turn the rear roller adjustment bolt clock- PROBLEM: THE WALKING BELT SLOWS WHEN WALKED ON...
Uk Manual
Page 14
... and light exercise. For aerobic exercise, adjust the speed of the treadmill until your heart rate is especially important for you to 10 minutes of heart rate readings. Training Zone Exercise After warming up increases your body temperature, heart rate, and circulation in your body begin to use the pulse sensor on the lungs to cool down Finish each workout with pre-existing health problems. The pulse sensor is intended only as a guide. Fat...
... and light exercise. For aerobic exercise, adjust the speed of the treadmill until your heart rate is especially important for you to 10 minutes of heart rate readings. Training Zone Exercise After warming up increases your body temperature, heart rate, and circulation in your body begin to use the pulse sensor on the lungs to cool down Finish each workout with pre-existing health problems. The pulse sensor is intended only as a guide. Fat...
Uk Manual
Page 15
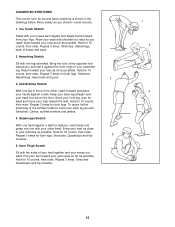
...times. Toe Touch Stretch Stand with one leg extended. Stretches: Hamstrings, lower back and groin. 3 3. Hold for 15 counts, then relax. To cause further stretching of the achilles tendons, bend your toes as far as possible. Hold for 15 counts, then relax. Move slowly as possible. Repeat 3 times.... The correct form for several basic stretches is shown in front of the other hand. Allow your back and shoulders to your knees outward. Stretches: Hamstrings, back of your feet together and your buttocks as well. Bend your front leg, lean forward and move your hips ...
...times. Toe Touch Stretch Stand with one leg extended. Stretches: Hamstrings, lower back and groin. 3 3. Hold for 15 counts, then relax. To cause further stretching of the achilles tendons, bend your toes as far as possible. Hold for 15 counts, then relax. Move slowly as possible. Repeat 3 times.... The correct form for several basic stretches is shown in front of the other hand. Allow your back and shoulders to your knees outward. Stretches: Hamstrings, back of your feet together and your buttocks as well. Bend your front leg, lean forward and move your hips ...
Uk Manual
Page 16
... (WESLO® CADENCE 915 treadmill) • The MODEL NUMBER of the product (WETL91090) • The PART NUMBER of the part (see the EXPLODED DRAWING and PART LIST attached in the centre of this manual) • The DESCRIPTION of ICON Health & Fitness, Inc. office, or write: ICON Fitness Lifestyle Ltd. WESLO® is a registered trademark of the part (see the EXPLODED DRAWING and PART LIST attached in Canada © 1999 ICON Health & Fitness, Inc. ORDERING REPLACEMENT PARTS To order replacement parts...
... (WESLO® CADENCE 915 treadmill) • The MODEL NUMBER of the product (WETL91090) • The PART NUMBER of the part (see the EXPLODED DRAWING and PART LIST attached in the centre of this manual) • The DESCRIPTION of ICON Health & Fitness, Inc. office, or write: ICON Fitness Lifestyle Ltd. WESLO® is a registered trademark of the part (see the EXPLODED DRAWING and PART LIST attached in Canada © 1999 ICON Health & Fitness, Inc. ORDERING REPLACEMENT PARTS To order replacement parts...

Uk Manual
Page 17
Note: Specifications are subject to change without notice. REMOVE THIS EXPLODED DRAWING AND PART LIST FROM THE MANUAL Save this EXPLODED DRAWING and PART LIST for future reference. For information about ordering replacement parts, see the back cover of the User's Manual. 34
Note: Specifications are subject to change without notice. REMOVE THIS EXPLODED DRAWING AND PART LIST FROM THE MANUAL Save this EXPLODED DRAWING and PART LIST for future reference. For information about ordering replacement parts, see the back cover of the User's Manual. 34
Uk Manual
Page 18
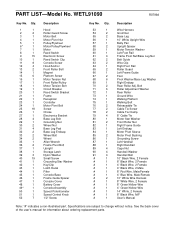
... Roller Bolt Magnet Platform Screw Motor Tension Nut Front Roller/Pulley Motor Tension Bolt Circuit Breaker Reed Switch Bracket Frame Receptical Controller Motor Pivot Bolt Screw Choke Electronics Bracket Base Leg Bolt Grounding Nut Wheel Nut Base Leg Pad Base Leg Endcap Wheel Bolt Wheel Allen Wrench Frame Pivot Bolt Upright Storage Latch Nylon Washer Small Screw Grounding Star Washer Key/Clip Latch Decal Filter Console Base Frame Guide Spacer Console Cover Battery Cover Console Assembly Speed Potentiometer Speed Control Knob 1/2" Screw Key No. Specifications are subject to change without...
... Roller Bolt Magnet Platform Screw Motor Tension Nut Front Roller/Pulley Motor Tension Bolt Circuit Breaker Reed Switch Bracket Frame Receptical Controller Motor Pivot Bolt Screw Choke Electronics Bracket Base Leg Bolt Grounding Nut Wheel Nut Base Leg Pad Base Leg Endcap Wheel Bolt Wheel Allen Wrench Frame Pivot Bolt Upright Storage Latch Nylon Washer Small Screw Grounding Star Washer Key/Clip Latch Decal Filter Console Base Frame Guide Spacer Console Cover Battery Cover Console Assembly Speed Potentiometer Speed Control Knob 1/2" Screw Key No. Specifications are subject to change without...
Uk Manual
Page 19
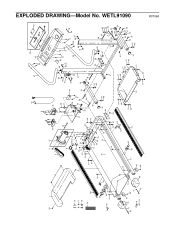
... 41 29 53 34 61 71 40 71 40 32 71 30 33 55 68 31 28 68 40 31 28 40 R0799A EXPLODED DRAWING-Model No.
... 41 29 53 34 61 71 40 71 40 32 71 30 33 55 68 31 28 68 40 31 28 40 R0799A EXPLODED DRAWING-Model No.


