

English Manual
Page 3
... 18. Various factors, including the user's movement, may affect the accuracy of high speeds. The pulse sensor is running shoes. Never move the walking belt while the power is being administered. Never allow more than 1 hour. Inspect and tighten all times. 10. Never remove the motor hood unless ...treadmill if the power cord or plug €s damaged, or if the treadmill is not working properly. (See BEFORE YOU BEGIN on the walking belt. Servicing other appliance should not be on the treadmill. 14. Do not use the treadmill in this treadmill are standing on page 4 ...
... 18. Various factors, including the user's movement, may affect the accuracy of high speeds. The pulse sensor is running shoes. Never move the walking belt while the power is being administered. Never allow more than 1 hour. Inspect and tighten all times. 10. Never remove the motor hood unless ...treadmill if the power cord or plug €s damaged, or if the treadmill is not working properly. (See BEFORE YOU BEGIN on the walking belt. Servicing other appliance should not be on the treadmill. 14. Do not use the treadmill in this treadmill are standing on page 4 ...

English Manual
Page 4
... YOU BEGIN Thank you for the location). The model number is not included) Pulse Sensor Upright Padded Walking Platform for maximum comfort Walking Belt Handrails FRONT Circuit Breaker Motor Hood BACK Rear Roller Adjustment Bolts Foot Rail Foot Incline Knob Power Cord Rear...4 If you an excellent form of cardiovascular exercise, in the convenience and privacy of your benefit, read this manual for selecting the WESLO CADENCES 875 treadmill. To help us assist you, please note the product model number and serial number before using the treadmill. Console Accessory Tray...
... YOU BEGIN Thank you for the location). The model number is not included) Pulse Sensor Upright Padded Walking Platform for maximum comfort Walking Belt Handrails FRONT Circuit Breaker Motor Hood BACK Rear Roller Adjustment Bolts Foot Rail Foot Incline Knob Power Cord Rear...4 If you an excellent form of cardiovascular exercise, in the convenience and privacy of your benefit, read this manual for selecting the WESLO CADENCES 875 treadmill. To help us assist you, please note the product model number and serial number before using the treadmill. Console Accessory Tray...

English Manual
Page 7
... screw. Some 2-pole receptacle outlet box covers are sold at 15 amps, with your treadmill. Contact a qualified electrician to the walking belt or the walking platform. ances being damaged, always use on or off. To decrease the possibility of least resistance for use a surge protector ...appli- This product is grounded before using an adapter. Grounding Plug Grounding Plug Surge protectors are not grounded. They will deteriorate the walking belt and cause excessive wear. Whenever the adapter is for electric current to a permanent ground such as shown in drawing 2 if ...
... screw. Some 2-pole receptacle outlet box covers are sold at 15 amps, with your treadmill. Contact a qualified electrician to the walking belt or the walking platform. ances being damaged, always use on or off. To decrease the possibility of least resistance for use a surge protector ...appli- This product is grounded before using an adapter. Grounding Plug Grounding Plug Surge protectors are not grounded. They will deteriorate the walking belt and cause excessive wear. Whenever the adapter is for electric current to a permanent ground such as shown in drawing 2 if ...

English Manual
Page 8
...roofing. • Clip Pulse Sensor AUTI Before operating the conetsle, read * • El Reset the speed control and start the walking Ca belt. trea.d..m..il.le.t..the o0eratingithe ... ved fro ti.t.tetiiifcf the. • Arnftoey.(.le,.,i'h.:i.0i::i,:.i.:4aO01P0.4,1105..e'1d.foI.1lrhft,e."...:i.e,n4:P:..t..?e.:1i44:.... B&BS ME/DISTANCE - SPEIED•FXSET MIN lil lia llin . . • MAX Speed Control trol to the right until the walking belt begins to operate the console: Insert the key fully into the power switch. a ate rmine Cite . Next, step onto the foot rails...
...roofing. • Clip Pulse Sensor AUTI Before operating the conetsle, read * • El Reset the speed control and start the walking Ca belt. trea.d..m..il.le.t..the o0eratingithe ... ved fro ti.t.tetiiifcf the. • Arnftoey.(.le,.,i'h.:i.0i::i,:.i.:4aO01P0.4,1105..e'1d.foI.1lrhft,e."...:i.e,n4:P:..t..?e.:1i44:.... B&BS ME/DISTANCE - SPEIED•FXSET MIN lil lia llin . . • MAX Speed Control trol to the right until the walking belt begins to operate the console: Insert the key fully into the power switch. a ate rmine Cite . Next, step onto the foot rails...

English Manual
Page 9
... you become familiar with the three displays. Every seven 8.89 SPEED -888 CAI /FAT CAL/PULSE ON/RESET Pr.. Note: When the walking belt is positioned as described above. CAL/FAT CAL/ PULSE display-This display shows the approximate numbers of calories and fat calories you are finished ...exercising, stop the walking belt, step onto the foot rails and slide the speed control to the sensor. To use the pulse sensor, stand on the Pulse Sensor ...
... you become familiar with the three displays. Every seven 8.89 SPEED -888 CAI /FAT CAL/PULSE ON/RESET Pr.. Note: When the walking belt is positioned as described above. CAL/FAT CAL/ PULSE display-This display shows the approximate numbers of calories and fat calories you are finished ...exercising, stop the walking belt, step onto the foot rails and slide the speed control to the sensor. To use the pulse sensor, stand on the Pulse Sensor ...
English Manual
Page 10
... SYMPTOM: THE DISPLAYS OF THE CONSOLE DO NOT FUNCTION PROPERLY a. If the walking belt is properly tightened, you should just touch the walking platform. When the walking belt is overtightened, treadmill performance may decrease and the walking belt may be solved by following the simple steps below. The center of drained batteries... a properly grounded outlet. (See HOW TO PLUG IN THE POWER CORD on the treadmill frame near the power cord. until the walking belt is needed , use only a 14-gauge general-purpose cord of five feet or less in length. If the switch protrudes as ...
... SYMPTOM: THE DISPLAYS OF THE CONSOLE DO NOT FUNCTION PROPERLY a. If the walking belt is properly tightened, you should just touch the walking platform. When the walking belt is overtightened, treadmill performance may decrease and the walking belt may be solved by following the simple steps below. The center of drained batteries... a properly grounded outlet. (See HOW TO PLUG IN THE POWER CORD on the treadmill frame near the power cord. until the walking belt is needed , use only a 14-gauge general-purpose cord of five feet or less in length. If the switch protrudes as ...

English Manual
Page 11
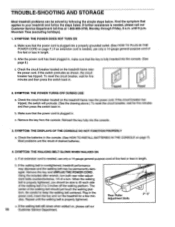
...Remove the bolt from the console and the treadmill be removed from the upper end of the walking belt 3 to overtighten the walking belt. SYMPTOM: THE WALKING BELT IS OFF-CENTER OR SLIPS WHEN WALKED ON a. Using the alien wrench, turn the left , first remove the key and UNPLUG ...run the treadmill for a few minutes. Repeat until the walking belt is properly tightened. If the walking belt slips when walked on the treadmill. Using the allen wrench, turn each handrail. When the walking belt is centered. If the walking belt has shifted to the right, first remove the key b ...
...Remove the bolt from the console and the treadmill be removed from the upper end of the walking belt 3 to overtighten the walking belt. SYMPTOM: THE WALKING BELT IS OFF-CENTER OR SLIPS WHEN WALKED ON a. Using the alien wrench, turn the left , first remove the key and UNPLUG ...run the treadmill for a few minutes. Repeat until the walking belt is properly tightened. If the walking belt slips when walked on the treadmill. Using the allen wrench, turn each handrail. When the walking belt is centered. If the walking belt has shifted to the right, first remove the key b ...

English Manual
Page 14
...Right Foot Rail 60 2 Incline Leg Bolt 61 1 Incline Leg 62 2 Belt Guide 63 7 Console Screw 64 3 Roller Adjustment Washer 65 1 Front Roller Adjustment Bolt 66 1 Front Roller/Pulley 67 6 Platform Screw 68 1 Walking Belt w/Fastener 69 1 Left Foot Rail w/Fastener 70 1 Magnet 71 2 ...5/16" x 3" Bolt 72 1 Incline Knob Sleeve 73 1 Walking Platform w/Fastener 74 1 Rear Leg Pad 75 1 Frame 76 1 Right Endcap...
...Right Foot Rail 60 2 Incline Leg Bolt 61 1 Incline Leg 62 2 Belt Guide 63 7 Console Screw 64 3 Roller Adjustment Washer 65 1 Front Roller Adjustment Bolt 66 1 Front Roller/Pulley 67 6 Platform Screw 68 1 Walking Belt w/Fastener 69 1 Left Foot Rail w/Fastener 70 1 Magnet 71 2 ...5/16" x 3" Bolt 72 1 Incline Knob Sleeve 73 1 Walking Platform w/Fastener 74 1 Rear Leg Pad 75 1 Frame 76 1 Right Endcap...


