
English Manual
Page 3
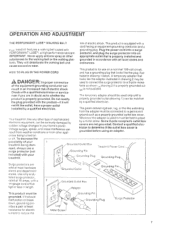
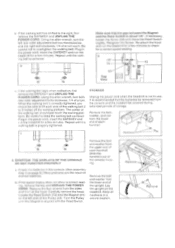
.... 13. Never allow more amps. Keep the power cord and the surge protector away from damage, place a mat under the treadmill. 4. Never start the treadmill while you are adequately informed of carrying 15 or more than one person on the walking belt. Adjust the speed In small increments...all warnings and precautions. 2. Never remove the motor hood unless instructed to ensure that blocks air openings. It Is the responsibility of the treadmill overheating, do so by persons weighing 250 pounds or less. Keep small children and pets away from moisture and dust. To reduce the ...
.... 13. Never allow more amps. Keep the power cord and the surge protector away from damage, place a mat under the treadmill. 4. Never start the treadmill while you are adequately informed of carrying 15 or more than one person on the walking belt. Adjust the speed In small increments...all warnings and precautions. 2. Never remove the motor hood unless instructed to ensure that blocks air openings. It Is the responsibility of the treadmill overheating, do so by persons weighing 250 pounds or less. Keep small children and pets away from moisture and dust. To reduce the ...
English Manual
Page 4
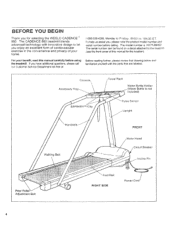
... you enjoy an excellent form of cardiovascular exercise in the convenience and privacy of this manual for selecting the WESLO CADENCE 860. The CADENCE 86O treadmill blends advanced technology with innovative design to let you have additional questions, please call our Customer Service Department toil-free at Before reading further, please ...
... you enjoy an excellent form of cardiovascular exercise in the convenience and privacy of this manual for selecting the WESLO CADENCE 860. The CADENCE 86O treadmill blends advanced technology with innovative design to let you have additional questions, please call our Customer Service Department toil-free at Before reading further, please ...
English Manual
Page 5
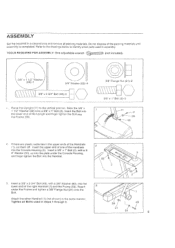
ASSEMBLY Set the treadmill in steps 1 through 3. • 5 59 ,/ 49 21 50 5 Attach the other Handrail (1) (not shown) in the same manner Tighten all packing materials. TOOLS REQUIRED FOR ...
ASSEMBLY Set the treadmill in steps 1 through 3. • 5 59 ,/ 49 21 50 5 Attach the other Handrail (1) (not shown) in the same manner Tighten all packing materials. TOOLS REQUIRED FOR ...
English Manual
Page 6
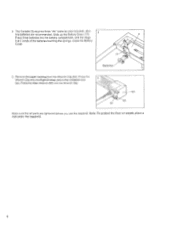
4. alka- 4 line batteries are tightened bi,.:lore you use the treadmill. Note: To protect the floor or carpet, place a mat under the treadmill, 6 tive (-) ends of the batteries touching the springs. Press the Men Wrench (65) into the battery compartment, with the nega- Close the Battery Cover. 77 ...
4. alka- 4 line batteries are tightened bi,.:lore you use the treadmill. Note: To protect the floor or carpet, place a mat under the treadmill, 6 tive (-) ends of the batteries touching the springs. Press the Men Wrench (65) into the battery compartment, with the nega- Close the Battery Cover. 77 ...
English Manual
Page 7
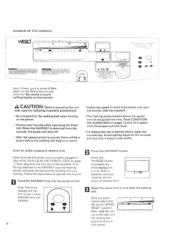
... such as shown in drawing 2 if a properly grounded outlet is equipped with a cord having an equipment-grounding conductor and a Your treadmill features a walking belt coated with a qualified electrician or serviceman if you are in your home's power. Check with grounding plug. Voltage...AND ADJUSTMENT THE PERFORMANT LURE"' WALKING BELT risk of least resistance for use a surge protector (not / Grounded Outlet Box 1, Grounding Pin Treadmill Power Cord-. Do not modify the plug provided with all local codes and form. grounding provides a path of electric shock. trician to...
... such as shown in drawing 2 if a properly grounded outlet is equipped with a cord having an equipment-grounding conductor and a Your treadmill features a walking belt coated with a qualified electrician or serviceman if you are in your home's power. Check with grounding plug. Voltage...AND ADJUSTMENT THE PERFORMANT LURE"' WALKING BELT risk of least resistance for use a surge protector (not / Grounded Outlet Box 1, Grounding Pin Treadmill Power Cord-. Do not modify the plug provided with all local codes and form. grounding provides a path of electric shock. trician to...
English Manual
Page 8
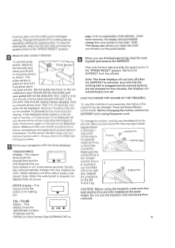
...the Ora/RESET button. a CAUTION: Before operating the con- Avoid spilling liquid on the power. • Always wear the clip while operating the treadmill. STEP BY STEP CONSOLE OPERATION Make sure that the power cord is a thin sheet orreal plastic oh the face of your clothing. I 144 Reset... the speed control and start the walking belt. Next, slide the control to the right until you are familiar with the treadmill. • The training zones marked above ), and slide the clip onto the waistband of the console, remove it. DIAGRAM OF THE CONSOLE i ...
...the Ora/RESET button. a CAUTION: Before operating the con- Avoid spilling liquid on the power. • Always wear the clip while operating the treadmill. STEP BY STEP CONSOLE OPERATION Make sure that the power cord is a thin sheet orreal plastic oh the face of your clothing. I 144 Reset... the speed control and start the walking belt. Next, slide the control to the right until you are familiar with the treadmill. • The training zones marked above ), and slide the clip onto the waistband of the console, remove it. DIAGRAM OF THE CONSOLE i ...
English Manual
Page 9
... foot rails and slide the speed control to reset. Always stand still while measuring your pulse. 0 Follow your exercise, the incline of the treadmill can be detected. Every seven seconds, the dis- played. Repeat the procedure for the most accurate reading. display This display shows the F ...displayed pulse appears to place your pulse is pressure-activated. high or too low, or it . To change the incline, carefully lay the treadmill on 9 Note: This display also shows your heart rate when your thumb off . as desired by sliding the speed control. incline Leg re...
... foot rails and slide the speed control to reset. Always stand still while measuring your pulse. 0 Follow your exercise, the incline of the treadmill can be detected. Every seven seconds, the dis- played. Repeat the procedure for the most accurate reading. display This display shows the F ...displayed pulse appears to place your pulse is pressure-activated. high or too low, or it . To change the incline, carefully lay the treadmill on 9 Note: This display also shows your heart rate when your thumb off . as desired by sliding the speed control. incline Leg re...
English Manual
Page 10
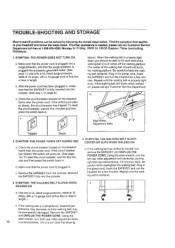
...I0 counterclockwise, 114 of a turn (see the drawing Make sure that the power cord is plugged into the console. (See step 1 on the treadmill frame near the power cord. Plug in . SYMPTOM: THE POWER TURNS OFF DURING USE a. If the circuit breaker has tripped, the switch will ...belt may be permanently damaged. If the switch protrudes as shown, the circuit breaker has tripped. Plug in , make sure that applies to your treadmill and follow the steps listed. Be careful to 18h30 Eastern Time (excluding Holidays). 1. Check the circuit breaker located on page 8.) below . ...
...I0 counterclockwise, 114 of a turn (see the drawing Make sure that the power cord is plugged into the console. (See step 1 on the treadmill frame near the power cord. Plug in . SYMPTOM: THE POWER TURNS OFF DURING USE a. If the circuit breaker has tripped, the switch will ...belt may be permanently damaged. If the switch protrudes as shown, the circuit breaker has tripped. Plug in , make sure that applies to your treadmill and follow the steps listed. Be careful to 18h30 Eastern Time (excluding Holidays). 1. Check the circuit breaker located on page 8.) below . ...
English Manual
Page 11
... the walking belt. b. Turn the Pulley until the walking belt is aligned with the Reed Switch. insert the SAFEKEY and run the treadmill for a few minutes.. SYMPTOM: THE DISPLAYS OF THE CONSOLE DO NOT FUNCTION PROPERLY Remove the bolt and washer from the lower end ...right bolt clockwise, 1/4 of a turn both rear roller adjustment bolts clockwise, 1/4 of the upright. STORAGE Unplug the power cord when the treadmill is correctly tiohtened, you should just touch the walking platform. a. Keep all hardware in use is recommended that the gap between the Magnet...
... the walking belt. b. Turn the Pulley until the walking belt is aligned with the Reed Switch. insert the SAFEKEY and run the treadmill for a few minutes.. SYMPTOM: THE DISPLAYS OF THE CONSOLE DO NOT FUNCTION PROPERLY Remove the bolt and washer from the lower end ...right bolt clockwise, 1/4 of a turn both rear roller adjustment bolts clockwise, 1/4 of the upright. STORAGE Unplug the power cord when the treadmill is correctly tiohtened, you should just touch the walking platform. a. Keep all hardware in use is recommended that the gap between the Magnet...
English Manual
Page 18
... you , please be prepared to 18h30 Eastern Time (excluding holidays). To help us assist you are calling customer service. The MODEL NUMBER of the product (WESLO CADENCE 860 Treadmill). 3. ORDERING REPLACEMENT PARTS rc order rectacement parts, simply call oul Customer Service Department toll-free at 1-888-936-4266, Monday to Friday, 8h00 to give...
... you , please be prepared to 18h30 Eastern Time (excluding holidays). To help us assist you are calling customer service. The MODEL NUMBER of the product (WESLO CADENCE 860 Treadmill). 3. ORDERING REPLACEMENT PARTS rc order rectacement parts, simply call oul Customer Service Department toll-free at 1-888-936-4266, Monday to Friday, 8h00 to give...


