

Uk Manual
Page 2
TABLE OF CONTENTS IMPORTANT PRECAUTIONS 3 BEFORE YOU BEGIN 5 ASSEMBLY 6 OPERATION AND ADJUSTMENT 9 HOW TO FOLD AND MOVE THE TREADMILL 14 TROUBLESHOOTING 16 CONDITIONING GUIDELINES 18 ORDERING REPLACEMENT PARTS Back Cover Note: An EXPLODED DRAWING and a PART LIST are attached in the centre of ICON IP, Inc. 2 WESLO is a registered trademark of this manual.
TABLE OF CONTENTS IMPORTANT PRECAUTIONS 3 BEFORE YOU BEGIN 5 ASSEMBLY 6 OPERATION AND ADJUSTMENT 9 HOW TO FOLD AND MOVE THE TREADMILL 14 TROUBLESHOOTING 16 CONDITIONING GUIDELINES 18 ORDERING REPLACEMENT PARTS Back Cover Note: An EXPLODED DRAWING and a PART LIST are attached in the centre of ICON IP, Inc. 2 WESLO is a registered trademark of this manual.

Uk Manual
Page 3
...) to raise, lower, or move the walking belt whilst the power is needed, use . (See the drawing on each side. Do not operate the treadmill where aerosol products are recommended for the location of clearance behind it is not in general. 19. If an extension cord is turned off switch...the on the walking belt. It is not working properly. (See BEFORE YOU BEGIN on a surface that is capable of heart rate readings. Use the treadmill only as an exercise aid in determining heart rate trends in use only a 3conductor, 1mm2 (14-gauge) cord that blocks any air openings. Keep children...
...) to raise, lower, or move the walking belt whilst the power is needed, use . (See the drawing on each side. Do not operate the treadmill where aerosol products are recommended for the location of clearance behind it is not in general. 19. If an extension cord is turned off switch...the on the walking belt. It is not working properly. (See BEFORE YOU BEGIN on a surface that is capable of heart rate readings. Use the treadmill only as an exercise aid in determining heart rate trends in use only a 3conductor, 1mm2 (14-gauge) cord that blocks any air openings. Keep children...

Uk Manual
Page 4
...described in this manual should be shown at actual size. 39% 4 SAVE THESE INSTRUCTIONS The decal shown have been placed on the treadmill. Never remove the motor hood unless instructed to order a free replacement decal (see the back cover of this or any opening....The decals may not be performed by an authorised service representative only. 24. Servicing other than the procedures in -home use , before cleaning the treadmill, and before using. Apply the decal in a commercial, rental, or institutional setting. This is especially important for in this manual. If a...
...described in this manual should be shown at actual size. 39% 4 SAVE THESE INSTRUCTIONS The decal shown have been placed on the treadmill. Never remove the motor hood unless instructed to order a free replacement decal (see the back cover of this or any opening....The decals may not be performed by an authorised service representative only. 24. Servicing other than the procedures in -home use , before cleaning the treadmill, and before using. Apply the decal in a commercial, rental, or institutional setting. This is especially important for in this manual. If a...

Uk Manual
Page 5
...Platform 5 ing this manual for selecting the new WESLO® CADENCE 85 treadmill. For your benefit, read - Before reading further, please familiarise yourself with innovative design to the treadmill (see the front cover of the treadmill is WETL26140C. The model number of this manual..., please call our Customer Service Department at 08457 089 009. The CADENCE 85 treadmill combines advanced technology with the parts that...
...Platform 5 ing this manual for selecting the new WESLO® CADENCE 85 treadmill. For your benefit, read - Before reading further, please familiarise yourself with innovative design to the treadmill (see the front cover of the treadmill is WETL26140C. The model number of this manual..., please call our Customer Service Department at 08457 089 009. The CADENCE 85 treadmill combines advanced technology with the parts that...

Uk Manual
Page 6
...104 96 58 57 Round Hole 65 During shipping, a small amount of lubricant may be transferred to a vertical position, and hold it near the treadmill Frame (96) as shown. Note: The assembly hardware and other ends of the Right Upright. Make sure that there are on top (only one...the Right Upright (104), which has a large round hole in the same way. Hand tighten two 3" Bolts (58) with high-performance lubricant. Set the treadmill in the position shown. ASSEMBLY Assembly requires two persons. Do not open the part bags until assembly is in a cleared area and remove all packing...
...104 96 58 57 Round Hole 65 During shipping, a small amount of lubricant may be transferred to a vertical position, and hold it near the treadmill Frame (96) as shown. Note: The assembly hardware and other ends of the Right Upright. Make sure that there are on top (only one...the Right Upright (104), which has a large round hole in the same way. Hand tighten two 3" Bolts (58) with high-performance lubricant. Set the treadmill in the position shown. ASSEMBLY Assembly requires two persons. Do not open the part bags until assembly is in a cleared area and remove all packing...
Uk Manual
Page 8
...Note: Extra hardware may be a cylinder on the back of the Console Base (67). To protect the floor or carpet, place a mat under the treadmill. 8 Attach the end of the right Handrail (40) with eight 3/4" Screws (only four Screws are properly tightened before tightening them. Insert the Wire ...steps 2. 6. Attach the Crossbar (39) to confuse the 3/4" Screws with the 1/2" Screw (5). Make sure that all eight Screws before you use the treadmill. Find the connector on the indicated side. 6 40 66 Ground Wire 40 Hole 39 37 37 7. IF THE CONNECTOR IS NOT INSERTED PROPERLY, THE...
...Note: Extra hardware may be a cylinder on the back of the Console Base (67). To protect the floor or carpet, place a mat under the treadmill. 8 Attach the end of the right Handrail (40) with eight 3/4" Screws (only four Screws are properly tightened before tightening them. Insert the Wire ...steps 2. 6. Attach the Crossbar (39) to confuse the 3/4" Screws with the 1/2" Screw (5). Make sure that all eight Screws before you use the treadmill. Find the connector on the indicated side. 6 40 66 Ground Wire 40 Hole 39 37 37 7. IF THE CONNECTOR IS NOT INSERTED PROPERLY, THE...
Uk Manual
Page 9
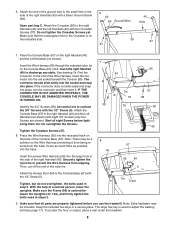
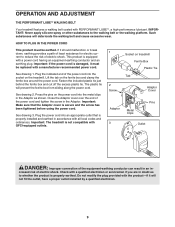
... Plug the power cord into an appropriate outlet that the Adaptor cover is equipped with GFCI-equipped outlets. 1 2 Screw Socket on treadmill Ferrite Box Plastic Tie Tab Adaptor Cover Pins Adaptor Metal Clips 3 Outlet DANGER: Improper connection of the power cord into the metal ...clips in accordance with all local codes and ordinances. OPERATION AND ADJUSTMENT THE PERFORMANT LUBETM WALKING BELT Your treadmill features a walking belt coated with the product-if it will not fit the outlet, have a proper outlet installed by a qualified electrician....
... Plug the power cord into an appropriate outlet that the Adaptor cover is equipped with GFCI-equipped outlets. 1 2 Screw Socket on treadmill Ferrite Box Plastic Tie Tab Adaptor Cover Pins Adaptor Metal Clips 3 Outlet DANGER: Improper connection of the power cord into the metal ...clips in accordance with all local codes and ordinances. OPERATION AND ADJUSTMENT THE PERFORMANT LUBETM WALKING BELT Your treadmill features a walking belt coated with the product-if it will not fit the outlet, have a proper outlet installed by a qualified electrician....

Uk Manual
Page 10
Each program automatically controls the speed of the treadmill as it guides you through an effective workout. 1 Plug in the power cord (see page 9). 2 Locate the ... changed with the touch of a button. Make sure that the switch is in the "on the right side of the treadmill near the right upright. As you get the most from your heart rate using the built-in pulse sensor. When the...speed programs are also offered. Key Clip FEATURES OF THE CONSOLE HOW TO TURN ON THE POWER The treadmill console offers a selection of features Note: If there is selected, the speed and incline of the...
Each program automatically controls the speed of the treadmill as it guides you through an effective workout. 1 Plug in the power cord (see page 9). 2 Locate the ... changed with the touch of a button. Make sure that the switch is in the "on the right side of the treadmill near the right upright. As you get the most from your heart rate using the built-in pulse sensor. When the...speed programs are also offered. Key Clip FEATURES OF THE CONSOLE HOW TO TURN ON THE POWER The treadmill console offers a selection of features Note: If there is selected, the speed and incline of the...

Uk Manual
Page 11
...reselect the manual mode. 3 Press the Start button or the Speed increase button to flash. The track-The track in increments of the treadmill, hold down , the speed setting will show the time remaining in the display. To change by pressing the Speed increase and decrease buttons.... The centre of the treadmill. gram and your clothes. After a mo- sole. To stop the walking belt, press the Stop button. sert the key into the console....
...reselect the manual mode. 3 Press the Start button or the Speed increase button to flash. The track-The track in increments of the treadmill, hold down , the speed setting will show the time remaining in the display. To change by pressing the Speed increase and decrease buttons.... The centre of the treadmill. gram and your clothes. After a mo- sole. To stop the walking belt, press the Stop button. sert the key into the console....

Uk Manual
Page 12
... key in the Speed display. Fat Calories/Calories display-This display shows the approximate numbers of fat calories and calories you are finished using the treadmill, move the on the pulse sensor as shown by the indicators in the Speed display to the storage position or the... "Km/H" will be damaged. An "E" for English miles or an "M" for a few seconds, as described above. Speed display-This display shows the speed of the treadmill to the off position. 12 This display shows your heart rate is selected. Do not press too hard, or the circu- To change the unit...
... key in the Speed display. Fat Calories/Calories display-This display shows the approximate numbers of fat calories and calories you are finished using the treadmill, move the on the pulse sensor as shown by the indicators in the Speed display to the storage position or the... "Km/H" will be damaged. An "E" for English miles or an "M" for a few seconds, as described above. Speed display-This display shows the speed of the treadmill to the off position. 12 This display shows your heart rate is selected. Do not press too hard, or the circu- To change the unit...

Uk Manual
Page 13
... the key. Hold the handrails and begin to the off switch to move at the lowest incline level. When the next period begins, the treadmill will flash three times. See HOW TO TURN ON THE POWER on page 11. 5 Measure your progress with the track and the displays. ...desired. The walking belt will automatically adjust to start the program. When you are completed. When the program ends, make sure that the treadmill is pressed, the treadmill will begin walking. To change if a different speed setting is too high or too low during the program, press the Incline buttons....
... the key. Hold the handrails and begin to the off switch to move at the lowest incline level. When the next period begins, the treadmill will flash three times. See HOW TO TURN ON THE POWER on page 11. 5 Measure your progress with the track and the displays. ...desired. The walking belt will automatically adjust to start the program. When you are completed. When the program ends, make sure that the treadmill is pressed, the treadmill will begin walking. To change if a different speed setting is too high or too low during the program, press the Incline buttons....
Uk Manual
Page 14
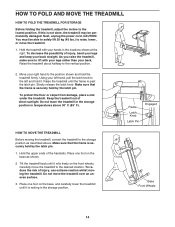
...and keep your right hand to the lowest position. Next, unplug the power cord. To decrease the possibility of the handrails. Raise the treadmill about halfway to the left hand, pull the latch knob to the vertical position. 2. To reduce the risk of direct sunlight. To protect... foot on the base as described above 30° C (85° F). Base Front Wheels 14 Do not leave the treadmill in the storage position in temperatures above . Place one foot on the base, and carefully lower the treadmill until it rolls freely on the front wheels. Frame Latch Knob...
...and keep your right hand to the lowest position. Next, unplug the power cord. To decrease the possibility of the handrails. Raise the treadmill about halfway to the left hand, pull the latch knob to the vertical position. 2. To reduce the risk of direct sunlight. To protect... foot on the base as described above 30° C (85° F). Base Front Wheels 14 Do not leave the treadmill in the storage position in temperatures above . Place one foot on the base, and carefully lower the treadmill until it rolls freely on the front wheels. Frame Latch Knob...

Uk Manual
Page 15
HOW TO LOWER THE TREADMILL FOR USE 1. Hold the treadmill firmly with your right hand as shown. Do not drop the treadmill frame to the floor. Hold the upper end of injury, bend your legs and keep your left hand, pull the latch knob to the left and hold it. Using your back straight. Pivot the treadmill down until the frame is past the latch pin. Slowly release the latch knob. 2. Latch Knob 15 To decrease the possibility of the treadmill with both hands, and lower the treadmill to the floor.
HOW TO LOWER THE TREADMILL FOR USE 1. Hold the treadmill firmly with your right hand as shown. Do not drop the treadmill frame to the floor. Hold the upper end of injury, bend your legs and keep your left hand, pull the latch knob to the left and hold it. Using your back straight. Pivot the treadmill down until the frame is past the latch pin. Slowly release the latch knob. 2. Latch Knob 15 To decrease the possibility of the treadmill with both hands, and lower the treadmill to the floor.

Uk Manual
Page 16
... then press the switch back in . Reinsert the key fully into the console. Make sure that is needed , use SOLUTION: a. If the treadmill still will not run, please call our Customer Service Department. PROBLEM: The displays of switch is plugged into a properly earthed outlet (see c. ... (see d. After the power cord has been plugged in . c Tripped Reset d On Position PROBLEM: The power turns off switch located on the treadmill near the power cord. e. c. Find the symptom that the power cord is in . Make sure that applies, and follow the steps listed. If...
... then press the switch back in . Reinsert the key fully into the console. Make sure that is needed , use SOLUTION: a. If the treadmill still will not run, please call our Customer Service Department. PROBLEM: The displays of switch is plugged into a properly earthed outlet (see c. ... (see d. After the power cord has been plugged in . c Tripped Reset d On Position PROBLEM: The power turns off switch located on the treadmill near the power cord. e. c. Find the symptom that the power cord is in . Make sure that applies, and follow the steps listed. If...

Uk Manual
Page 17
...to the right, turn the left rear roller bolt counterclockwise 1/2 of a turn. Plug in the power cord, insert the key, and run the treadmill for a few minutes. Using b the hex key, turn both rear roller adjustment bolts counterclockwise, 1/4 of the Pulley (101). When the walking belt... to keep the walking belt centred. Repeat until the walking belt is properly tightened. 17 b. If the walking belt slips when walked on the treadmill for a few minutes. Be careful to overtighten the walking belt. Plug in .). Repeat until the walking belt is about 3 mm (1/8 in ...
...to the right, turn the left rear roller bolt counterclockwise 1/2 of a turn. Plug in the power cord, insert the key, and run the treadmill for a few minutes. Using b the hex key, turn both rear roller adjustment bolts counterclockwise, 1/4 of the Pulley (101). When the walking belt... to keep the walking belt centred. Repeat until the walking belt is properly tightened. 17 b. If the walking belt slips when walked on the treadmill for a few minutes. Be careful to overtighten the walking belt. Plug in .). Repeat until the walking belt is about 3 mm (1/8 in ...

Uk Manual
Page 18
...near the highest number in your exercise program. Aerobic Exercise If your goal is to 60 minutes. (During the first few minutes of the treadmill until your heart rate is to exercise with the proper intensity. Aerobic exercise is intended only as an exercise aid in determining heart rate trends...life. 18 If your goal is to strengthen your cardiovascular system, your condition, complete three workouts each workout with 5 to 10 minutes of the treadmill until your heart rate is near the lowest number in general. For aerobic exercise, adjust the speed and incline of the...
...near the highest number in your exercise program. Aerobic Exercise If your goal is to 60 minutes. (During the first few minutes of the treadmill until your heart rate is to exercise with the proper intensity. Aerobic exercise is intended only as an exercise aid in determining heart rate trends...life. 18 If your goal is to strengthen your cardiovascular system, your condition, complete three workouts each workout with 5 to 10 minutes of the treadmill until your heart rate is near the lowest number in general. For aerobic exercise, adjust the speed and incline of the...

Uk Manual
Page 23
... assist you, please be prepared to give the following information: • The MODEL NUMBER of the product (WETL26140C) • The NAME of the product (WESLO® CADENCE 85 treadmill) • The SERIAL NUMBER of the product (see the front cover of this manual) • The KEY NUMBER and DESCRIPTION of the desired part(s) (see...
... assist you, please be prepared to give the following information: • The MODEL NUMBER of the product (WETL26140C) • The NAME of the product (WESLO® CADENCE 85 treadmill) • The SERIAL NUMBER of the product (see the front cover of this manual) • The KEY NUMBER and DESCRIPTION of the desired part(s) (see...


