
English Manual
Page 1
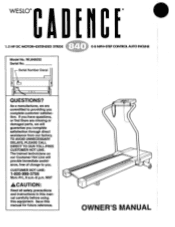
...: Read all safety precautions and instructions In this manual carefully before using this manual for future reference. 6 5" O OWNER'S MANUAL Save this equipment. As a manufacturer, we will provide Immediate assistance, free of charge to providing you complete satisfaction through direct assistance from our factory. WL840032 Serial No. CUSTOMER HOT LINE: 1-800-999-3756 Mon.-Fri., 6 a.m.-6 p.m. Serial Number Decal QUESTIONS? TO AVOID UNNECESSARY...
...: Read all safety precautions and instructions In this manual carefully before using this manual for future reference. 6 5" O OWNER'S MANUAL Save this equipment. As a manufacturer, we will provide Immediate assistance, free of charge to providing you complete satisfaction through direct assistance from our factory. WL840032 Serial No. CUSTOMER HOT LINE: 1-800-999-3756 Mon.-Fri., 6 a.m.-6 p.m. Serial Number Decal QUESTIONS? TO AVOID UNNECESSARY...

English Manual
Page 2
... warranty beyond that specifically set forth above is authorized by WESLO. This warranty gives you specific legal rights. All products for commercial or rental purposes. WESLO INC., 1500 S. 1000 W., LOGAN, UT 84321-9813 2 All returns must be free from defects in workmanship and material, under normal use and service conditions, for a period of ninety (90) days from state to replacing or repairing...
... warranty beyond that specifically set forth above is authorized by WESLO. This warranty gives you specific legal rights. All products for commercial or rental purposes. WESLO INC., 1500 S. 1000 W., LOGAN, UT 84321-9813 2 All returns must be free from defects in workmanship and material, under normal use and service conditions, for a period of ninety (90) days from state to replacing or repairing...

English Manual
Page 3
... persons with pre-existing health problems. Read all instructions before using. MPH•STEP CONTROL AUTO INCUNE TABLE OF CONTENTS IMPORTANT SAFETY PRECAUTIONS BEFORE YOU BEGIN ASSEMBLY OPERATION AND ADJUSTMENT TROUBLE-SHOOTING AND STORAGE CONDITIONING GUIDELINES PART LIST EXPLODED DRAWING ORDERING REPLACEMENT PARTS 4 5 6 7 10 12 14 15 Back Cover AWARNING: Before beginning this product. 3 CA ElICE WESLO® 1.5 HP DC MOTOR•EXTENDED STRIDE *. WESLO assumes no responsibility for...
... persons with pre-existing health problems. Read all instructions before using. MPH•STEP CONTROL AUTO INCUNE TABLE OF CONTENTS IMPORTANT SAFETY PRECAUTIONS BEFORE YOU BEGIN ASSEMBLY OPERATION AND ADJUSTMENT TROUBLE-SHOOTING AND STORAGE CONDITIONING GUIDELINES PART LIST EXPLODED DRAWING ORDERING REPLACEMENT PARTS 4 5 6 7 10 12 14 15 Back Cover AWARNING: Before beginning this product. 3 CA ElICE WESLO® 1.5 HP DC MOTOR•EXTENDED STRIDE *. WESLO assumes no responsibility for...
English Manual
Page 4
... precautions and information before performing the maintenance and adjustment procedures described in this manual. No other than 1 hour. 12. The pulse earciip is needed, use the treadmill with at least 8 feet of heart rate readings. Never start the treadmill while you are used by an authorized service representative only. 4 SAVE THESE INSTRUCTIONS Keep small children away from the treadmill at a time. Never remove the motor hood unless instructed to avoid...
... precautions and information before performing the maintenance and adjustment procedures described in this manual. No other than 1 hour. 12. The pulse earciip is needed, use the treadmill with at least 8 feet of heart rate readings. Never start the treadmill while you are used by an authorized service representative only. 4 SAVE THESE INSTRUCTIONS Keep small children away from the treadmill at a time. Never remove the motor hood unless instructed to avoid...
English Manual
Page 5
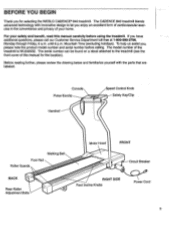
... the treadmill (see the front cover of this manual carefully before calling. The CADENCE 840 treadmill blends advanced technology with the parts that are labeled. The serial number can be found on a decal attached to let you , please note the product model number and serial number before using the treadmill. For your home. Console Pulse Earclip Handrail Speed Control Knob Safety Key/Clip Walking Belt Foot Rail Roller Guards BACK Rear Roller Adjustment Bolts Motor Hood FRONT Circuit Breaker O RIGHT SIDE Foot Incline Knobs Power Cord...
... the treadmill (see the front cover of this manual carefully before calling. The CADENCE 840 treadmill blends advanced technology with the parts that are labeled. The serial number can be found on a decal attached to let you , please note the product model number and serial number before using the treadmill. For your home. Console Pulse Earclip Handrail Speed Control Knob Safety Key/Clip Walking Belt Foot Rail Roller Guards BACK Rear Roller Adjustment Bolts Motor Hood FRONT Circuit Breaker O RIGHT SIDE Foot Incline Knobs Power Cord...
English Manual
Page 6
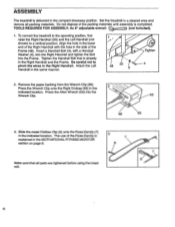
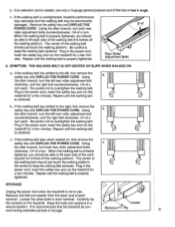
ASSEMBLY The treadmill is completed. Attach the Left Handrail in the 2 indicated location. Align the hole in the lower end of the Right Handrail with a Handrail Washer (3), into the Right Handrail and tighten the Bolt into the Wrench Clip. 63 0 66 65 3. Press the Wrench Clip onto the Right Endcap (63) in the same manner. 48 20 3 Tighten 4 2. Set the treadmill in...
ASSEMBLY The treadmill is completed. Attach the Left Handrail in the 2 indicated location. Align the hole in the lower end of the Right Handrail with a Handrail Washer (3), into the Right Handrail and tighten the Bolt into the Wrench Clip. 63 0 66 65 3. Press the Wrench Clip onto the Right Endcap (63) in the same manner. 48 20 3 Tighten 4 2. Set the treadmill in...
English Manual
Page 7
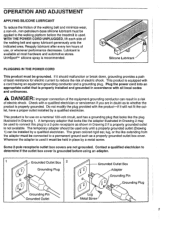
... like extending from the adapter must be grounded. OPERATION AND ADJUSTMENT APPLYING SILICONE LUBRICANT To reduce the friction of the walking belt and minimize wear, a non-oil-, non-petroleum-base silicone lubricant must be used to connect this plug to a 2-pole receptacle as shown in Drawing 2 if a properly grounded outlet is not available. Silicone Lubricant PLUGGING IN THE POWER CORD This product must...
... like extending from the adapter must be grounded. OPERATION AND ADJUSTMENT APPLYING SILICONE LUBRICANT To reduce the friction of the walking belt and minimize wear, a non-oil-, non-petroleum-base silicone lubricant must be used to connect this plug to a 2-pole receptacle as shown in Drawing 2 if a properly grounded outlet is not available. Silicone Lubricant PLUGGING IN THE POWER CORD This product must...
English Manual
Page 8
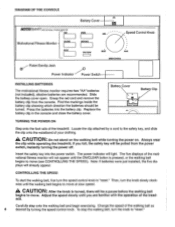
... turning the power on. The power indicator will already appear. Then, turn the knob to move (see CONTROLLING THE SPEED). A CAUTION: After the knob Is turned, there will be turned. The five displays of the treadmill. Note: If batteries were just installed, the five displays will light. Carefully step onto the walking belt and begin exercising. Replace the battery clip in the console and close the battery cover. PULSE Pulse Earclip Jack Power Indicator DISTANCE ON/CLEAR I I RESET SPEED CONTROL Power Switch INSTALLING BATTERIES The motivational fitness monitor...
... turning the power on. The power indicator will already appear. Then, turn the knob to move (see CONTROLLING THE SPEED). A CAUTION: After the knob Is turned, there will be turned. The five displays of the treadmill. Note: If batteries were just installed, the five displays will light. Carefully step onto the walking belt and begin exercising. Replace the battery clip in the console and close the battery cover. PULSE Pulse Earclip Jack Power Indicator DISTANCE ON/CLEAR I I RESET SPEED CONTROL Power Switch INSTALLING BATTERIES The motivational fitness monitor...
English Manual
Page 9
... console, and attach the earclip to stand still while measuring your exercise, the incline of the treadmill. Using your left ear lobe. The displays can be reset and will darken, although the power will be changed using the foot incline knobs on . Note: When the walking belt is stopped, the TIME display will be reset by pressing the ON/CLEAR button. PULSE-This display shows your collar. TURNING OFF THE POWER To turn off the power, remove...
... console, and attach the earclip to stand still while measuring your exercise, the incline of the treadmill. Using your left ear lobe. The displays can be reset and will darken, although the power will be changed using the foot incline knobs on . Note: When the walking belt is stopped, the TIME display will be reset by pressing the ON/CLEAR button. PULSE-This display shows your collar. TURNING OFF THE POWER To turn off the power, remove...
English Manual
Page 10
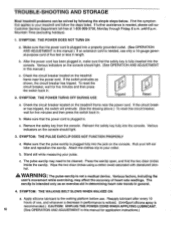
.... Press the earclip open, and find the two clear circles inside the earclip. Various factors, including the user's movement while exercising, may need to the walking platform before use only a 14-gauge general-purpose cord of heart rate readings. Mountain Time (excluding holidays). 1. If the switch protrudes as an exercise aid In determining heart rate trends In general. 4. SYMPTOM: THE POWER DOES NOT TURN ON a. To reset...
.... Press the earclip open, and find the two clear circles inside the earclip. Various factors, including the user's movement while exercising, may need to the walking platform before use only a 14-gauge general-purpose cord of heart rate readings. Mountain Time (excluding holidays). 1. If the switch protrudes as an exercise aid In determining heart rate trends In general. 4. SYMPTOM: THE POWER DOES NOT TURN ON a. To reset...
English Manual
Page 11
... THE POWER CORD. Using c. When the walking belt is properly tightened. It is needed, use . If an extension cord is recommended that the treadmill be able to keep the walking belt centered. c. clockwise, and the right bolt counterclockwise, 1/4 of the walk- b. Repeat until the walking belt is correctly tightened, you should be covered during extended periods of the walking belt should just touch the walking platform. Plug in the power cord, insert the safety key...
... THE POWER CORD. Using c. When the walking belt is properly tightened. It is needed, use . If an extension cord is recommended that the treadmill be able to keep the walking belt centered. c. clockwise, and the right bolt counterclockwise, 1/4 of the walk- b. Repeat until the walking belt is correctly tightened, you should be covered during extended periods of the walking belt should just touch the walking platform. Plug in the power cord, insert the safety key...

English Manual
Page 12
AWARNING: Before beginning this or any exercise program, consult your training zone. This Is especially important for at least four minutes, and then measure your training zone for exercise by using the pulse mode of the console. This is too high, decrease the intensity of your heart rate as a guide. If your heart rate is known as your physician. Begin each workout with 5 to 10 minutes...
AWARNING: Before beginning this or any exercise program, consult your training zone. This Is especially important for at least four minutes, and then measure your training zone for exercise by using the pulse mode of the console. This is too high, decrease the intensity of your heart rate as a guide. If your heart rate is known as your physician. Begin each workout with 5 to 10 minutes...

English Manual
Page 13
HAMSTRING STRETCH Sit with your knees bent slightly and slowly bend forward from your hips toward the wall. Stretches: Hamstrings, lower back and groin. Stretches: Quadriceps and hip muscles. Repeat 3 times. Hold for 15 counts, then relax. Bring your heel as ...place your hands against a wall for both legs. Bring the sole of your feet together and your toes as far as possible. To cause further stretching of knees and back. Correct form for both legs. Move slowly as well. Keep your back leg straight and your back leg as you stretch-never bounce.
HAMSTRING STRETCH Sit with your knees bent slightly and slowly bend forward from your hips toward the wall. Stretches: Hamstrings, lower back and groin. Stretches: Quadriceps and hip muscles. Repeat 3 times. Hold for 15 counts, then relax. Bring your heel as ...place your hands against a wall for both legs. Bring the sole of your feet together and your toes as far as possible. To cause further stretching of knees and back. Correct form for both legs. Move slowly as well. Keep your back leg straight and your back leg as you stretch-never bounce.
English Manual
Page 14
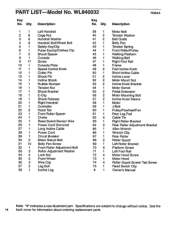
... Rail Frame Foot Incline Knob Short Incline Cable Incline Lever Motor Mount Nut Incline Knob Bracket Motor Swivel Pedal Extension Motor Mounting Bolt Incline Knob Sleeve Motor J-Bolt Pulley/FlywheeVFan Rear Leg Pad Cable Tie Right Roller Bracket Rear Roller Adjustment Bracket Allen Wrench Wrench Clip Rear Roller Roller Guard Left Roller Bracket Platform Screw Left Foot Rail Motor Hood Screw Motor Hood Roller Guard Screw/ Tab Screw Reed Switch Clip Owner's Manual Note: "#" indicates a non-illustrated part. PART LIST Model No. Qty. WL840032 R394A Key No. Specifications are subject to...
... Rail Frame Foot Incline Knob Short Incline Cable Incline Lever Motor Mount Nut Incline Knob Bracket Motor Swivel Pedal Extension Motor Mounting Bolt Incline Knob Sleeve Motor J-Bolt Pulley/FlywheeVFan Rear Leg Pad Cable Tie Right Roller Bracket Rear Roller Adjustment Bracket Allen Wrench Wrench Clip Rear Roller Roller Guard Left Roller Bracket Platform Screw Left Foot Rail Motor Hood Screw Motor Hood Roller Guard Screw/ Tab Screw Reed Switch Clip Owner's Manual Note: "#" indicates a non-illustrated part. PART LIST Model No. Qty. WL840032 R394A Key No. Specifications are subject to...
English Manual
Page 15
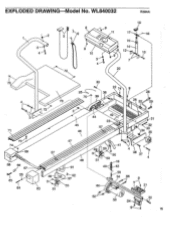
WL840032 R394A 2 3 4 19 8 6 5 9 11 17 18 15 9 10 3 4 14 13 9 7 20 7 72 4 73,..- 30 22 74 9 36 28 75' 4) 39 2 29 • • 72 3 71 2 45 46 44 42 23 57 31 32 33 35 70 74 68 69 66 0 / 67 33 65 64 47 57 48 61 49 55 62 27 9 53 63 51 4 9 51 41 5 9 50 53 16 40+43 59 54 60 4 38 37 4 56 9 21 52 58 24 30 9 15 EXPLODED DRAWING Model No.
WL840032 R394A 2 3 4 19 8 6 5 9 11 17 18 15 9 10 3 4 14 13 9 7 20 7 72 4 73,..- 30 22 74 9 36 28 75' 4) 39 2 29 • • 72 3 71 2 45 46 44 42 23 57 31 32 33 35 70 74 68 69 66 0 / 67 33 65 64 47 57 48 61 49 55 62 27 9 53 63 51 4 9 51 41 5 9 50 53 16 40+43 59 54 60 4 38 37 4 56 9 21 52 58 24 30 9 15 EXPLODED DRAWING Model No.
English Manual
Page 16
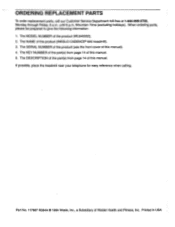
...). 2. The SERIAL NUMBER of the product (see the front cover of this manual. Printed in USA The MODEL NUMBER of Weider Health and Fitness, Inc. The NAME of this manual). 4. The KEY NUMBER of the part(s) from page 14 of this manual. 5. The DESCRIPTION of the part(s) from page 14 of the product (WESLO CADENCE® 840 treadmill). 3. ORDERING REPLACEMENT PARTS To order replacement parts, call our Customer Service Department toll-free at 1-800...
...). 2. The SERIAL NUMBER of the product (see the front cover of this manual. Printed in USA The MODEL NUMBER of Weider Health and Fitness, Inc. The NAME of this manual). 4. The KEY NUMBER of the part(s) from page 14 of this manual. 5. The DESCRIPTION of the part(s) from page 14 of the product (WESLO CADENCE® 840 treadmill). 3. ORDERING REPLACEMENT PARTS To order replacement parts, call our Customer Service Department toll-free at 1-800...


