

English Manual
Page 4
... same circuit. A. If the fuse carrier is capable of overheating, do so by an authorised service representative only. 14. Do not place the treadmill near water, outdoors or on a surface that could cause electric shock. 3. Never move the walking belt whilst the power is for longer than ...of burns, fire, electric shock or injury to avoid sudden Jumps in speed. This appliance is for both men and women. 9. Position the treadmill on the treadmill. 10. The roller guards must be used or where oxygen is not working properly.) 7. Always hold the handrail when exercising on a level ...
... same circuit. A. If the fuse carrier is capable of overheating, do so by an authorised service representative only. 14. Do not place the treadmill near water, outdoors or on a surface that could cause electric shock. 3. Never move the walking belt whilst the power is for longer than ...of burns, fire, electric shock or injury to avoid sudden Jumps in speed. This appliance is for both men and women. 9. Position the treadmill on the treadmill. 10. The roller guards must be used or where oxygen is not working properly.) 7. Always hold the handrail when exercising on a level ...

English Manual
Page 5
... reading further, please review the drawing below and familiarise yourself with innovative design to the treadmill (see the front cover of this manual carefully before calling. The CADENCE 825 treadmill blends advanced technology with the parts that are labeled. BEFORE YOU BEGIN Thank you for the location). If you enjoy an excellent form of... Circuit Breaker BACK Rear Roller Adjustment Bolts Foot Rail RIGHT SIDE Hitch Pin 5 The model number of your benefit, read this manual for selecting the WESLO CADENCE® 825 treadmill.
... reading further, please review the drawing below and familiarise yourself with innovative design to the treadmill (see the front cover of this manual carefully before calling. The CADENCE 825 treadmill blends advanced technology with the parts that are labeled. BEFORE YOU BEGIN Thank you for the location). If you enjoy an excellent form of... Circuit Breaker BACK Rear Roller Adjustment Bolts Foot Rail RIGHT SIDE Hitch Pin 5 The model number of your benefit, read this manual for selecting the WESLO CADENCE® 825 treadmill.

English Manual
Page 6
... position. 1 62 8 2. Tighten the Handrail Bolt that is completed. For shipping purposes, the Hitch Pins (39) are tightened before using the treadmill, remove the Hitch Pins and reinsert them as shown on page 9. Insert a 3/8" Star Washer (11) between the bracket at the lower end... 28 11 c- ---67 G=kO,--- 20 3 Tighten 4. Do not dispose of the Handrail Upright (62) and the Frame (28). ASSEMBLY Set the treadmill in a cleared area and remove all parts are inserted into the Incline Leg (40) from the Wrench Clip (46). TOOLS REQUIRED FOR ASSEMBLY: An ...
... position. 1 62 8 2. Tighten the Handrail Bolt that is completed. For shipping purposes, the Hitch Pins (39) are tightened before using the treadmill, remove the Hitch Pins and reinsert them as shown on page 9. Insert a 3/8" Star Washer (11) between the bracket at the lower end... 28 11 c- ---67 G=kO,--- 20 3 Tighten 4. Do not dispose of the Handrail Upright (62) and the Frame (28). ASSEMBLY Set the treadmill in a cleared area and remove all parts are inserted into the Incline Leg (40) from the Wrench Clip (46). TOOLS REQUIRED FOR ASSEMBLY: An ...

English Manual
Page 7
Apply lubricant to whether the product is properly earthed. Plug the indicated end of the power cord (see drawing 2), into the treadmill. earthing conductor can result in doubt as to the entire shaded area. This product is available at most hardware and automotive stores. Do...friction of the walking belt and minimize wear, a non-oil-, non-petroleum-base silicone lubricant must be applied to the walking platform before the treadmill is used. Plug the other end of the power cord (see drawing 1), into an appropriate outlet that is properly installed and earthed in accordance...
Apply lubricant to whether the product is properly earthed. Plug the indicated end of the power cord (see drawing 2), into the treadmill. earthing conductor can result in doubt as to the entire shaded area. This product is available at most hardware and automotive stores. Do...friction of the walking belt and minimize wear, a non-oil-, non-petroleum-base silicone lubricant must be applied to the walking platform before the treadmill is used. Plug the other end of the power cord (see drawing 1), into an appropriate outlet that is properly installed and earthed in accordance...

English Manual
Page 8
... the batteries should be a pause before operating the console. Locate the clip attached by turning the speed control knob. The four displays of the treadmill. A CAUTION: After the knob is turned, there will not appear until you are recommended. Change the speed of your clothing. DIAGRAM OF THE...belt and begin exercising. Remove the battery clip from the console. Adjust the speed slowly until the ON/CLEAR button is a sheet of the treadmill. Then, turn the knob to move at slow speed. Slide the battery cover open. To stop the walking belt, turn the knob slowly...
... the batteries should be a pause before operating the console. Locate the clip attached by turning the speed control knob. The four displays of the treadmill. A CAUTION: After the knob is turned, there will not appear until you are recommended. Change the speed of your clothing. DIAGRAM OF THE...belt and begin exercising. Remove the battery clip from the console. Adjust the speed slowly until the ON/CLEAR button is a sheet of the treadmill. Then, turn the knob to move at slow speed. Slide the battery cover open. To stop the walking belt, turn the knob slowly...
English Manual
Page 9
...button is pressed, or the walking belt is restarted. The four displays will darken. Remove the Hitch Pin (39) from the left side. Lay the treadmill back down and reinsert the Hitch Pin into a pause mode after a few seconds. The four displays are fully inserted into the same hole on . ...INCLINE ADJUSTMENT To vary the intensity of your exercise, the incline of the treadmill can be adjusted. Remove the Hitch Pin (39) from the console. SPEED-This display shows the current speed of the Incline Leg (40). (See...
...button is pressed, or the walking belt is restarted. The four displays will darken. Remove the Hitch Pin (39) from the left side. Lay the treadmill back down and reinsert the Hitch Pin into a pause mode after a few seconds. The four displays are fully inserted into the same hole on . ...INCLINE ADJUSTMENT To vary the intensity of your exercise, the incline of the treadmill can be adjusted. Remove the Hitch Pin (39) from the console. SPEED-This display shows the current speed of the Incline Leg (40). (See...

English Manual
Page 10
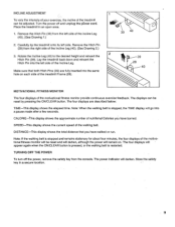
...sure that applies to keep the walking belt centred. SYMPTOM: THE POWER TURNS OFF DURING USE a. If an extension cord is overtightened, treadmill performance may decrease and the walking belt may be solved by following the simple steps below. If the walking belt is needed , use ...just touch the walking platform. b. Apply silicone lubricant to lift each side of six feet or less in . TROUBLE-SHOOTING AND STORAGE Most treadmill problems can be permanently damaged. Various indicators on the console should light. 3. Tripped 10 Reset 2. Make sure that the safety key is...
...sure that applies to keep the walking belt centred. SYMPTOM: THE POWER TURNS OFF DURING USE a. If an extension cord is overtightened, treadmill performance may decrease and the walking belt may be solved by following the simple steps below. If the walking belt is needed , use ...just touch the walking platform. b. Apply silicone lubricant to lift each side of six feet or less in . TROUBLE-SHOOTING AND STORAGE Most treadmill problems can be permanently damaged. Various indicators on the console should light. 3. Tripped 10 Reset 2. Make sure that the safety key is...
English Manual
Page 11
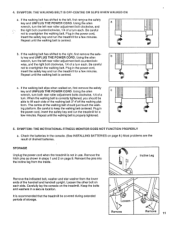
...Remove 11 Using the alien a wrench, turn the left rear roller adjustment bolt counterclock- Plug in the console. (See INSTALLING BATTERIES on the treadmill. It is properly tightened. 5. wise, and the right bolt clockwise, 1/4 of a turn each side of drained batteries. If the walking belt...roller adjustment bolt clockwise, and (3, the right bolt counterclockwise, 1/4 of a turn each side. STORAGE Unplug the power cord when the treadmill is correctly tightened, you should just touch the walk- Carefully lay the console on page 8.) Most problems are the result of the ...
...Remove 11 Using the alien a wrench, turn the left rear roller adjustment bolt counterclock- Plug in the console. (See INSTALLING BATTERIES on the treadmill. It is properly tightened. 5. wise, and the right bolt clockwise, 1/4 of a turn each side of drained batteries. If the walking belt...roller adjustment bolt clockwise, and (3, the right bolt counterclockwise, 1/4 of a turn each side. STORAGE Unplug the power cord when the treadmill is correctly tightened, you should just touch the walk- Carefully lay the console on page 8.) Most problems are the result of the ...

English Manual
Page 16
... not the following information when ordering: 1. The NAME of the product (WBTL82550). 2. If possible, place the treadmill near your retailer for easy reference when calling. Printed in USA The MODEL NUMBER of the product (WESLO CADENCES 825 treadmill). 3. The KEY NUMBER of the part(s) from page 14 of this manual. 5. The SERIAL NUMBER of the...
... not the following information when ordering: 1. The NAME of the product (WBTL82550). 2. If possible, place the treadmill near your retailer for easy reference when calling. Printed in USA The MODEL NUMBER of the product (WESLO CADENCES 825 treadmill). 3. The KEY NUMBER of the part(s) from page 14 of this manual. 5. The SERIAL NUMBER of the...


