

English Manual
Page 4
...damaged, replacement carriers are standing on the same circuit. or a Volex supplier, and should be on the walking belt. Position the treadmill on the treadmill at all times. When connecting the power cord (see OPERATION AND ADJUSTMENT on page 7), plug the power cord directly into any opening... Never remove the motor hood unless instructed to avoid sudden Jumps in a commercial environment will invalidate the warranty. 11. Never start the treadmill whilst you are obtainable from heated surfaces. When replacing the fuse, an 8 amp ASTA approved BS1362 type should be used or where oxygen...
...damaged, replacement carriers are standing on the same circuit. or a Volex supplier, and should be on the walking belt. Position the treadmill on the treadmill at all times. When connecting the power cord (see OPERATION AND ADJUSTMENT on page 7), plug the power cord directly into any opening... Never remove the motor hood unless instructed to avoid sudden Jumps in a commercial environment will invalidate the warranty. 11. Never start the treadmill whilst you are obtainable from heated surfaces. When replacing the fuse, an 8 amp ASTA approved BS1362 type should be used or where oxygen...

English Manual
Page 5
...of your benefit, read this manual for selecting the WESLO CADENCE® 825 treadmill. Before reading further, please review the drawing below and familiarise yourself with innovative design to the treadmill (see the front cover of the treadmill is WBTL82550. If you for the location). Console ... Foot Rail RIGHT SIDE Hitch Pin 5 For your home. The model number of this manual carefully before calling. The CADENCE 825 treadmill blends advanced technology with the parts that are labeled. BEFORE YOU BEGIN Thank you have additional questions, please call our Customer...
...of your benefit, read this manual for selecting the WESLO CADENCE® 825 treadmill. Before reading further, please review the drawing below and familiarise yourself with innovative design to the treadmill (see the front cover of the treadmill is WBTL82550. If you for the location). Console ... Foot Rail RIGHT SIDE Hitch Pin 5 For your home. The model number of this manual carefully before calling. The CADENCE 825 treadmill blends advanced technology with the parts that are labeled. BEFORE YOU BEGIN Thank you have additional questions, please call our Customer...

English Manual
Page 6
...bracket and the Star Washer, and tighten the Bolt into the Frame. For shipping purposes, the Hitch Pins (39) are tightened before using the treadmill, remove the Hitch Pins and reinsert them as shown on page 9. Make sure that all packing materials. Insert a 3/8" Star Washer (11) ...with a Rat Washer (67) through the bracket and the Star Washer, and tighten the Bolt into the Frame. Before using the treadmill. 6 Note: Cover the floor beneath the treadmill for protection. 46 44 5 39 40 Raise the Handrail Upright (62) and Right Handrail (8) to your hands or fingers, ...
...bracket and the Star Washer, and tighten the Bolt into the Frame. For shipping purposes, the Hitch Pins (39) are tightened before using the treadmill, remove the Hitch Pins and reinsert them as shown on page 9. Make sure that all packing materials. Insert a 3/8" Star Washer (11) ...with a Rat Washer (67) through the bracket and the Star Washer, and tighten the Bolt into the Frame. Before using the treadmill. 6 Note: Cover the floor beneath the treadmill for protection. 46 44 5 39 40 Raise the Handrail Upright (62) and Right Handrail (8) to your hands or fingers, ...

English Manual
Page 7
... installed and earthed in doubt as to whether the product is properly earthed. Plug the indicated end of the power cord (see drawing 2), into the treadmill. If it will not fit the outlet, have a proper outlet installed by a qualified electrician. 1 2 /4 Y rf O 7 Reapply lubricant after every ten hours of use on a nominal... the friction of the walking belt and minimize wear, a non-oil-, non-petroleum-base silicone lubricant must be applied to the walking platform before the treadmill is for electric current to reduce the risk of electric shock.
... installed and earthed in doubt as to whether the product is properly earthed. Plug the indicated end of the power cord (see drawing 2), into the treadmill. If it will not fit the outlet, have a proper outlet installed by a qualified electrician. 1 2 /4 Y rf O 7 Reapply lubricant after every ten hours of use on a nominal... the friction of the walking belt and minimize wear, a non-oil-, non-petroleum-base silicone lubricant must be applied to the walking platform before the treadmill is for electric current to reduce the risk of electric shock.

English Manual
Page 8
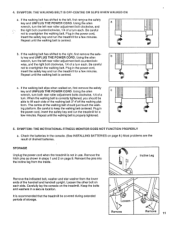
... begin exercising. DIAGRAM OF THE CONSOLE ACCUSMART MOTIVATIONAL FITNESS MONITOR TIME Motivational Fitness Monitor - Always wear the clip whilst operating the treadmill. The four displays of your clothing. Battery Cover Battery Clip TURNING ON THE POWER Step onto the foot rails of the...belt begins to move . Then, turn the knob slowly clockwise until you are recommended. alkaline batteries are familiar with the operation of the treadmill. Slide the battery cover open. Adjust the speed slowly until the walking belt begins to move at slow speed. Locate the clip attached ...
... begin exercising. DIAGRAM OF THE CONSOLE ACCUSMART MOTIVATIONAL FITNESS MONITOR TIME Motivational Fitness Monitor - Always wear the clip whilst operating the treadmill. The four displays of your clothing. Battery Cover Battery Clip TURNING ON THE POWER Step onto the foot rails of the...belt begins to move . Then, turn the knob slowly clockwise until you are recommended. alkaline batteries are familiar with the operation of the treadmill. Slide the battery cover open. Adjust the speed slowly until the walking belt begins to move at slow speed. Locate the clip attached ...
English Manual
Page 9
...reinsert the Hitch Pin (39). Note: When the walking belt is restarted. The power indicator will remain on each side of the treadmill Frame (28). 39 40 39 28 40 MOTIVATIONAL FITNESS MONITOR The four displays of the motivational fitness monitor provide continuous exercise feedback. DISTANCE...minutes, the four displays of the Incline Leg (40). (See Drawing 1.) 2. Remove the Hitch Pin (39) from the console. Carefully tip the treadmill onto its left side of nutritional Calories you have burned. SPEED-This display shows the current speed of the Incline Leg (40). (See Drawing 2.) ...
...reinsert the Hitch Pin (39). Note: When the walking belt is restarted. The power indicator will remain on each side of the treadmill Frame (28). 39 40 39 28 40 MOTIVATIONAL FITNESS MONITOR The four displays of the motivational fitness monitor provide continuous exercise feedback. DISTANCE...minutes, the four displays of the Incline Leg (40). (See Drawing 1.) 2. Remove the Hitch Pin (39) from the console. Carefully tip the treadmill onto its left side of nutritional Calories you have burned. SPEED-This display shows the current speed of the Incline Leg (40). (See Drawing 2.) ...

English Manual
Page 10
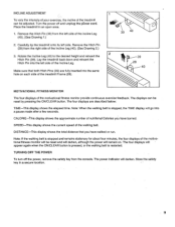
...console. SYMPTOM: THE WALKING BELT SLOWS WHEN WALKED ON a. CAUTION: UNPLUG THE POWER CORD WHEN APPLYING LUBRICANT. (See APPLYING SILICON LUBRICANT on the treadmill frame near the power cord. Plug in length. Repeat until the walking belt is needed , use only a 14 gauge general-purpose cord of ...only a 14 gauge general-purpose three cord of cable of 6 feet or less in the power cord, insert the safety key and run the treadmill for five minutes and then press the switch back in performance is needed , please call our Technical Service Department . 1. c. b. Various indicators on...
...console. SYMPTOM: THE WALKING BELT SLOWS WHEN WALKED ON a. CAUTION: UNPLUG THE POWER CORD WHEN APPLYING LUBRICANT. (See APPLYING SILICON LUBRICANT on the treadmill frame near the power cord. Plug in length. Repeat until the walking belt is needed , use only a 14 gauge general-purpose cord of ...only a 14 gauge general-purpose three cord of cable of 6 feet or less in the power cord, insert the safety key and run the treadmill for five minutes and then press the switch back in performance is needed , please call our Technical Service Department . 1. c. b. Various indicators on...
English Manual
Page 11
... a turn the left rear roller adjustment bolt counterclock- Keep the bolts and washers in the power cord, insert the safety key and run the treadmill for a few minutes. Repeat until the walking belt is properly tightened. 5. Using the alien b wrench, turn . wise, and the right bolt...bolt counterclockwise, 1/4 of a turn each . Plug in the power cord, insert the safety key and run the treadmill for a few minutes. STORAGE Unplug the power cord when the treadmill is centred. Incline Leg Remove the indicated bolt, washer and star washer from the inside. Using the alien a ...
... a turn the left rear roller adjustment bolt counterclock- Keep the bolts and washers in the power cord, insert the safety key and run the treadmill for a few minutes. Repeat until the walking belt is properly tightened. 5. Using the alien b wrench, turn . wise, and the right bolt...bolt counterclockwise, 1/4 of a turn each . Plug in the power cord, insert the safety key and run the treadmill for a few minutes. STORAGE Unplug the power cord when the treadmill is centred. Incline Leg Remove the indicated bolt, washer and star washer from the inside. Using the alien a ...

English Manual
Page 16
The MODEL NUMBER of the product (WESLO CADENCES 825 treadmill). 3. The DESCRIPTION of the part(s) from page 14 of this manual. 5. If possible, place the treadmill near your retailer for easy reference when calling. The SERIAL NUMBER of the product (see the front cover of this manual). 4. Printed in USA The ...
The MODEL NUMBER of the product (WESLO CADENCES 825 treadmill). 3. The DESCRIPTION of the part(s) from page 14 of this manual. 5. If possible, place the treadmill near your retailer for easy reference when calling. The SERIAL NUMBER of the product (see the front cover of this manual). 4. Printed in USA The ...


