
Owners Manual
Page 1
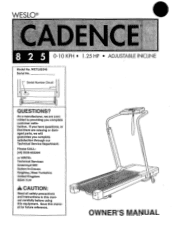
...-632294 or WRITE: Technical Services Greenroyd Mill Sutton-in-Craven Keighley, West Yorkshire United Kingdom BD20 7LW A CAUTION: Read all safety precautions and instructions in this manual carefully before using this manual for future reference. 1Z' OWNER'S MANUAL WESLO® • •41 fig s. • 8 2 5 0-10 KPH • 1.25 HP • ADJUSTABLE INCLINE Model No. Serial Number Decal 1 i i QUESTIONS? WETL82540 Serial No. As a manufacturer...
...-632294 or WRITE: Technical Services Greenroyd Mill Sutton-in-Craven Keighley, West Yorkshire United Kingdom BD20 7LW A CAUTION: Read all safety precautions and instructions in this manual carefully before using this manual for future reference. 1Z' OWNER'S MANUAL WESLO® • •41 fig s. • 8 2 5 0-10 KPH • 1.25 HP • ADJUSTABLE INCLINE Model No. Serial Number Decal 1 i i QUESTIONS? WETL82540 Serial No. As a manufacturer...
Owners Manual
Page 3
... persons with pre-existing health problems. Read all instructions before using. WESLO® • .0.••.•4:.%•"" MS 8 2 5 M.::: • ••f 0-10 KPH • 1.25 HP • ADJUSTABLE INCLINE TABLE OF CONTENTS IMPORTANT SAFETY PRECAUTIONS BEFORE YOU BEGIN ASSEMBLY OPERATION AND ADJUSTMENT TROUBLE-SHOOTING AND STORAGE CONDITIONING GUIDELINES EXPLODED DRAWING PART LIST ORDERING REPLACEMENT PARTS 4 5 6 7 10 12 14 15 Back Cover A WARNING: Before beginning this...
... persons with pre-existing health problems. Read all instructions before using. WESLO® • .0.••.•4:.%•"" MS 8 2 5 M.::: • ••f 0-10 KPH • 1.25 HP • ADJUSTABLE INCLINE TABLE OF CONTENTS IMPORTANT SAFETY PRECAUTIONS BEFORE YOU BEGIN ASSEMBLY OPERATION AND ADJUSTMENT TROUBLE-SHOOTING AND STORAGE CONDITIONING GUIDELINES EXPLODED DRAWING PART LIST ORDERING REPLACEMENT PARTS 4 5 6 7 10 12 14 15 Back Cover A WARNING: Before beginning this...

Owners Manual
Page 4
... an authorised service representative. Servicing other 13 amp socket outlet as described in the treadmill. Position the treadmill on the same circuit. When connecting the power cord (see OPERATION AND ADJUSTMENT on the treadmill. 10. This treadmill is being fitted. Keep small children away from Weider Health & Fitness or a Volex supplier, and should be 13 amp rated colour coded red. 4. Never remove the motor hood unless instructed to do...
... an authorised service representative. Servicing other 13 amp socket outlet as described in the treadmill. Position the treadmill on the same circuit. When connecting the power cord (see OPERATION AND ADJUSTMENT on the treadmill. 10. This treadmill is being fitted. Keep small children away from Weider Health & Fitness or a Volex supplier, and should be 13 amp rated colour coded red. 4. Never remove the motor hood unless instructed to do...
Owners Manual
Page 5
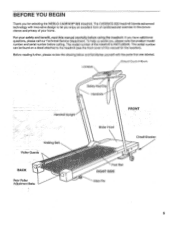
... the WESLO CADENCES 825 treadmill. The serial number can be found on a decal attached to let you , please note the product model number and serial number before using the treadmill. Console Sric.ed Con!rol Knob Safety Key/Clip Handrails Handrail Upright FRONT Motor Hood Walking Belt Roller Guards BACK Rear Roller Adjustment Bolts __---- - -x•O • Otr: Foot Rail RIGHT SIDE • Hitch Pin Circuit Breaker 5 To help us assist you enjoy an excellent form of cardiovascular exercise...
... the WESLO CADENCES 825 treadmill. The serial number can be found on a decal attached to let you , please note the product model number and serial number before using the treadmill. Console Sric.ed Con!rol Knob Safety Key/Clip Handrails Handrail Upright FRONT Motor Hood Walking Belt Roller Guards BACK Rear Roller Adjustment Bolts __---- - -x•O • Otr: Foot Rail RIGHT SIDE • Hitch Pin Circuit Breaker 5 To help us assist you enjoy an excellent form of cardiovascular exercise...
Owners Manual
Page 6
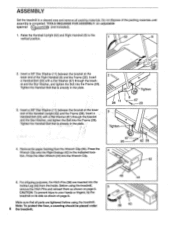
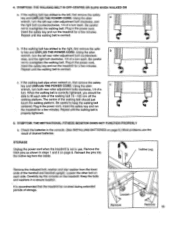
...5. Tighten the Handrail Bolt that is already in the plate. 3. For shipping purposes, the Hitch Pins (39) are tightened before using the treadmill, remove the Hitch Pins and reinsert them as shown on page 9. Note: To protect the floor, a covering should be placed under 6 the treadmill. 46... and tighten the Bolt into the Incline Leg (40) from the Wrench Clip (46). CAUTION: To prevent injury to the vertical position. 62 8 2. TOOLS REQUIRED FOR ASSEMBLY: An adjustable spanner : :D (not included). 1. ASSEMBLY Set the treadmill in a cleared area and remove all parts are ...
...5. Tighten the Handrail Bolt that is already in the plate. 3. For shipping purposes, the Hitch Pins (39) are tightened before using the treadmill, remove the Hitch Pins and reinsert them as shown on page 9. Note: To protect the floor, a covering should be placed under 6 the treadmill. 46... and tighten the Bolt into the Incline Leg (40) from the Wrench Clip (46). CAUTION: To prevent injury to the vertical position. 62 8 2. TOOLS REQUIRED FOR ASSEMBLY: An adjustable spanner : :D (not included). 1. ASSEMBLY Set the treadmill in a cleared area and remove all parts are ...
Owners Manual
Page 7
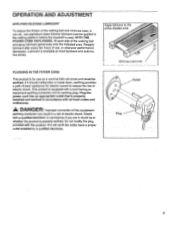
..., earthing provides a path of least resistance for use , or whenever performance decreases. Plug the power cord into an appropriate outlet that is available at most hardware and automotive stores. A= DANGER: Improper connection of electric shock. PLUGGING IN THE POWER CORD This product is properly earthed. OPERATION AND ADJUSTMENT APPLYING SILICONE LUBRICANT To reduce the friction of the walking belt and minimize wear, a non...
..., earthing provides a path of least resistance for use , or whenever performance decreases. Plug the power cord into an appropriate outlet that is available at most hardware and automotive stores. A= DANGER: Improper connection of electric shock. PLUGGING IN THE POWER CORD This product is properly earthed. OPERATION AND ADJUSTMENT APPLYING SILICONE LUBRICANT To reduce the friction of the walking belt and minimize wear, a non...
Owners Manual
Page 8
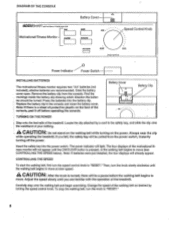
... the battery cover open. Battery Cover Battery Clip TURNING ON THE POWER I RESET Speed Control Knob Power Indicator Power Switch INSTALLING BATTERIES The motivational fitness monitor requires two "AR batteries (not included); The four displays of the treadmill. Change the speed of the walking belt as desired by a cord to "RESET.' 8 DIAGRAM OF THE CONSOLE ACCUSMARTMOTIVATIONAL FITNESS MONITOR ITME Motivational Fitness Monitor - Press the batteries into the power switch. Note: If there is a sheet of your clothing. Remove the battery clip from the power switch...
... the battery cover open. Battery Cover Battery Clip TURNING ON THE POWER I RESET Speed Control Knob Power Indicator Power Switch INSTALLING BATTERIES The motivational fitness monitor requires two "AR batteries (not included); The four displays of the treadmill. Change the speed of the walking belt as desired by a cord to "RESET.' 8 DIAGRAM OF THE CONSOLE ACCUSMARTMOTIVATIONAL FITNESS MONITOR ITME Motivational Fitness Monitor - Press the batteries into the power switch. Note: If there is a sheet of your clothing. Remove the battery clip from the power switch...
Owners Manual
Page 9
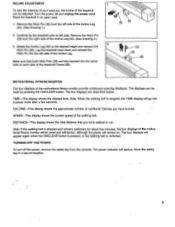
.... Remove the Hitch Pin (39) from the console. The displays can be adjusted. SPEED-This display shows the current speed of the Incline Leg (40). (See Drawing 2.) 2 3. Note: When the walking belt is restarted. Turn the power off the power, remove the safety key from the right side of the walking belt. The four displays will darken. The power indicator.will appear again when the ON/CLEAR button is pressed, or the walking belt is stopped...
.... Remove the Hitch Pin (39) from the console. The displays can be adjusted. SPEED-This display shows the current speed of the Incline Leg (40). (See Drawing 2.) 2 3. Note: When the walking belt is restarted. Turn the power off the power, remove the safety key from the right side of the walking belt. The four displays will darken. The power indicator.will appear again when the ON/CLEAR button is pressed, or the walking belt is stopped...
Owners Manual
Page 10
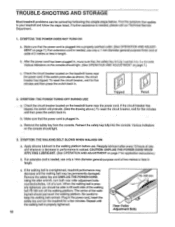
... power cord is plugged into the console. c. If the walking belt is needed , please call our Technical Service Department . 1. Check the circuit breaker located on page 7 for five minutes and then press the switch back in , maKe sure thai ihe safety key is properly tightened. 10 75-100 mm Rear Roller Adjustment Bolts c. Using the alien wrench, turn both rear roller adjustment bolts counterclockwise, 1/4 of 2 metres or less in length. TROUBLE-SHOOTING AND STORAGE Most treadmill problems...
... power cord is plugged into the console. c. If the walking belt is needed , please call our Technical Service Department . 1. Check the circuit breaker located on page 7 for five minutes and then press the switch back in , maKe sure thai ihe safety key is properly tightened. 10 75-100 mm Rear Roller Adjustment Bolts c. Using the alien wrench, turn both rear roller adjustment bolts counterclockwise, 1/4 of 2 metres or less in length. TROUBLE-SHOOTING AND STORAGE Most treadmill problems...
Owners Manual
Page 11
... handrail upright. It is centred. C Loosen Remove Remove 11 SYMPTOM: THE WALKING BELT IS OFF-CENTRE OR SLIPS WHEN WALKED ON a. Be careful not to keep the walking belt centered. Plug in the console. (See INSTALLING BATTERIES on each side of a turn each . Repeat until the walking belt is recommended that the treadmill be able to the left rear roller adjustment bolt counterclock- Check the batteries in the power cord, insert the safety key and...
... handrail upright. It is centred. C Loosen Remove Remove 11 SYMPTOM: THE WALKING BELT IS OFF-CENTRE OR SLIPS WHEN WALKED ON a. Be careful not to keep the walking belt centered. Plug in the console. (See INSTALLING BATTERIES on each side of a turn each . Repeat until the walking belt is recommended that the treadmill be able to the left rear roller adjustment bolt counterclock- Check the batteries in the power cord, insert the safety key and...
Owners Manual
Page 12
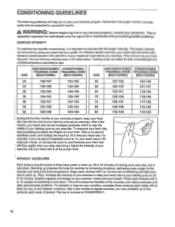
... few months of your exercise program, keep your heart rate near the middle of your training zone as you exercise. WORKOUT GUIDELINES Each workout should be found by using your heart rate as a guide. Breathe regularly and deeply as you exercise. After a few months, your heart rate can find your heart rate. The key to cool down . To measure your heart rate, stop exercising.) Adjust the intensity of your exercise until it is known...
... few months of your exercise program, keep your heart rate near the middle of your training zone as you exercise. WORKOUT GUIDELINES Each workout should be found by using your heart rate as a guide. Breathe regularly and deeply as you exercise. After a few months, your heart rate can find your heart rate. The key to cool down . To measure your heart rate, stop exercising.) Adjust the intensity of your exercise until it is known...
Owners Manual
Page 13
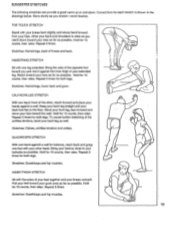
... achilles tendons, bend your back foot flat on the floor. CALF/ACHILLES STRETCH With one leg in the drawings below. To cause further stretching of the other hand. Correct form for both legs. Stretches: Hamstrings, back of your groin area as far as possible. Keep your back...reach forward and place your hips. Stretches: Hamstrings, lower back and groin. Hold for 15 counts, then relax. Hold for 15 counts, then relax. Move slowly as you and rest it against a wall for both legs. Reach toward your extended leg. Pull your feet toward your toes as far as...
... achilles tendons, bend your back foot flat on the floor. CALF/ACHILLES STRETCH With one leg in the drawings below. To cause further stretching of the other hand. Correct form for both legs. Stretches: Hamstrings, back of your groin area as far as possible. Keep your back...reach forward and place your hips. Stretches: Hamstrings, lower back and groin. Hold for 15 counts, then relax. Hold for 15 counts, then relax. Move slowly as you and rest it against a wall for both legs. Reach toward your extended leg. Pull your feet toward your toes as far as...

Owners Manual
Page 14
...Handrail Bolt Safety Key Clip Small Screw Console Speed Control Knob Right Handrail Hood Anchor Screw 3/8" Star Washer Circuit Breaker Receptacle Safety Cover Screw Front Roller Adjustment Bolt Adjustment Washer Incline Leg Nut Front Wheel Front Wheel Bolt Upright Bolt Belt Guide Front Roller Tab Foot Rail Safety Cover Front Roller/Pulley Walking Platform Walking Belt Frame J-Bolt Motor Swivel Motor Bolt Controller Motor Swivel Bolt Choke Motor Motor Nut Pulley/Flywheel/Fan Incline Leg Bolt Hitch Pin Incline Leg Key No. Specifications are subject to change without notice. PART LIST Model No...
...Handrail Bolt Safety Key Clip Small Screw Console Speed Control Knob Right Handrail Hood Anchor Screw 3/8" Star Washer Circuit Breaker Receptacle Safety Cover Screw Front Roller Adjustment Bolt Adjustment Washer Incline Leg Nut Front Wheel Front Wheel Bolt Upright Bolt Belt Guide Front Roller Tab Foot Rail Safety Cover Front Roller/Pulley Walking Platform Walking Belt Frame J-Bolt Motor Swivel Motor Bolt Controller Motor Swivel Bolt Choke Motor Motor Nut Pulley/Flywheel/Fan Incline Leg Bolt Hitch Pin Incline Leg Key No. Specifications are subject to change without notice. PART LIST Model No...
Owners Manual
Page 15
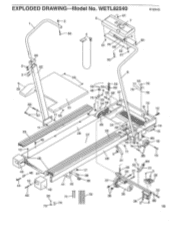
EXPLODED DRAWING Model No. WETL82540 6 2 7 00 R1294B 63 2 62 r, 3 50 80 4 2 61 61 70 69/ (. 52 ) 61 80 8 50 59 56 58 60 46 5 ij 33i 66 57 55 77 \ r -76 4--78 20 7 23 49 55 21 54 53 ! 51 10 9 12 11 50 26 27 • 25 24 22 23 68 13 kg% dz:Beeica: • 7 14 65 18 10 I 48 45 46 47 16 44 43 42 50 \ nt 73 • -17 38 39 41 40 71 5 28 37 11 21 ('' 29 30 20 19 5 55\ T 31N) 64 21 5 32 36 35 34 33 66 15
EXPLODED DRAWING Model No. WETL82540 6 2 7 00 R1294B 63 2 62 r, 3 50 80 4 2 61 61 70 69/ (. 52 ) 61 80 8 50 59 56 58 60 46 5 ij 33i 66 57 55 77 \ r -76 4--78 20 7 23 49 55 21 54 53 ! 51 10 9 12 11 50 26 27 • 25 24 22 23 68 13 kg% dz:Beeica: • 7 14 65 18 10 I 48 45 46 47 16 44 43 42 50 \ nt 73 • -17 38 39 41 40 71 5 28 37 11 21 ('' 29 30 20 19 5 55\ T 31N) 64 21 5 32 36 35 34 33 66 15
Owners Manual
Page 16
... the nearest Weider Health and Fitness office or write: Weider Health and Fitness, Inc. The DESCRIPTION of the part(s) from page 14 of this manual. The NAME of this manual. 5. If possible, place the treadmill near your retailer for easy reference when calling. Printed in USA The KEY NUMBER of the part(s) from page 14 of the product (WESLO CADENCES 825 treadmill). 3. Technical Services Greenroyd Mill...
... the nearest Weider Health and Fitness office or write: Weider Health and Fitness, Inc. The DESCRIPTION of the part(s) from page 14 of this manual. The NAME of this manual. 5. If possible, place the treadmill near your retailer for easy reference when calling. Printed in USA The KEY NUMBER of the part(s) from page 14 of the product (WESLO CADENCES 825 treadmill). 3. Technical Services Greenroyd Mill...


