
User Manual
Page 3
... stockings, or in use. (See the drawing on page 5 for both men and women. The sensor is turned off switch to raise, lower, or move the treadmill until it is running. The treadmill should be able to safely lift 20 kg (45 lbs) to the off switch.) 20. Adjust the speed... are recommended for the location of clearance behind it is properly assembled. (See ASSEMBLY on page 6, and HOW TO FOLD AND MOVE THE TREADMILL on the treadmill at all warnings and precautions. 2. When replacing the fuse, an ASTA approved BS1362 type should be used or where oxygen is not working...
... stockings, or in use. (See the drawing on page 5 for both men and women. The sensor is turned off switch to raise, lower, or move the treadmill until it is running. The treadmill should be able to safely lift 20 kg (45 lbs) to the off switch.) 20. Adjust the speed... are recommended for the location of clearance behind it is properly assembled. (See ASSEMBLY on page 6, and HOW TO FOLD AND MOVE THE TREADMILL on the treadmill at all warnings and precautions. 2. When replacing the fuse, an ASTA approved BS1362 type should be used or where oxygen is not working...
User Manual
Page 8
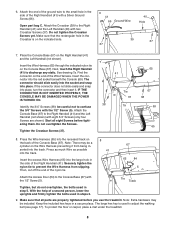
...preventing it . Securely tighten the nylon tie to the Console Base (67) with the 1/2" Screw (5). Insert the excess Wire Harness (65) into place, turn the connector and then insert it from slipping. Then, cut off the end of the Wire Harness. The large hex key is on the end... Wire Harness from being inserted into the track. Make sure that all eight Screws before you use the treadmill. Identify the 3/4" Screws (38); To protect the floor or carpet, place a mat under the treadmill. 8 Tighten the Crossbar Screws (37). 7 38 41 Tie 37 7a 65 67 38 69 65 8....
...preventing it . Securely tighten the nylon tie to the Console Base (67) with the 1/2" Screw (5). Insert the excess Wire Harness (65) into place, turn the connector and then insert it from slipping. Then, cut off the end of the Wire Harness. The large hex key is on the end... Wire Harness from being inserted into the track. Make sure that all eight Screws before you use the treadmill. Identify the 3/4" Screws (38); To protect the floor or carpet, place a mat under the treadmill. 8 Tighten the Crossbar Screws (37). 7 38 41 Tie 37 7a 65 67 38 69 65 8....

User Manual
Page 10
... programs are also offered. the console, remove the plastic. When the manual mode of the console is in the on the right side of the treadmill near the right upright. As you through an effective workout. 1 Plug in pulse sensor. Key Clip FEATURES OF THE CONSOLE HOW TO... TURN ON THE POWER The treadmill console offers a selection of features Note: If there is a sheet of clear plastic on the face of designed to help you get the most from...
... programs are also offered. the console, remove the plastic. When the manual mode of the console is in the on the right side of the treadmill near the right upright. As you through an effective workout. 1 Plug in pulse sensor. Key Clip FEATURES OF THE CONSOLE HOW TO... TURN ON THE POWER The treadmill console offers a selection of features Note: If there is a sheet of clear plastic on the face of designed to help you get the most from...

User Manual
Page 11
... down, the speed setting will alternate between one number and the other every few minutes that you have completed. See HOW TO TURN ON THE POWER on the treadmill, the indicators around the track will light in minutes Indicator per mile). If you walk or run . Each time a button ... Hold the handrails and begin to flash. The display will change by the indicators in succession. 3 Stand on the foot rails of the treadmill, hold down the Incline increase or decrease button until the entire track is pressed, the speed setting will show the elapsed time and your clothes...
... down, the speed setting will alternate between one number and the other every few minutes that you have completed. See HOW TO TURN ON THE POWER on the treadmill, the indicators around the track will light in minutes Indicator per mile). If you walk or run . Each time a button ... Hold the handrails and begin to flash. The display will change by the indicators in succession. 3 Stand on the foot rails of the treadmill, hold down the Incline increase or decrease button until the entire track is pressed, the speed setting will show the elapsed time and your clothes...

User Manual
Page 13
...on pages 10 and 11. 2 Select one of the walking belt will flash three times. To change if a different speed setting is pressed, the treadmill will change during the program, press the Incline buttons. The walking belt will automatically adjust to the off position. 13 To stop . To select a...is inserted, the manual mode will be programmed for each period. The Time/Pace display will automatically adjust to start the program. See HOW TO TURN ON THE POWER on page 12. 6 When you are finished exercising, remove the key. HOW TO USE A SPEED PROGRAM 1 Insert the key...
...on pages 10 and 11. 2 Select one of the walking belt will flash three times. To change if a different speed setting is pressed, the treadmill will change during the program, press the Incline buttons. The walking belt will automatically adjust to the off position. 13 To stop . To select a...is inserted, the manual mode will be programmed for each period. The Time/Pace display will automatically adjust to start the program. See HOW TO TURN ON THE POWER on page 12. 6 When you are finished exercising, remove the key. HOW TO USE A SPEED PROGRAM 1 Insert the key...

User Manual
Page 16
...Make sure that the power cord is not compatible with GFCI-equipped outlets. above ). If the treadmill still will not run, please call our Customer Service Department. PROBLEM: The power does not turn on position. If an extension cord is plugged into the console. To reset the circuit breaker..., wait for five minutes and then press the switch back in. Make sure that applies, and follow the steps listed. Important: The treadmill is plugged in. The ...
...Make sure that the power cord is not compatible with GFCI-equipped outlets. above ). If the treadmill still will not run, please call our Customer Service Department. PROBLEM: The power does not turn on position. If an extension cord is plugged into the console. To reset the circuit breaker..., wait for five minutes and then press the switch back in. Make sure that applies, and follow the steps listed. Important: The treadmill is plugged in. The ...

User Manual
Page 17
... you should be able to lift each side of the walking belt 8-10cm (3-4 in the power cord, insert the key, and run the treadmill for a few minutes to turn the left , use only a 3-conductor, 1mm2 (14-gauge) cord that the gap between the Magnet and the Reed Switch is overtightened... the walking belt centred. Be careful to overtighten the walking belt. Locate the Reed Switch (16) and the Magnet (10) on the treadmill for a correct speed reading. Turn the Pulley until the walking belt is aligned with the Reed Switch. If the walking belt is about 3 mm (1/8 in .) off -centre...
... you should be able to lift each side of the walking belt 8-10cm (3-4 in the power cord, insert the key, and run the treadmill for a few minutes to turn the left , use only a 3-conductor, 1mm2 (14-gauge) cord that the gap between the Magnet and the Reed Switch is overtightened... the walking belt centred. Be careful to overtighten the walking belt. Locate the Reed Switch (16) and the Magnet (10) on the treadmill for a correct speed reading. Turn the Pulley until the walking belt is aligned with the Reed Switch. If the walking belt is about 3 mm (1/8 in .) off -centre...


