

User Manual
Page 1
USER'S MANUAL Class HC Fitness Product If you have questions, or if there are committed to providing complete customer satisfaction. Serial Number Decal QUESTIONS? Customer Service Department Unit 4 Revie Road Industrial Estate Revie Road Beeston Leeds, LS118JG UK email: [email protected] CAUTION Read all precautions and instructions in this manual before using this manual for future reference. Save this equipment. WETL25130 Serial No. As a manufacturer, we are missing or damaged parts, please call: 08457 089 009 or write: ICON Health & Fitness, Ltd. Model No.
USER'S MANUAL Class HC Fitness Product If you have questions, or if there are committed to providing complete customer satisfaction. Serial Number Decal QUESTIONS? Customer Service Department Unit 4 Revie Road Industrial Estate Revie Road Beeston Leeds, LS118JG UK email: [email protected] CAUTION Read all precautions and instructions in this manual before using this manual for future reference. Save this equipment. WETL25130 Serial No. As a manufacturer, we are missing or damaged parts, please call: 08457 089 009 or write: ICON Health & Fitness, Ltd. Model No.

User Manual
Page 2
WESLO is a registered trademark of this manual. TABLE OF CONTENTS IMPORTANT PRECAUTIONS 3 BEFORE YOU BEGIN 5 ASSEMBLY 6 OPERATION AND ADJUSTMENT 9 HOW TO FOLD AND MOVE THE TREADMILL 14 TROUBLESHOOTING 16 CONDITIONING GUIDELINES 18 ORDERING REPLACEMENT PARTS Back Cover Note: An EXPLODED DRAWING and a PART LIST are attached in the centre of ICON Health & Fitness, Inc. 2
WESLO is a registered trademark of this manual. TABLE OF CONTENTS IMPORTANT PRECAUTIONS 3 BEFORE YOU BEGIN 5 ASSEMBLY 6 OPERATION AND ADJUSTMENT 9 HOW TO FOLD AND MOVE THE TREADMILL 14 TROUBLESHOOTING 16 CONDITIONING GUIDELINES 18 ORDERING REPLACEMENT PARTS Back Cover Note: An EXPLODED DRAWING and a PART LIST are attached in the centre of ICON Health & Fitness, Inc. 2

User Manual
Page 3
... TO FOLD AND MOVE THE TREADMILL on the walking belt. When replacing the fuse, an ASTA approved BS1362 type should be fitted to persons, read the following important precautions and information before operating the treadmill. 1. Do not wear loose clothes that blocks any air openings. When connecting the power cord (see page 9), plug the power cord into an earthed circuit. 18. Always remove the key, unplug the power cord, and move...
... TO FOLD AND MOVE THE TREADMILL on the walking belt. When replacing the fuse, an ASTA approved BS1362 type should be fitted to persons, read the following important precautions and information before operating the treadmill. 1. Do not wear loose clothes that blocks any air openings. When connecting the power cord (see page 9), plug the power cord into an earthed circuit. 18. Always remove the key, unplug the power cord, and move...

User Manual
Page 4
... so by an authorised service representative only. 24. Always unplug the power cord immediately after use of 35 or persons with pre-existing health problems. Read all parts of this manual). nance and adjustment procedures described in the location shown. Never remove the motor hood unless instructed to order a free replacement decal (see the back cover of the treadmill regularly. 22. WARNING: Before beginning this manual. DANGER: 23. Apply...
... so by an authorised service representative only. 24. Always unplug the power cord immediately after use of 35 or persons with pre-existing health problems. Read all parts of this manual). nance and adjustment procedures described in the location shown. Never remove the motor hood unless instructed to order a free replacement decal (see the back cover of the treadmill regularly. 22. WARNING: Before beginning this manual. DANGER: 23. Apply...
User Manual
Page 5
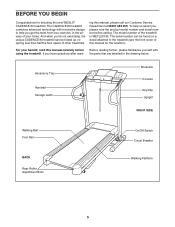
... not exercising, the unique CADENCE 80 treadmill can be folded up, requiring less than half the floor space of this manual for selecting the new WESLO® CADENCE 80 treadmill. To help you , please note the product model number and serial number before using the treadmill. Accessory Tray Handrail Storage Latch Bookrack Console Key/Clip Upright RIGHT SIDE Walking Belt Foot Rail BACK Rear Roller Adjustment Bolts On/Off Switch Circuit Breaker Walking Platform 5 The CADENCE 80 treadmill combines advanced technology with the parts...
... not exercising, the unique CADENCE 80 treadmill can be folded up, requiring less than half the floor space of this manual for selecting the new WESLO® CADENCE 80 treadmill. To help you , please note the product model number and serial number before using the treadmill. Accessory Tray Handrail Storage Latch Bookrack Console Key/Clip Upright RIGHT SIDE Walking Belt Foot Rail BACK Rear Roller Adjustment Bolts On/Off Switch Circuit Breaker Walking Platform 5 The CADENCE 80 treadmill combines advanced technology with the parts...

User Manual
Page 6
... Right Upright. Set the treadmill in separate part bags. Attach the four Base Pads (73) to the PART IDENTIFICATION CHART in the centre of the treadmill walking belt is in the indicated position. Hand tighten two 3" Bolts (58) with a soft cloth and a mild, non-abrasive cleaner. This is completed. Place a Wheel (63) in the lower end of the walking belt, simply wipe off the lubricant with...
... Right Upright. Set the treadmill in separate part bags. Attach the four Base Pads (73) to the PART IDENTIFICATION CHART in the centre of the treadmill walking belt is in the indicated position. Hand tighten two 3" Bolts (58) with a soft cloth and a mild, non-abrasive cleaner. This is completed. Place a Wheel (63) in the lower end of the walking belt, simply wipe off the lubricant with...
User Manual
Page 7
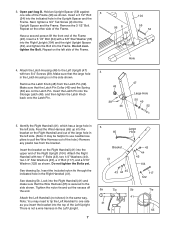
..., tighten a 3/4" Tek Screw (9) into the Right Handrail (41) and make sure that the large hole in the Latch Housing is not a wire harness in the left side of the large hole in the Upright Spacer and the Frame. There is on the other side of the hole.) Remove any plastic ties from the Latch Pin (52). Remove the 3 1/2" Bolt. Make...
..., tighten a 3/4" Tek Screw (9) into the Right Handrail (41) and make sure that the large hole in the Latch Housing is not a wire harness in the left side of the large hole in the Upright Spacer and the Frame. There is on the other side of the hole.) Remove any plastic ties from the Latch Pin (52). Remove the 3 1/2" Bolt. Make...
User Manual
Page 8
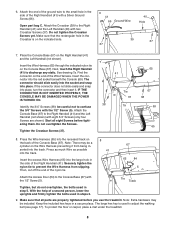
... included hex keys in step 5. To protect the floor or carpet, place a mat under the treadmill. 8 Tie Track Tighten, but do not overtighten, the bolts used in the side of the Right Handrail (41). Note: Extra hardware may be a cylinder on the back of the ground wire to confuse the 3/4" Screws with the 1/2" Screw (5). 6. Attach the Crossbar (39) to the Console Base...
... included hex keys in step 5. To protect the floor or carpet, place a mat under the treadmill. 8 Tie Track Tighten, but do not overtighten, the bolts used in the side of the Right Handrail (41). Note: Extra hardware may be a cylinder on the back of the ground wire to confuse the 3/4" Screws with the 1/2" Screw (5). 6. Attach the Crossbar (39) to the Console Base...

User Manual
Page 9
... local codes and or- Two power cords are in doubt as to whether the product is properly installed and earthed in - dinances. Such substances will prevent the fer- Refer to drawing 1. Plug the power cord into the socket on the treadmill. creased risk of least resistance for electric current to the walking belt or the walking platform. HOW TO PLUG IN THE POWER CORD 1 This...
... local codes and or- Two power cords are in doubt as to whether the product is properly installed and earthed in - dinances. Such substances will prevent the fer- Refer to drawing 1. Plug the power cord into the socket on the treadmill. creased risk of least resistance for electric current to the walking belt or the walking platform. HOW TO PLUG IN THE POWER CORD 1 This...

User Manual
Page 10
... your heart rate using the built-in pulse sensor. Key Clip FEATURES OF THE CONSOLE HOW TO TURN ON THE POWER The treadmill console offers a selection of features Note: If there is in the on position. You can be changed with the touch of a button. Two speed programs are also offered. Each program automatically controls the speed of the treadmill can even measure your workouts. the console, remove the plastic. When the manual mode...
... your heart rate using the built-in pulse sensor. Key Clip FEATURES OF THE CONSOLE HOW TO TURN ON THE POWER The treadmill console offers a selection of features Note: If there is in the on position. You can be changed with the touch of a button. Two speed programs are also offered. Each program automatically controls the speed of the treadmill can even measure your workouts. the console, remove the plastic. When the manual mode...

User Manual
Page 11
... the console represents a distance of laps that you have completed. When the manual mode is pressed, the speed setting will show the number of 400 meter (1/4 mile). Find the clip attached to light in succession until the key is measured in the pro- ment, the track and the displays will light in succession. HOW TO USE THE MANUAL MODE 1 Insert the key fully into the console. Each time a button is...
... the console represents a distance of laps that you have completed. When the manual mode is pressed, the speed setting will show the number of 400 meter (1/4 mile). Find the clip attached to light in succession until the key is measured in the pro- ment, the track and the displays will light in succession. HOW TO USE THE MANUAL MODE 1 Insert the key fully into the console. Each time a button is...

User Manual
Page 12
.../Calories display-This display shows the approximate numbers of fat calories and calories you have burned (see step 6). 6 Measure your heart rate if desired. lation in the Speed display. Step onto the foot rails, press the Stop button, and adjust the incline of the treadmill to show which unit of the walking belt. Press the Speed increase button to the storage position or the treadmill will not be damaged. Then, place your pulse...
.../Calories display-This display shows the approximate numbers of fat calories and calories you have burned (see step 6). 6 Measure your heart rate if desired. lation in the Speed display. Step onto the foot rails, press the Stop button, and adjust the incline of the treadmill to show which unit of the walking belt. Press the Speed increase button to the storage position or the treadmill will not be damaged. Then, place your pulse...

User Manual
Page 13
... walking belt will change the incline setting during the program, you can manually override the setting by pressing the Speed buttons. The Time/Pace display will flash three times. See step 5 on page 12. 6 When you are finished using the treadmill, move at the lowest incline level. To select a speed program, press the Program button repeatedly until all 30 periods are finished exercising, remove the key. Note: The same speed setting may be selected. To change during the programs...
... walking belt will change the incline setting during the program, you can manually override the setting by pressing the Speed buttons. The Time/Pace display will flash three times. See step 5 on page 12. 6 When you are finished using the treadmill, move at the lowest incline level. To select a speed program, press the Program button repeatedly until all 30 periods are finished exercising, remove the key. Note: The same speed setting may be selected. To change during the programs...

User Manual
Page 14
... position. 2. Carefully move the treadmill over an uneven surface. 3. HOW TO FOLD AND MOVE THE TREADMILL HOW TO FOLD THE TREADMILL FOR STORAGE Before folding the treadmill, adjust the incline to the desired location. Move your hands in temperatures above . Make sure that the frame is past the latch pin. Do not move the treadmill to the lowest position. Base Front Wheels 14 Next, unplug the power cord. Hold the...
... position. 2. Carefully move the treadmill over an uneven surface. 3. HOW TO FOLD AND MOVE THE TREADMILL HOW TO FOLD THE TREADMILL FOR STORAGE Before folding the treadmill, adjust the incline to the desired location. Move your hands in temperatures above . Make sure that the frame is past the latch pin. Do not move the treadmill to the lowest position. Base Front Wheels 14 Next, unplug the power cord. Hold the...

User Manual
Page 16
... then press the switch back in . Reinsert the key fully into the console. If the treadmill still will not run, please call our Customer Service Department. TROUBLESHOOTING Most treadmill problems can be in the on position. Check the on/off switch is in , make sure that is needed , use SOLUTION: a. Check the circuit breaker located on position (see d. After the power cord has been plugged in...
... then press the switch back in . Reinsert the key fully into the console. If the treadmill still will not run, please call our Customer Service Department. TROUBLESHOOTING Most treadmill problems can be in the on position. Check the on/off switch is in , make sure that is needed , use SOLUTION: a. Check the circuit breaker located on position (see d. After the power cord has been plugged in...

User Manual
Page 17
... Screw (78), move the Reed Switch slightly, and then retighten the Screw. PROBLEM: The walking belt slows when walked on SOLUTION: a. When the walking belt is correctly tightened, you should be able to turn the left rear roller bolt counterclockwise 1/2 of a turn . If an extension cord is needed, use the hex key to lift each side of the walking belt 8-10cm (3-4 in .) off the walking platform. Remove the key and UNPLUG THE POWER CORD. b. When the walking belt is properly tightened...
... Screw (78), move the Reed Switch slightly, and then retighten the Screw. PROBLEM: The walking belt slows when walked on SOLUTION: a. When the walking belt is correctly tightened, you should be able to turn the left rear roller bolt counterclockwise 1/2 of a turn . If an extension cord is needed, use the hex key to lift each side of the walking belt 8-10cm (3-4 in .) off the walking platform. Remove the key and UNPLUG THE POWER CORD. b. When the walking belt is properly tightened...
User Manual
Page 18
... aerobic exercise, adjust the speed and incline of the treadmill until your heart rate is near the highest number in your goal is activity that requires large amounts of stretching and light exercise. Next, find the proper heart rate for a sustained period of stretching to cool down -Finish each workout with preexisting health problems. The pulse sensor is near the bottom of the chart (ages are recommended heart rates...
... aerobic exercise, adjust the speed and incline of the treadmill until your heart rate is near the highest number in your goal is activity that requires large amounts of stretching and light exercise. Next, find the proper heart rate for a sustained period of stretching to cool down -Finish each workout with preexisting health problems. The pulse sensor is near the bottom of the chart (ages are recommended heart rates...

User Manual
Page 20
... following information: • The MODEL NUMBER of the product (WETL25130) • The NAME of the product (WESLO® CADENCE 80 treadmill) • The SERIAL NUMBER of the product (see the front cover of this manual) • The KEY NUMBER and DESCRIPTION of the desired part(s) (see the PART LIST and the EXPLODED DRAWING in the centre of this manual) Part No. 200223 R0903A Printed in USA © 2003 ICON Health & Fitness...
... following information: • The MODEL NUMBER of the product (WETL25130) • The NAME of the product (WESLO® CADENCE 80 treadmill) • The SERIAL NUMBER of the product (see the front cover of this manual) • The KEY NUMBER and DESCRIPTION of the desired part(s) (see the PART LIST and the EXPLODED DRAWING in the centre of this manual) Part No. 200223 R0903A Printed in USA © 2003 ICON Health & Fitness...
User Manual
Page 21
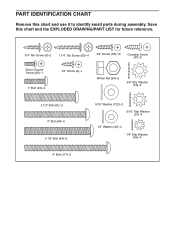
PART IDENTIFICATION CHART Remove this chart and the EXPLODED DRAWING/PART LIST for future reference. 3/4" Tek Screw (9)-2 1 1/4" Tek Screw (60)-4 3/4" Screw (38)-10 Crossbar Screw (37)-2 Silver Ground Screw (66)-1 1" Bolt (43)-4 1/2" Screw (5)-1 Wheel Nut (64)-2 3/8" Star Washer (55)-2 2 1/2" Bolt (61)-2 3" Bolt (58)-4 3 1/2" Bolt (54)-2 5/16" Washer (122)-2 5/16" Star Washer (57)-4 1/4" Washer (44)-4 1/4" Star Washer (45)-4 4" Bolt (117)-2 Save this chart and use it to identify small parts during assembly.
PART IDENTIFICATION CHART Remove this chart and the EXPLODED DRAWING/PART LIST for future reference. 3/4" Tek Screw (9)-2 1 1/4" Tek Screw (60)-4 3/4" Screw (38)-10 Crossbar Screw (37)-2 Silver Ground Screw (66)-1 1" Bolt (43)-4 1/2" Screw (5)-1 Wheel Nut (64)-2 3/8" Star Washer (55)-2 2 1/2" Bolt (61)-2 3" Bolt (58)-4 3 1/2" Bolt (54)-2 5/16" Washer (122)-2 5/16" Star Washer (57)-4 1/4" Washer (44)-4 1/4" Star Washer (45)-4 4" Bolt (117)-2 Save this chart and use it to identify small parts during assembly.

User Manual
Page 22
... Key Clip Console Warning Decal Base Pad U-Nut Base Endcap Upright Grommet Frame Ground Wire Screw Base Filter Wire Belly Pan Ferrite Box Power Cord Set Access Door Cable Tie Clamp Releasable Tie 8" Cable Tie Ground Wire Rear Wheel Bolt Incline Leg Nut Key No. Qty. Bolt Right Upright Hood Mount Bracket Motor Pivot Sleeve Motor Controller Wire Hex Key Incline Pivot Bolt Rear Belly Pan Screw Rear Belly Pan Incline Motor Nut Incline Motor Bolt Incline Stop Bracket Incline Motor Incline Wire 4" Bolt Star Washer Crossbar Foam Handrail Foam Belly pan Plug...
... Key Clip Console Warning Decal Base Pad U-Nut Base Endcap Upright Grommet Frame Ground Wire Screw Base Filter Wire Belly Pan Ferrite Box Power Cord Set Access Door Cable Tie Clamp Releasable Tie 8" Cable Tie Ground Wire Rear Wheel Bolt Incline Leg Nut Key No. Qty. Bolt Right Upright Hood Mount Bracket Motor Pivot Sleeve Motor Controller Wire Hex Key Incline Pivot Bolt Rear Belly Pan Screw Rear Belly Pan Incline Motor Nut Incline Motor Bolt Incline Stop Bracket Incline Motor Incline Wire 4" Bolt Star Washer Crossbar Foam Handrail Foam Belly pan Plug...


