

User Manual
Page 1
Save this equipment. Customer Service Department Unit 4 Revie Road Industrial Estate Revie Road Beeston Leeds, LS118JG UK email: [email protected] CAUTION Read all precautions and instructions in this manual before using this manual for future reference. USER'S MANUAL Class HC Fitness Product As a manufacturer, we are missing or damaged parts, please call: 08457 089 009 or write: ICON Health & Fitness, Ltd. WETL25130 Serial No. Serial Number Decal QUESTIONS? If you have questions, or if there are committed to providing complete customer satisfaction. Model No.
Save this equipment. Customer Service Department Unit 4 Revie Road Industrial Estate Revie Road Beeston Leeds, LS118JG UK email: [email protected] CAUTION Read all precautions and instructions in this manual before using this manual for future reference. USER'S MANUAL Class HC Fitness Product As a manufacturer, we are missing or damaged parts, please call: 08457 089 009 or write: ICON Health & Fitness, Ltd. WETL25130 Serial No. Serial Number Decal QUESTIONS? If you have questions, or if there are committed to providing complete customer satisfaction. Model No.

User Manual
Page 2
TABLE OF CONTENTS IMPORTANT PRECAUTIONS 3 BEFORE YOU BEGIN 5 ASSEMBLY 6 OPERATION AND ADJUSTMENT 9 HOW TO FOLD AND MOVE THE TREADMILL 14 TROUBLESHOOTING 16 CONDITIONING GUIDELINES 18 ORDERING REPLACEMENT PARTS Back Cover Note: An EXPLODED DRAWING and a PART LIST are attached in the centre of ICON Health & Fitness, Inc. 2 WESLO is a registered trademark of this manual.
TABLE OF CONTENTS IMPORTANT PRECAUTIONS 3 BEFORE YOU BEGIN 5 ASSEMBLY 6 OPERATION AND ADJUSTMENT 9 HOW TO FOLD AND MOVE THE TREADMILL 14 TROUBLESHOOTING 16 CONDITIONING GUIDELINES 18 ORDERING REPLACEMENT PARTS Back Cover Note: An EXPLODED DRAWING and a PART LIST are attached in the centre of ICON Health & Fitness, Inc. 2 WESLO is a registered trademark of this manual.

User Manual
Page 4
...procedures in this or any opening. WARNING: Before beginning this manual. Note: The decals may not be performed by an authorised service representative. SAVE THESE INSTRUCTIONS The decal shown have been placed on the treadmill. 21. Never insert any object into any exercise program, ...-existing health problems. Read all parts of the treadmill regularly. 22. nance and adjustment procedures described in this manual should be shown at actual size. 4 ICON assumes no responsibility for in the location shown. The treadmill is not legible, please call our Customer Service...
...procedures in this or any opening. WARNING: Before beginning this manual. Note: The decals may not be performed by an authorised service representative. SAVE THESE INSTRUCTIONS The decal shown have been placed on the treadmill. 21. Never insert any object into any exercise program, ...-existing health problems. Read all parts of the treadmill regularly. 22. nance and adjustment procedures described in this manual should be shown at actual size. 4 ICON assumes no responsibility for in the location shown. The treadmill is not legible, please call our Customer Service...
User Manual
Page 5
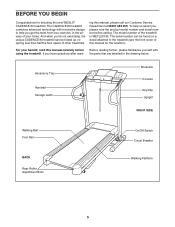
... in the privacy of other treadmills. The model number of this manual for selecting the new WESLO® CADENCE 80 treadmill. For your home. Before reading further, please familiarise yourself with innovative design to the treadmill (see the front cover of the treadmill is WETL25130. Accessory Tray Handrail...On/Off Switch Circuit Breaker Walking Platform 5 ing this manual carefully before calling. The serial number can be found on a decal attached to help us assist you 're not exercising, the unique CADENCE 80 treadmill can be folded up, requiring less than half the ...
... in the privacy of other treadmills. The model number of this manual for selecting the new WESLO® CADENCE 80 treadmill. For your home. Before reading further, please familiarise yourself with innovative design to the treadmill (see the front cover of the treadmill is WETL25130. Accessory Tray Handrail...On/Off Switch Circuit Breaker Walking Platform 5 ing this manual carefully before calling. The serial number can be found on a decal attached to help us assist you 're not exercising, the unique CADENCE 80 treadmill can be folded up, requiring less than half the ...

User Manual
Page 6
... instructed to the top of the Right Upright. With the help identifying the assembly hardware, refer to a vertical position, and hold it near the treadmill Frame (96) as shown. Raise the Base (79) to the PART IDENTIFICATION CHART in the position shown. Make sure that there are packaged in... hole is unplugged. do so. 1. Assembly requires the included hex keys and your own phillips screwdriver and needlenose pliers . , wire cutters For help of this manual. Hand tighten two 3" Bolts (58) with four 1 1/4" Tek Screws (60). 1 61 Bolt 73 Hole 60 73 75 60 63 64 62 79 64...
... instructed to the top of the Right Upright. With the help identifying the assembly hardware, refer to a vertical position, and hold it near the treadmill Frame (96) as shown. Raise the Base (79) to the PART IDENTIFICATION CHART in the position shown. Make sure that there are packaged in... hole is unplugged. do so. 1. Assembly requires the included hex keys and your own phillips screwdriver and needlenose pliers . , wire cutters For help of this manual. Hand tighten two 3" Bolts (58) with four 1 1/4" Tek Screws (60). 1 61 Bolt 73 Hole 60 73 75 60 63 64 62 79 64...

User Manual
Page 10
... it guides you through an effective workout. 1 Plug in pulse sensor. Key Clip FEATURES OF THE CONSOLE HOW TO TURN ON THE POWER The treadmill console offers a selection of features Note: If there is a sheet of clear plastic on the face of designed to help you get the most from ...-in the power cord (see page 9). 2 Locate the on/off switch on position. On Position 10 When the manual mode of the console is in the on the right side of the treadmill near the right upright. You can be changed with the touch of a button. the console, remove the plastic. Two...
... it guides you through an effective workout. 1 Plug in pulse sensor. Key Clip FEATURES OF THE CONSOLE HOW TO TURN ON THE POWER The treadmill console offers a selection of features Note: If there is a sheet of clear plastic on the face of designed to help you get the most from ...-in the power cord (see page 9). 2 Locate the on/off switch on position. On Position 10 When the manual mode of the console is in the on the right side of the treadmill near the right upright. You can be changed with the touch of a button. the console, remove the plastic. Two...

User Manual
Page 11
...as shown by carefully taking a few steps backward until the desired incline level is reached. 5 Follow your clothes. The center of the treadmill as desired by 0.1 mph. The display will alternate between one number and the other every few minutes that you have walked or run ...a distance of your progress with the track and the displays. If you have selected a speed program, press the Program button repeatedly to reselect the manual mode. 3 Press the Start button or the Speed increase button to flash. Note: During the first few seconds, as needed. If a button...
...as shown by carefully taking a few steps backward until the desired incline level is reached. 5 Follow your clothes. The center of the treadmill as desired by 0.1 mph. The display will alternate between one number and the other every few minutes that you have walked or run ...a distance of your progress with the track and the displays. If you have selected a speed program, press the Program button repeatedly to reselect the manual mode. 3 Press the Start button or the Speed increase button to flash. Note: During the first few seconds, as needed. If a button...

User Manual
Page 13
...the two speed program indicators lights. To change during the programs. Each program consists of 30 one of the treadmill will automatically adjust to move the on page 12. 6 When you can manually override the setting by pressing the Speed buttons. See step 6 on /off position. 13 Note: The ...graphs beside the indicators show how the speed of the speed programs. When the key is pressed, the treadmill will change the incline setting during the ...
...the two speed program indicators lights. To change during the programs. Each program consists of 30 one of the treadmill will automatically adjust to move the on page 12. 6 When you can manually override the setting by pressing the Speed buttons. See step 6 on /off position. 13 Note: The ...graphs beside the indicators show how the speed of the speed programs. When the key is pressed, the treadmill will change the incline setting during the ...

User Manual
Page 20
...information: • The MODEL NUMBER of the product (WETL25130) • The NAME of the product (WESLO® CADENCE 80 treadmill) • The SERIAL NUMBER of the product (see the front cover of this manual) • The KEY NUMBER and DESCRIPTION of the desired part(s) (see the PART LIST and the ...EXPLODED DRAWING in the centre of this manual) Part No. 200223 R0903A Printed in USA © 2003 ICON Health...
...information: • The MODEL NUMBER of the product (WETL25130) • The NAME of the product (WESLO® CADENCE 80 treadmill) • The SERIAL NUMBER of the product (see the front cover of this manual) • The KEY NUMBER and DESCRIPTION of the desired part(s) (see the PART LIST and the ...EXPLODED DRAWING in the centre of this manual) Part No. 200223 R0903A Printed in USA © 2003 ICON Health...

User Manual
Page 22
..." Green Wire, F/Ring 8" Green Wire, F/Ring 4" Green Wire, F/Ring 6" Blue Wire, 2F 4" Blue Wire, 2F 8" White Wire, 2F 6" White Wire, 2F 4" Black Wire, 2F User's Manual *Includes all parts shown in the box #These parts are not illustrated Qty. Description Key No. Description 91 2 92 4 93 1 94 3 95 3 96 1 97 1 98... 2 56 1 57 4 58 4 59 2 60 2 61 2 62 2 63 2 64 2 65 1 66 2 67 1 68 1 69 1 70 1 71 1 72 1 73 4 74 4 75 2 76 1 77 1 78 10 79 1 80 1 81 1 82 1 83 1 84 1 85 3 86 3 87 1 88 1 89 1 90 4 Latch Housing Left Upright Latch Knob Latch Pin Collar Spring Latch Pin Clip Cage Nut...
..." Green Wire, F/Ring 8" Green Wire, F/Ring 4" Green Wire, F/Ring 6" Blue Wire, 2F 4" Blue Wire, 2F 8" White Wire, 2F 6" White Wire, 2F 4" Black Wire, 2F User's Manual *Includes all parts shown in the box #These parts are not illustrated Qty. Description Key No. Description 91 2 92 4 93 1 94 3 95 3 96 1 97 1 98... 2 56 1 57 4 58 4 59 2 60 2 61 2 62 2 63 2 64 2 65 1 66 2 67 1 68 1 69 1 70 1 71 1 72 1 73 4 74 4 75 2 76 1 77 1 78 10 79 1 80 1 81 1 82 1 83 1 84 1 85 3 86 3 87 1 88 1 89 1 90 4 Latch Housing Left Upright Latch Knob Latch Pin Collar Spring Latch Pin Clip Cage Nut...

