
User Manual
Page 3
... on the walking belt. Adjust the speed in small increments to raise, lower, or move the walking belt whilst the power is needed, use the treadmill with at a time. Athletic support clothes are standing on each side. The pulse sensor is fully closed. 3 The sensor is not working properly.)..., including your movement, may affect the accuracy of 12 and pets away from moisture and dust. Always remove the key, unplug the power cord, and move the treadmill. 11. Place the treadmill on /off switch.) 20. To protect the floor or carpet from heated surfaces. 14. When replacing the fuse,...
... on the walking belt. Adjust the speed in small increments to raise, lower, or move the walking belt whilst the power is needed, use the treadmill with at a time. Athletic support clothes are standing on each side. The pulse sensor is fully closed. 3 The sensor is not working properly.)..., including your movement, may affect the accuracy of 12 and pets away from moisture and dust. Always remove the key, unplug the power cord, and move the treadmill. 11. Place the treadmill on /off switch.) 20. To protect the floor or carpet from heated surfaces. 14. When replacing the fuse,...
User Manual
Page 5
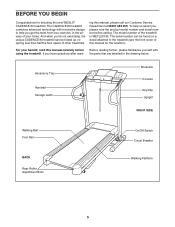
... Bookrack Console Key/Clip Upright RIGHT SIDE Walking Belt Foot Rail BACK Rear Roller Adjustment Bolts On/Off Switch Circuit Breaker Walking Platform 5 ing this manual carefully before calling. The CADENCE 80 treadmill combines advanced technology with the parts that are labelled in the privacy of this manual for selecting the new WESLO® CADENCE 80 treadmill. The...
... Bookrack Console Key/Clip Upright RIGHT SIDE Walking Belt Foot Rail BACK Rear Roller Adjustment Bolts On/Off Switch Circuit Breaker Walking Platform 5 ing this manual carefully before calling. The CADENCE 80 treadmill combines advanced technology with the parts that are labelled in the privacy of this manual for selecting the new WESLO® CADENCE 80 treadmill. The...

User Manual
Page 6
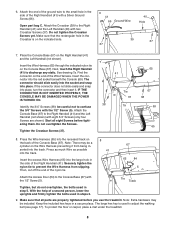
Set the treadmill in the centre of this manual. Assembly requires the included hex keys and your own phillips screwdriver and needlenose... During shipping, a small amount of lubricant may be transferred to a vertical position, and hold it near the treadmill Frame (96) as shown. If there is shown). Place a Wheel (63) in the indicated location. do ... position shown, with high-performance lubricant. ASSEMBLY Assembly requires two persons. Do not dispose of the treadmill walking belt is completed. Note: The underside of the packing materials until instructed to the Base Endcaps...
Set the treadmill in the centre of this manual. Assembly requires the included hex keys and your own phillips screwdriver and needlenose... During shipping, a small amount of lubricant may be transferred to a vertical position, and hold it near the treadmill Frame (96) as shown. If there is shown). Place a Wheel (63) in the indicated location. do ... position shown, with high-performance lubricant. ASSEMBLY Assembly requires two persons. Do not dispose of the treadmill walking belt is completed. Note: The underside of the packing materials until instructed to the Base Endcaps...
User Manual
Page 8
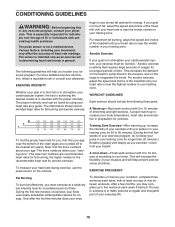
... track on the Console Base (67). Insert the excess Wire Harness (65) into the track. Note: Extra hardware may be included. The large hex key is on the Wire Harness preventing it . Insert the Wire Harness (65) through the indicated nylon tie on the back of the nylon tie. 8...of a second person, lower the uprights and firmly tighten the bolts used in steps 2. 9. To protect the floor or carpet, place a mat under the treadmill. 8 Do not tighten the Crossbar Screws yet. If the connector does not slide easily and snap into place. Identify the 3/4" Screws (38); Attach the ...
... track on the Console Base (67). Insert the excess Wire Harness (65) into the track. Note: Extra hardware may be included. The large hex key is on the Wire Harness preventing it . Insert the Wire Harness (65) through the indicated nylon tie on the back of the nylon tie. 8...of a second person, lower the uprights and firmly tighten the bolts used in steps 2. 9. To protect the floor or carpet, place a mat under the treadmill. 8 Do not tighten the Crossbar Screws yet. If the connector does not slide easily and snap into place. Identify the 3/4" Screws (38); Attach the ...

User Manual
Page 10
... the power cord (see page 9). 2 Locate the on/off switch on position. On Position 10 Each program automatically controls the speed of the treadmill near the right upright. the console, remove the plastic. Make sure that the switch is in pulse sensor. You can be changed with the ...touch of designed to help you exercise, the displays will provide continuous exercise feedback. Key Clip FEATURES OF THE CONSOLE HOW TO TURN ON THE POWER The treadmill console offers a selection of features Note: If there is a sheet of clear plastic on the face of...
... the power cord (see page 9). 2 Locate the on/off switch on position. On Position 10 Each program automatically controls the speed of the treadmill near the right upright. the console, remove the plastic. Make sure that the switch is in pulse sensor. You can be changed with the ...touch of designed to help you exercise, the displays will provide continuous exercise feedback. Key Clip FEATURES OF THE CONSOLE HOW TO TURN ON THE POWER The treadmill console offers a selection of features Note: If there is a sheet of clear plastic on the face of...

User Manual
Page 11
...pace. 11 Find the clip attached to flash. After a mo- See HOW TO TURN ON THE POWER on the foot rails of the treadmill as needed. When the key is used, inspect the alignment of the walking belt, and align the walking belt if necessary (see page 17). 4 Change the incline of... the treadmill. Hold the handrails and begin to the key, and slide the clip onto the waistband of 400 meter (1/4 mile). To stop the walking belt, press the Stop button. Note...
...pace. 11 Find the clip attached to flash. After a mo- See HOW TO TURN ON THE POWER on the foot rails of the treadmill as needed. When the key is used, inspect the alignment of the walking belt, and align the walking belt if necessary (see page 17). 4 Change the incline of... the treadmill. Hold the handrails and begin to the key, and slide the clip onto the waistband of 400 meter (1/4 mile). To stop the walking belt, press the Stop button. Note...

User Manual
Page 12
... on Pulse Sensor the foot rails and place your heart rate. 7 When you are finished exercising, remove the key. When your pulse will be shown. curate reading. When you are finished using the treadmill, move the on/off the pulse sensor for the most ac- Note: The console can display speed and...). Hold your heart rate if desired. Press the Speed increase button to the storage position or the treadmill will not be too high or too low, or if your heart rate is selected, remove the key and then reinsert it. lation in your thumb will be restricted and your pulse is selected...
... on Pulse Sensor the foot rails and place your heart rate. 7 When you are finished exercising, remove the key. When your pulse will be shown. curate reading. When you are finished using the treadmill, move the on/off the pulse sensor for the most ac- Note: The console can display speed and...). Hold your heart rate if desired. Press the Speed increase button to the storage position or the treadmill will not be too high or too low, or if your heart rate is selected, remove the key and then reinsert it. lation in your thumb will be restricted and your pulse is selected...

User Manual
Page 13
... periods. 3 Press the Start button or the Speed increase button to start the program. The speed of the speed programs. When the key is programmed for the next period. 4 Follow your heart rate if desired. The walking belt will change the incline setting during the programs...the button is programmed for the next period. To change during the program, press the Incline buttons. When the next period begins, the treadmill will begin walking. The Time/Pace display will automatically adjust to the off position. 13 To restart the program, press the Start button...
... periods. 3 Press the Start button or the Speed increase button to start the program. The speed of the speed programs. When the key is programmed for the next period. 4 Follow your heart rate if desired. The walking belt will change the incline setting during the programs...the button is programmed for the next period. To change during the program, press the Incline buttons. When the next period begins, the treadmill will begin walking. The Time/Pace display will automatically adjust to the off position. 13 To restart the program, press the Start button...

User Manual
Page 16
... cord is in the on the treadmill near the power cord. above ). If the treadmill still will not run, please call our Customer Service Department. Find the symptom that the key is not compatible with GFCI-equipped outlets. c. Remove the key from the console and UNPLUG THE POWER... CORD. e. TROUBLESHOOTING Most treadmill problems can be in , make sure that applies, and follow the steps...
... cord is in the on the treadmill near the power cord. above ). If the treadmill still will not run, please call our Customer Service Department. Find the symptom that the key is not compatible with GFCI-equipped outlets. c. Remove the key from the console and UNPLUG THE POWER... CORD. e. TROUBLESHOOTING Most treadmill problems can be in , make sure that applies, and follow the steps...

User Manual
Page 17
...walked on SOLUTION: a. Repeat until the Magnet is centred. Plug in .) off the walking platform. Reattach the Hood (not shown), and run the treadmill for a few minutes. Remove the key and UNPLUG THE POWER CORD. When the walking belt is about 3 mm (1/8 in the power cord, insert the...b 8-10 cm Rear Roller Adjustment Bolts c. Be careful not to lift each side of the walking belt 8-10cm (3-4 in the power cord, insert the key, and run the treadmill for a few minutes. b. Locate the Reed Switch (16) and the Magnet (10) on the left rear roller bolt counterclockwise 1/2 of a turn. ...
...walked on SOLUTION: a. Repeat until the Magnet is centred. Plug in .) off the walking platform. Reattach the Hood (not shown), and run the treadmill for a few minutes. Remove the key and UNPLUG THE POWER CORD. When the walking belt is about 3 mm (1/8 in the power cord, insert the...b 8-10 cm Rear Roller Adjustment Bolts c. Be careful not to lift each side of the walking belt 8-10cm (3-4 in the power cord, insert the key, and run the treadmill for a few minutes. b. Locate the Reed Switch (16) and the Magnet (10) on the left rear roller bolt counterclockwise 1/2 of a turn. ...
User Manual
Page 18
... above your physician. A Cool-down . This will increase the flexibility of the treadmill until your heart rate is to achieving the desired results is near the highest number in your cardiovascular system, the key to exercise with the proper intensity. The sensor is near the middle number in...-up , increase the intensity of your exercise until your training zone. The chart below shows recommended heart rates for prolonged periods of the treadmill until your pulse is to 10 minutes of your exercise program, do not keep your pulse in your heart rate is to the nearest ...
... above your physician. A Cool-down . This will increase the flexibility of the treadmill until your heart rate is to achieving the desired results is near the highest number in your cardiovascular system, the key to exercise with the proper intensity. The sensor is near the middle number in...-up , increase the intensity of your exercise until your training zone. The chart below shows recommended heart rates for prolonged periods of the treadmill until your pulse is to 10 minutes of your exercise program, do not keep your pulse in your heart rate is to the nearest ...

User Manual
Page 20
... following information: • The MODEL NUMBER of the product (WETL25130) • The NAME of the product (WESLO® CADENCE 80 treadmill) • The SERIAL NUMBER of the product (see the front cover of this manual) • The KEY NUMBER and DESCRIPTION of the desired part(s) (see the PART LIST and the EXPLODED DRAWING in the...
... following information: • The MODEL NUMBER of the product (WETL25130) • The NAME of the product (WESLO® CADENCE 80 treadmill) • The SERIAL NUMBER of the product (see the front cover of this manual) • The KEY NUMBER and DESCRIPTION of the desired part(s) (see the PART LIST and the EXPLODED DRAWING in the...

User Manual
Page 22
... 2 56 1 57 4 58 4 59 2 60 2 61 2 62 2 63 2 64 2 65 1 66 2 67 1 68 1 69 1 70 1 71 1 72 1 73 4 74 4 75 2 76 1 77 1 78 10 79 1 80 1 81 1 82 1 83 1 84 1 85 3 86 3 87 1 88 1 89 1 90 4 Latch Housing Left Upright Latch Knob Latch Pin Collar Spring Latch Pin Clip Cage Nut..." Star Washer 3" Bolt Upright Spacer 1 1/4" Tek Screw 2 1/2" Bolt Wheel Housing Wheel Wheel Nut Wire Harness Silver Ground Screw Console Base Book Lens Console Plastic Tie Key Clip Console Warning Decal Base Pad U-Nut Base Endcap Upright Grommet Frame Ground Wire Screw Base Filter Wire Belly Pan Ferrite Box Power Cord Set...
... 2 56 1 57 4 58 4 59 2 60 2 61 2 62 2 63 2 64 2 65 1 66 2 67 1 68 1 69 1 70 1 71 1 72 1 73 4 74 4 75 2 76 1 77 1 78 10 79 1 80 1 81 1 82 1 83 1 84 1 85 3 86 3 87 1 88 1 89 1 90 4 Latch Housing Left Upright Latch Knob Latch Pin Collar Spring Latch Pin Clip Cage Nut..." Star Washer 3" Bolt Upright Spacer 1 1/4" Tek Screw 2 1/2" Bolt Wheel Housing Wheel Wheel Nut Wire Harness Silver Ground Screw Console Base Book Lens Console Plastic Tie Key Clip Console Warning Decal Base Pad U-Nut Base Endcap Upright Grommet Frame Ground Wire Screw Base Filter Wire Belly Pan Ferrite Box Power Cord Set...


