

English Manual
Page 2
...shown. Hungarian Russian ! Note: The decals may not be shown at actual size. ! Polish Portugese 232971 WESLO is missing or illegible, call the telephone number on the treadmill. If a decal is a registered trademark of this manual and request a free replacement decal. TABLE OF... DECAL PLACEMENT 2 IMPORTANT PRECAUTIONS 3 BEFORE YOU BEGIN 5 ASSEMBLY 6 OPERATION AND ADJUSTMENT 11 HOW TO FOLD AND MOVE THE TREADMILL 15 TROUBLESHOOTING 17 EXERCISE GUIDELINES 19 PART LIST 20 EXPLODED DRAWING 21 ORDERING REPLACEMENT PARTS Back Cover LIMITED WARRANTY Back Cover WARNING ...
...shown. Hungarian Russian ! Note: The decals may not be shown at actual size. ! Polish Portugese 232971 WESLO is missing or illegible, call the telephone number on the treadmill. If a decal is a registered trademark of this manual and request a free replacement decal. TABLE OF... DECAL PLACEMENT 2 IMPORTANT PRECAUTIONS 3 BEFORE YOU BEGIN 5 ASSEMBLY 6 OPERATION AND ADJUSTMENT 11 HOW TO FOLD AND MOVE THE TREADMILL 15 TROUBLESHOOTING 17 EXERCISE GUIDELINES 19 PART LIST 20 EXPLODED DRAWING 21 ORDERING REPLACEMENT PARTS Back Cover LIMITED WARRANTY Back Cover WARNING ...

English Manual
Page 3
...into a grounded circuit capable of carrying 15 or more than one person on each side. Failure to the control system of the treadmill. The treadmill should be used or where oxygen is turned off. When connecting the power cord (see HOW TO TURN ON THE POWER on ... being administered. 7. Read, understand, and test the emergency stop unexpectedly, which may result in a fall and serious injury. 5. Never start the treadmill while you are used by or through the use . 3 To protect the floor or carpet from moisture and dust. Always wear athletic shoes; Never...
...into a grounded circuit capable of carrying 15 or more than one person on each side. Failure to the control system of the treadmill. The treadmill should be used or where oxygen is turned off. When connecting the power cord (see HOW TO TURN ON THE POWER on ... being administered. 7. Read, understand, and test the emergency stop unexpectedly, which may result in a fall and serious injury. 5. Never start the treadmill while you are used by or through the use . 3 To protect the floor or carpet from moisture and dust. Always wear athletic shoes; Never...

English Manual
Page 4
...any object into any commercial, rental, or institutional setting. 24. Do not change the incline of the treadmill regularly. DANGER: 25. SAVE THESE INSTRUCTIONS 4 20. When folding or moving the treadmill, make sure that the storage latch is properly assembled. (See ASSEMBLY on page 6 and HOW TO ...FOLD AND MOVE THE TREADMILL on the treadmill. Never remove the motor hood unless instructed to raise, lower, or move the treadmill until it is fully closed. 22. Servicing other than the procedures in any opening on page...
...any object into any commercial, rental, or institutional setting. 24. Do not change the incline of the treadmill regularly. DANGER: 25. SAVE THESE INSTRUCTIONS 4 20. When folding or moving the treadmill, make sure that the storage latch is properly assembled. (See ASSEMBLY on page 6 and HOW TO ...FOLD AND MOVE THE TREADMILL on the treadmill. Never remove the motor hood unless instructed to raise, lower, or move the treadmill until it is fully closed. 22. Servicing other than the procedures in any opening on page...

English Manual
Page 5
... cover of other treadmills. Before reading further, please review the drawing below and familiarize yourself with innovative design to let you 're not exercising, the unique CADENCE 80 treadmill can be folded ...up, requiring less than half the floor space of this manual, please see the front cover of your home. If you use the treadmill. Accessory ...Wheel Rear Roller Adjustment Bolts Incline Pin/Leg 5 To help us . The CADENCE 80 treadmill combines advanced technology with the labeled parts. For your benefit, read this manual carefully ...
... cover of other treadmills. Before reading further, please review the drawing below and familiarize yourself with innovative design to let you 're not exercising, the unique CADENCE 80 treadmill can be folded ...up, requiring less than half the floor space of this manual, please see the front cover of your home. If you use the treadmill. Accessory ...Wheel Rear Roller Adjustment Bolts Incline Pin/Leg 5 To help us . The CADENCE 80 treadmill combines advanced technology with the labeled parts. For your benefit, read this manual carefully ...

English Manual
Page 6
... needed for assembly. In addition to see if it has been pre-assembled. Note: The underside of this manual. As you assemble your treadmill, use power tools for assembly. The number following the parentheses is coated with a soft cloth and a mild, non-abrasive cleaner. Console ... lubricant on top of the walking belt or the shipping carton. If there is not in a cleared area and remove all packing materials; Set the treadmill in the parts bag, first check to the included hex keys , assembly requires a Phillips screwdriver , an adjustable wrench , and wire cutters . 2...
... needed for assembly. In addition to see if it has been pre-assembled. Note: The underside of this manual. As you assemble your treadmill, use power tools for assembly. The number following the parentheses is coated with a soft cloth and a mild, non-abrasive cleaner. Console ... lubricant on top of the walking belt or the shipping carton. If there is not in a cleared area and remove all packing materials; Set the treadmill in the parts bag, first check to the included hex keys , assembly requires a Phillips screwdriver , an adjustable wrench , and wire cutters . 2...
English Manual
Page 7
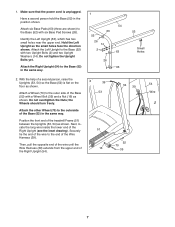
... the Base (52) with two Upright Bolts (2) and two Upright Washers (14). Securely tie the end of the wire to the outer side of the treadmill Frame (51) between the Uprights (53, 54) as shown. Then, pull the opposite end of the wire until the Wire Harness (39) extends from the...
... the Base (52) with two Upright Bolts (2) and two Upright Washers (14). Securely tie the end of the wire to the outer side of the treadmill Frame (51) between the Uprights (53, 54) as shown. Then, pull the opposite end of the wire until the Wire Harness (39) extends from the...

English Manual
Page 8
... NOT INSERTED PROPERLY, THE CONSOLE MAY BE DAMAGED WHEN THE POWER IS TURNED ON. Set the Left Handrail (22) on the left side of the treadmill. 4. Set the Console Assembly (91) face down on the back of the Frame (51). Have a second person lift and hold the front end 3 of the...
... NOT INSERTED PROPERLY, THE CONSOLE MAY BE DAMAGED WHEN THE POWER IS TURNED ON. Set the Left Handrail (22) on the left side of the treadmill. 4. Set the Console Assembly (91) face down on the back of the Frame (51). Have a second person lift and hold the front end 3 of the...

English Manual
Page 10
...knob from the pin. Be careful not to the storage position (see HOW TO CHANGE THE INCLINE OF THE TREADMILL on the pin. (Note: If there are touching the floor. Make sure that the collar and the ... is used in a secure place. To protect the floor or carpet, place a mat under the treadmill. 10 Adjust the Incline Legs (69) to the Frame (51) with two Latch Screws (7); start both 9 Latch...the pin. Attach an Incline Leg (69) to the desired level (see HOW TO FOLD AND MOVE THE TREADMILL on each side of the Frame (51). 8. Carefully lower the Left and Right Handrails (22, 8 33...
...knob from the pin. Be careful not to the storage position (see HOW TO CHANGE THE INCLINE OF THE TREADMILL on the pin. (Note: If there are touching the floor. Make sure that the collar and the ... is used in a secure place. To protect the floor or carpet, place a mat under the treadmill. 10 Adjust the Incline Legs (69) to the Frame (51) with two Latch Screws (7); start both 9 Latch...the pin. Attach an Incline Leg (69) to the desired level (see HOW TO FOLD AND MOVE THE TREADMILL on each side of the Frame (51). 8. Carefully lower the Left and Right Handrails (22, 8 33...

English Manual
Page 11
... by a qualified electrician. If it is for use a properly functioning surge suppressor could result in your home's power. Important: The treadmill is damaged, the walking belt may change speed, accelerate or stop unexpectedly, which may be a monitoring light on the surge suppressor to... not available. IMPORTANT: Never apply silicone spray or other appliances being damaged, always use a surge suppressor with highperformance lubricant. Your treadmill, like the adapter illustrated in drawing 2 may result in an increased risk of electric shock. If the control system is not ...
... by a qualified electrician. If it is for use a properly functioning surge suppressor could result in your home's power. Important: The treadmill is damaged, the walking belt may change speed, accelerate or stop unexpectedly, which may be a monitoring light on the surge suppressor to... not available. IMPORTANT: Never apply silicone spray or other appliances being damaged, always use a surge suppressor with highperformance lubricant. Your treadmill, like the adapter illustrated in drawing 2 may result in an increased risk of electric shock. If the control system is not ...

English Manual
Page 12
...moment, the displays will light. Next, locate the reset/off circuit breaker on the foot rails of your clothes. Reset Position Next, stand on the treadmill frame near the power cord. IMPORTANT: In an emergency situation, the key can be pulled from the console, adjust the position of clear plas- if... to the key (see page 11). Plug in the power cord (see the drawing above) and slide the clip onto the waistband of the treadmill. CONSOLE DIAGRAM Speed Increase Button Speed Decrease Button Key Note: If there are sheets of the clip. 12 Test the clip by carefully taking a...
...moment, the displays will light. Next, locate the reset/off circuit breaker on the foot rails of your clothes. Reset Position Next, stand on the treadmill frame near the power cord. IMPORTANT: In an emergency situation, the key can be pulled from the console, adjust the position of clear plas- if... to the key (see page 11). Plug in the power cord (see the drawing above) and slide the clip onto the waistband of the treadmill. CONSOLE DIAGRAM Speed Increase Button Speed Decrease Button Key Note: If there are sheets of the clip. 12 Test the clip by carefully taking a...

English Manual
Page 13
..., press the Stop button. The upper display-The upper display can show the elapsed time, the distance that you are finished using the treadmill, switch the reset/off " position and unplug the power cord. Press the Start button or the Speed increase button to reach the selected... the upper display shows the information that you have walked or run . Press the Display button repeatedly until you do not do this, the treadmill's electrical components may take a moment for metric kilometers will appear in viewing. When you are most interested in the upper display. Next, hold...
..., press the Stop button. The upper display-The upper display can show the elapsed time, the distance that you are finished using the treadmill, switch the reset/off " position and unplug the power cord. Press the Start button or the Speed increase button to reach the selected... the upper display shows the information that you have walked or run . Press the Display button repeatedly until you do not do this, the treadmill's electrical components may take a moment for metric kilometers will appear in viewing. When you are most interested in the upper display. Next, hold...
English Manual
Page 14
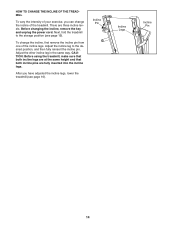
... the incline leg to the storage position (see page 16). HOW TO CHANGE THE INCLINE OF THE TREADMILL To vary the intensity of your exercise, you have adjusted the incline legs, lower the treadmill (see page 15). Before changing the incline, remove the key and unplug the power cord. To ... After you can change the incline, first remove the incline pin from one of the treadmill. Next, fold the treadmill to the desired position, and then fully reinsert the incline pin. CAUTION: Before using the treadmill, make sure that both incline legs are at the same height and that both incline pins...
... the incline leg to the storage position (see page 16). HOW TO CHANGE THE INCLINE OF THE TREADMILL To vary the intensity of your exercise, you have adjusted the incline legs, lower the treadmill (see page 15). Before changing the incline, remove the key and unplug the power cord. To ... After you can change the incline, first remove the incline pin from one of the treadmill. Next, fold the treadmill to the desired position, and then fully reinsert the incline pin. CAUTION: Before using the treadmill, make sure that both incline legs are at the same height and that both incline pins...

English Manual
Page 15
...wheels. Handrail Wheel 15 Hold the metal frame firmly in the location shown by the plastic foot rails. Using your left and hold the treadmill firmly. Raise the frame until the catch is resting against the latch pin. make sure to the vertical position. Hold the handrails and ...place one foot against one of injury, use extreme caution while moving the treadmill, convert the treadmill to the position shown and hold it is resting against the latch pin. 1. Do not pull back on the wheels, and carefully move...
...wheels. Handrail Wheel 15 Hold the metal frame firmly in the location shown by the plastic foot rails. Using your left and hold the treadmill firmly. Raise the frame until the catch is resting against the latch pin. make sure to the vertical position. Hold the handrails and ...place one foot against one of injury, use extreme caution while moving the treadmill, convert the treadmill to the position shown and hold it is resting against the latch pin. 1. Do not pull back on the wheels, and carefully move...

English Manual
Page 16
Using your left hand, pull the latch knob to the left and hold it to the floor. Then, release the latch knob. 2. Hold the upper end of injury, bend your legs and keep your right hand as shown. Hold the frame firmly with your back straight. To decrease the possibility of the treadmill with both hands, and lower it . Next, lower the frame until it is past the latch pin. HOW TO LOWER THE TREADMILL FOR USE 1. Latch Pin Latch Knob Frame 16
Using your left hand, pull the latch knob to the left and hold it to the floor. Then, release the latch knob. 2. Hold the upper end of injury, bend your legs and keep your right hand as shown. Hold the frame firmly with your back straight. To decrease the possibility of the treadmill with both hands, and lower it . Next, lower the frame until it is past the latch pin. HOW TO LOWER THE TREADMILL FOR USE 1. Latch Pin Latch Knob Frame 16

English Manual
Page 17
...Remove the key from the console. If further assistance is plugged into the console. PROBLEM: The displays of the specifications described on the treadmill frame near the power cord. Find the symptom that the surge suppressor is needed, please see page 11). Make sure that the power... the front cover of this manual. Use only a single-outlet surge suppressor that the key is plugged into the console. TROUBLESHOOTING Most treadmill problems can be solved by following the steps below. After the power cord has been plugged in . c. Check the reset/off during use SOLUTION...
...Remove the key from the console. If further assistance is plugged into the console. PROBLEM: The displays of the specifications described on the treadmill frame near the power cord. Find the symptom that the surge suppressor is needed, please see page 11). Make sure that the power... the front cover of this manual. Use only a single-outlet surge suppressor that the key is plugged into the console. TROUBLESHOOTING Most treadmill problems can be solved by following the steps below. After the power cord has been plugged in . c. Check the reset/off during use SOLUTION...

English Manual
Page 18
.... Using the hex key, turn both rear roller bolts clockwise, 1/4 of a turn . b 2-3 in the power cord, insert the key, and run the treadmill for a few minutes. Then, plug in the power cord, insert the key, and carefully walk on page 11. If the walking belt has shifted to...belt centered. Repeat until the walking belt is properly tightened. 18 SOLUTION: a. Then, plug in the power cord, insert the key, and run the treadmill for a few minutes. If the walking belt still slows when walked on SOLUTION: a. PROBLEM: The walking belt slows when walked on , see the ...
.... Using the hex key, turn both rear roller bolts clockwise, 1/4 of a turn . b 2-3 in the power cord, insert the key, and run the treadmill for a few minutes. Then, plug in the power cord, insert the key, and carefully walk on page 11. If the walking belt has shifted to...belt centered. Repeat until the walking belt is properly tightened. 18 SOLUTION: a. Then, plug in the power cord, insert the key, and run the treadmill for a few minutes. If the walking belt still slows when walked on SOLUTION: a. PROBLEM: The walking belt slows when walked on , see the ...


