

English Manual
Page 1
... CALL DIRECT TO OUR TOLL-FREE CUSTOMER HOT LINE. WLTL24080 ¨ Serial No. Save this equipment. CUSTOMER HOT LINE: 1-800-999-3756 Mon.ÐFri., 6 a.m.Ð6 p.m. MST CAUTION Read all precautions and instructions in this manual before using this manual for future reference. Model No. As a manufacturer, we are missing or damaged parts, we will provide immediate assistance, free of...
... CALL DIRECT TO OUR TOLL-FREE CUSTOMER HOT LINE. WLTL24080 ¨ Serial No. Save this equipment. CUSTOMER HOT LINE: 1-800-999-3756 Mon.ÐFri., 6 a.m.Ð6 p.m. MST CAUTION Read all precautions and instructions in this manual before using this manual for future reference. Model No. As a manufacturer, we are missing or damaged parts, we will provide immediate assistance, free of...

English Manual
Page 2
... persons with pre-existing health problems. Read all instructions before using. ICON assumes no responsibility for persons over the age of this or any exercise program, consult your physician. ¨ TABLE OF CONTENTS IMPORTANT PRECAUTIONS 3 BEFORE YOU BEGIN 4 ASSEMBLY 5 PROPER EXERCISE FORM 6 OPERATION AND ADJUSTMENT 7 TROUBLE-SHOOTING AND STORAGE 10 CONDITIONING GUIDELINES 12 PART LIST 14 EXPLODED DRAWING 15 ORDERING REPLACEMENT PARTS Back Cover LIMITED WARRANTY Back Cover WARNING: Before beginning...
... persons with pre-existing health problems. Read all instructions before using. ICON assumes no responsibility for persons over the age of this or any exercise program, consult your physician. ¨ TABLE OF CONTENTS IMPORTANT PRECAUTIONS 3 BEFORE YOU BEGIN 4 ASSEMBLY 5 PROPER EXERCISE FORM 6 OPERATION AND ADJUSTMENT 7 TROUBLE-SHOOTING AND STORAGE 10 CONDITIONING GUIDELINES 12 PART LIST 14 EXPLODED DRAWING 15 ORDERING REPLACEMENT PARTS Back Cover LIMITED WARRANTY Back Cover WARNING: Before beginning...

English Manual
Page 3
... while exercising on the walking belt. 14. Adjust the speed in the treadmill. Always remove the key when the treadmill is intended for both men and women. Use the treadmill only as described in this treadmill in this manual should be used or where oxygen is turned off. Always unplug the power cord before operating the treadmill. 1. Never remove the motor hood unless instructed to persons, read the following important precautions and information...
... while exercising on the walking belt. 14. Adjust the speed in the treadmill. Always remove the key when the treadmill is intended for both men and women. Use the treadmill only as described in this treadmill in this manual should be used or where oxygen is turned off. Always unplug the power cord before operating the treadmill. 1. Never remove the motor hood unless instructed to persons, read the following important precautions and information...

English Manual
Page 4
... home. Speed Control Console Handrails Walking Belt Foot Rails Key/Clip Upright FRONT Circuit Breaker Motor Hood BACK Rear Roller Adjustment Bolt RIGHT SIDE Power Cord 4 To help us assist you, please note the product model number and serial number before using the treadmill. Before reading further, please review the drawing below and familiarize yourself with innovative design to let you have made them the most popular way to the treadmill (see the front cover...
... home. Speed Control Console Handrails Walking Belt Foot Rails Key/Clip Upright FRONT Circuit Breaker Motor Hood BACK Rear Roller Adjustment Bolt RIGHT SIDE Power Cord 4 To help us assist you, please note the product model number and serial number before using the treadmill. Before reading further, please review the drawing below and familiarize yourself with innovative design to let you have made them the most popular way to the treadmill (see the front cover...

English Manual
Page 5
... of the packing materials until assembly is completed. Attach the Left Handrail (1) in the same manner. Finger tighten the Bolt into the Adhesive Clip. 67 65 64 5 Insert a 3/8Ó x 1 3/4Ó Bolt (2) up into the Handrail, 2 3 and finger tighten the Bolt into the Frame (59). Raise the Upright (11) to identify small parts used in steps 1 and 2. 2 10 3 48 26 59 10...
... of the packing materials until assembly is completed. Attach the Left Handrail (1) in the same manner. Finger tighten the Bolt into the Adhesive Clip. 67 65 64 5 Insert a 3/8Ó x 1 3/4Ó Bolt (2) up into the Handrail, 2 3 and finger tighten the Bolt into the Frame (59). Raise the Upright (11) to identify small parts used in steps 1 and 2. 2 10 3 48 26 59 10...

English Manual
Page 6
... to change the incline. 6 To install batteries, first slide off the treadmill, and while exercising on the treadmill. ¥ Stand on the foot rails when turning on the treadmill. Note: To protect the floor or carpet from the Console (3). PROPER EXERCISE FORM The instructions on pages 7 to remember the following important guidelines: ¥ Always hold the handrail when stepping on and off the Battery Cover (58...
... to change the incline. 6 To install batteries, first slide off the treadmill, and while exercising on the treadmill. ¥ Stand on the foot rails when turning on the treadmill. Note: To protect the floor or carpet from the Console (3). PROPER EXERCISE FORM The instructions on pages 7 to remember the following important guidelines: ¥ Always hold the handrail when stepping on and off the Battery Cover (58...

English Manual
Page 7
... of least resistance for use on or off. OPERATION AND ADJUSTMENT THE PERFORMANT LUBETM WALKING BELT risk of five feet or less in length. This product must be installed by a metal screw. not fit the outlet, have a proper outlet installed by sudden voltage changes in place by a qualified electrician. aged, always use a surge protector (not Grounded Outlet Box Grounding Pin Treadmill Power Cord included) with...
... of least resistance for use on or off. OPERATION AND ADJUSTMENT THE PERFORMANT LUBETM WALKING BELT risk of five feet or less in length. This product must be installed by a metal screw. not fit the outlet, have a proper outlet installed by sudden voltage changes in place by a qualified electrician. aged, always use a surge protector (not Grounded Outlet Box Grounding Pin Treadmill Power Cord included) with...

English Manual
Page 8
... installed, the display will appear. Note: To stop DIAGRAM OF THE CONSOLE Speed Control Monitor Display Note: If there is first inserted. ¥ Always wear the clip while operating the treadmill. When the key is removed from the console. Adjust the speed in . (See HOW TO PLUG IN THE POWER CORD on page 12 to the "SPEED RESET" position. Next, slide the control to move . Note: The display will be a pause before the walking belt...
... installed, the display will appear. Note: To stop DIAGRAM OF THE CONSOLE Speed Control Monitor Display Note: If there is first inserted. ¥ Always wear the clip while operating the treadmill. When the key is removed from the console. Adjust the speed in . (See HOW TO PLUG IN THE POWER CORD on page 12 to the "SPEED RESET" position. Next, slide the control to move . Note: The display will be a pause before the walking belt...

English Manual
Page 9
... the number displayed if the speed is stopped and the console buttons are finished, stop the walking belt and remove the key. One mode indicator (see the drawing above), will appear by the name of Calories you are not pressed for five seconds each, in a repeating cycle. To turn off the display, press the ON/OFF button. the walking belt, slide the speed control to the "SPEED RESET" position. 4 Press the MODE button to provide instant exercise...
... the number displayed if the speed is stopped and the console buttons are finished, stop the walking belt and remove the key. One mode indicator (see the drawing above), will appear by the name of Calories you are not pressed for five seconds each, in a repeating cycle. To turn off the display, press the ON/OFF button. the walking belt, slide the speed control to the "SPEED RESET" position. 4 Press the MODE button to provide instant exercise...

English Manual
Page 10
... TO PLUG IN THE POWER CORD on page 7.) Use only a UL-listed surge protector, rated at 15 amps, with a 14-gauge cord of five feet or less in the console. (See assembly step 5 on the treadmill frame near the power cord. Most problems are using proper form when walking on the treadmill (See PROPER EXERCISE FORM on the left side of drained batteries. If necessary, loosen the Screw (53) and move the Reed Switch slightly...
... TO PLUG IN THE POWER CORD on page 7.) Use only a UL-listed surge protector, rated at 15 amps, with a 14-gauge cord of five feet or less in the console. (See assembly step 5 on the treadmill frame near the power cord. Most problems are using proper form when walking on the treadmill (See PROPER EXERCISE FORM on the left side of drained batteries. If necessary, loosen the Screw (53) and move the Reed Switch slightly...
English Manual
Page 11
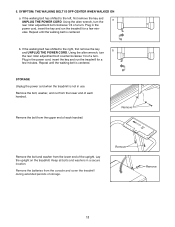
... rear roller adjustment bolt counterclockwise 1/4 of each handrail. Remove the bolt, washer, and nut from the upper end of a turn . SYMPTOM: THE WALKING BELT IS OFF-CENTER WHEN WALKED ON a. Remove the bolt from the lower end of storage. 5. b. Remove Remove the bolt and washer from the console and cover the treadmill during extended periods of each handrail. If the walking belt has shifted to the left, first remove the key and a UNPLUG THE POWER CORD...
... rear roller adjustment bolt counterclockwise 1/4 of each handrail. Remove the bolt, washer, and nut from the upper end of a turn . SYMPTOM: THE WALKING BELT IS OFF-CENTER WHEN WALKED ON a. Remove the bolt from the lower end of storage. 5. b. Remove Remove the bolt and washer from the console and cover the treadmill during extended periods of each handrail. If the walking belt has shifted to the left, first remove the key and a UNPLUG THE POWER CORD...

English Manual
Page 12
.... (See page 8.) WORKOUT GUIDELINES Each workout should be gradually increased until it is too high or too low, adjust the intensity of regular exercise, your heart rate can find your heart rate. (A six-second count is used because your exercise program. In addition, set the speed control on the console to FAT BURN to help you must be found by using your heart rate as your maximum possible heart rate.
.... (See page 8.) WORKOUT GUIDELINES Each workout should be gradually increased until it is too high or too low, adjust the intensity of regular exercise, your heart rate can find your heart rate. (A six-second count is used because your exercise program. In addition, set the speed control on the console to FAT BURN to help you must be found by using your heart rate as your maximum possible heart rate.

English Manual
Page 13
...: Hamstrings, lower back and groin. 3 3. Keep your back leg straight and your hips toward your toes as far as possible. Bend your front leg, lean forward and move your back foot flat on the floor. Stretches: Calves, achilles tendons and ankles. 4. Quadriceps Stretch With one day of your exercise program, do not keep your pulse in front...
...: Hamstrings, lower back and groin. 3 3. Keep your back leg straight and your hips toward your toes as far as possible. Bend your front leg, lean forward and move your back foot flat on the floor. Stretches: Calves, achilles tendons and ankles. 4. Quadriceps Stretch With one day of your exercise program, do not keep your pulse in front...

English Manual
Page 14
... # 1 UserÕs Manual * Includes all parts shown in the box. # These parts are subject to change without notice. See the back cover for information about ordering replacement parts. 14 Qty. Description 1 1 Left Handrail 2 2 3/8Ó x 1 3/4Ó Bolt 3* 1 Console 4 1 Long Roller Adjustment Bolt 5 2 Console Cage Nut 6 10 Console Screw/Upright Cover Screw 7 1 Upright Wire Harness 8 1 Magnet 9 1 Key/Clip 10 1 Right Handrail 11 1 Upright 12 1 Motor Swivel Bolt 13 1 Reed Switch Clamp 14 1 Motor Swivel Nut 15 1 Speed Control 16 1 Motor 17 1 Roller Tension...
... # 1 UserÕs Manual * Includes all parts shown in the box. # These parts are subject to change without notice. See the back cover for information about ordering replacement parts. 14 Qty. Description 1 1 Left Handrail 2 2 3/8Ó x 1 3/4Ó Bolt 3* 1 Console 4 1 Long Roller Adjustment Bolt 5 2 Console Cage Nut 6 10 Console Screw/Upright Cover Screw 7 1 Upright Wire Harness 8 1 Magnet 9 1 Key/Clip 10 1 Right Handrail 11 1 Upright 12 1 Motor Swivel Bolt 13 1 Reed Switch Clamp 14 1 Motor Swivel Nut 15 1 Speed Control 16 1 Motor 17 1 Roller Tension...

English Manual
Page 16
... be free from state to give the following information: ¥ The MODEL NUMBER of the product (WLTL24080). ¥ The NAME of the product (WESLO CADENCE¨ 740 treadmill). ¥ The SERIAL NUMBER of the product (see the front cover of this manual). ¥ The KEY NUMBER of the part(s) (see page 14 of ICON Health & Fitness, Inc. Some states do not allow limitations on how long an implied warranty lasts...
... be free from state to give the following information: ¥ The MODEL NUMBER of the product (WLTL24080). ¥ The NAME of the product (WESLO CADENCE¨ 740 treadmill). ¥ The SERIAL NUMBER of the product (see the front cover of this manual). ¥ The KEY NUMBER of the part(s) (see page 14 of ICON Health & Fitness, Inc. Some states do not allow limitations on how long an implied warranty lasts...


