
Uk Manual
Page 1
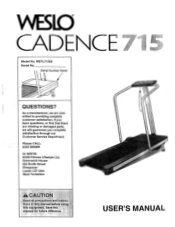
... that there are committed to providing complete customer satisfaction. Please CALL: 0345-089009 Or WRITE: ICON Fitness Lifestyle Ltd. Greenwich House 223 North Street Sheepscar Leeds LS7 2AA West Yorkshire AUT 0 Read all precautions and instruc tions in this manual before usin this equipment Save this manual for future reference ?z: USER'S MANUAL WETL71562 Serial No. \NERO CADENCE Model No.
... that there are committed to providing complete customer satisfaction. Please CALL: 0345-089009 Or WRITE: ICON Fitness Lifestyle Ltd. Greenwich House 223 North Street Sheepscar Leeds LS7 2AA West Yorkshire AUT 0 Read all precautions and instruc tions in this manual before usin this equipment Save this manual for future reference ?z: USER'S MANUAL WETL71562 Serial No. \NERO CADENCE Model No.

Uk Manual
Page 2
ro e ariege sustained by or t roy e u 2 WESO CAD E N TABLE OF CONTENTS IMPORTANT PRECAUTIONS BEFORE YOU BEGIN ASSEMBLY PROPER EXERCISE FORM OPERATION AND ADJUSTMENT TROUBLE-SHOOTING AND STORAGE CONDITIONING GUIDELINES PART LIST EXPLODED DRAWING ORDERING REPLACEMENT PARTS 3 4 5 7 7 10 12 14 15 Back Cover exercise WARM Before beginniog this' Prian5yorpeons especially important for onalinju or- al:Saunies no responsibility for persons ge progratTh.c9ft4lt y91-IT physician. with pre existing health probler isead all instructions before using.
ro e ariege sustained by or t roy e u 2 WESO CAD E N TABLE OF CONTENTS IMPORTANT PRECAUTIONS BEFORE YOU BEGIN ASSEMBLY PROPER EXERCISE FORM OPERATION AND ADJUSTMENT TROUBLE-SHOOTING AND STORAGE CONDITIONING GUIDELINES PART LIST EXPLODED DRAWING ORDERING REPLACEMENT PARTS 3 4 5 7 7 10 12 14 15 Back Cover exercise WARM Before beginniog this' Prian5yorpeons especially important for onalinju or- al:Saunies no responsibility for persons ge progratTh.c9ft4lt y91-IT physician. with pre existing health probler isead all instructions before using.
Uk Manual
Page 3
... on the treadmill. . Never drop or insert any opening. 20. Never remove the motor hood unless instructed to change the incline. . Keep the power cord away from moisture and dust. Do not use . 18. The treadmill should be on page 6), plug the power cord directly into any object into an earthed circuit. When connecting the power cord (see HOW TO PLUG IN THE POWER CORD on the same circuit. When replacing the fuse...
... on the treadmill. . Never drop or insert any opening. 20. Never remove the motor hood unless instructed to change the incline. . Keep the power cord away from moisture and dust. Do not use . 18. The treadmill should be on page 6), plug the power cord directly into any object into an earthed circuit. When connecting the power cord (see HOW TO PLUG IN THE POWER CORD on the same circuit. When replacing the fuse...
Uk Manual
Page 4
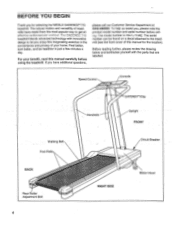
... a decal attached to the treadmill (see the front cover of treadmills have additional questions, please call our Customer Service Department at 0345-089009. Before reading further, please review the drawing below and familiarise yourself with innovative design to get an c'ffc'rstive r. Speed Control Console 0z1r-71-rSAFEKEY- /Clip Handrails Upright FRONT Walking Belt Foot Rails BACK Rear Roller Adjustment Bolt 4 s. ./%" RIGHT SIDE Circuit Breaker Motor Hood BEFORE...
... a decal attached to the treadmill (see the front cover of treadmills have additional questions, please call our Customer Service Department at 0345-089009. Before reading further, please review the drawing below and familiarise yourself with innovative design to get an c'ffc'rstive r. Speed Control Console 0z1r-71-rSAFEKEY- /Clip Handrails Upright FRONT Walking Belt Foot Rails BACK Rear Roller Adjustment Bolt 4 s. ./%" RIGHT SIDE Circuit Breaker Motor Hood BEFORE...
Uk Manual
Page 5
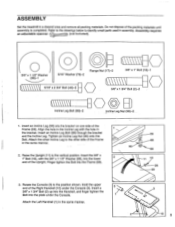
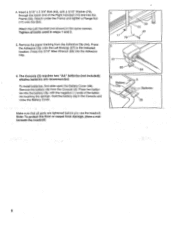
... Console. Assembly requires an adjustable spanner (not inniiidPd). 0 3/8" x 1 1/2" Washer (28)-1 5/16" Washer (79)-2 5/16" x 2 3/4" Bolt (49)-2 0 O Flange Nut (17)-2 3/8" x 1" Bolt (18)-1 \\\\\\\\ O 3/8" x 1 3/4" Bolt (2)-2 Incline Leg Bolt (89)-2 (O) Incline Leg Nut (90)-2 1. Align the hole in the same manner. 2. Insert the 3/8" x 1" Bolt (18), with the hole in assembly. Finger tighten the Bolt into the lower 2 end of the Frame (59). Rotate the Console (3) to identify small parts used in the bracket. Attach...
... Console. Assembly requires an adjustable spanner (not inniiidPd). 0 3/8" x 1 1/2" Washer (28)-1 5/16" Washer (79)-2 5/16" x 2 3/4" Bolt (49)-2 0 O Flange Nut (17)-2 3/8" x 1" Bolt (18)-1 \\\\\\\\ O 3/8" x 1 3/4" Bolt (2)-2 Incline Leg Bolt (89)-2 (O) Incline Leg Nut (90)-2 1. Align the hole in the same manner. 2. Insert the 3/8" x 1" Bolt (18), with the hole in assembly. Finger tighten the Bolt into the lower 2 end of the Frame (59). Rotate the Console (3) to identify small parts used in the bracket. Attach...
Uk Manual
Page 6
...) in the same manner. alkaline batteries are tightened before you use the treadmill. Hold the battery clip in the Console and close the Battery Cover. 4 17 79 5 67 65 Battery Clip 59 10 64 3 Batteries 58 Make sure that all bolts used in steps 1 and 2. 5. Attach the Left Handrail (not shown) in the indicated location. Remove the paper backing from the Console (3). 4. Press the 3/16" Allen Wrench (65...
...) in the same manner. alkaline batteries are tightened before you use the treadmill. Hold the battery clip in the Console and close the Battery Cover. 4 17 79 5 67 65 Battery Clip 59 10 64 3 Batteries 58 Make sure that all bolts used in steps 1 and 2. 5. Attach the Left Handrail (not shown) in the indicated location. Remove the paper backing from the Console (3). 4. Press the 3/16" Allen Wrench (65...
Uk Manual
Page 7
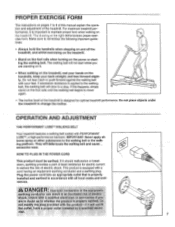
..., a high-performance lubricant. Plug the power cord into an appropriate outlet that is properly earthed. bo not modify the plug provided with a cord having an equipment-earthing conductor and a earthing plug. PROPER EXERCISE FORM The instructions on pages 7 to 9 of this happens, simply stand on the foot rails until the walking belt begins to move again. • The incline level of the treadmill is important...
..., a high-performance lubricant. Plug the power cord into an appropriate outlet that is properly earthed. bo not modify the plug provided with a cord having an equipment-earthing conductor and a earthing plug. PROPER EXERCISE FORM The instructions on pages 7 to 9 of this happens, simply stand on the foot rails until the walking belt begins to move again. • The incline level of the treadmill is important...
Uk Manual
Page 8
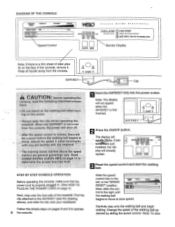
... clip attached to operate 8 the console. TRAINING ZONES WARM UP SPEED•RESET MN. • . Note: To stop STEI (8BES) SPEED TIME ., OP oisr. tAi. read the following . . After the speed control is a thin sheet of the console, remove it. Note: The display will already appear. MZMONHESG WASINUIP rem-mu • iIIVhIIIIIII trol to move . DIAGRAM OF THE CONSOLE (- Adjust the speed in small increments until the walking belt...
... clip attached to operate 8 the console. TRAINING ZONES WARM UP SPEED•RESET MN. • . Note: To stop STEI (8BES) SPEED TIME ., OP oisr. tAi. read the following . . After the speed control is a thin sheet of the console, remove it. Note: The display will already appear. MZMONHESG WASINUIP rem-mu • iIIVhIIIIIII trol to move . DIAGRAM OF THE CONSOLE (- Adjust the speed in small increments until the walking belt...
Uk Manual
Page 9
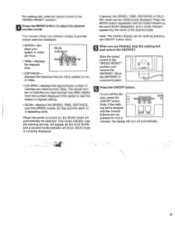
... the number displayed if the speed is stopped and the console buttons are finished, stop the walking belt CA and remove the SAFEKEY. Store the SAFEKEY in miles per hour. • TIME-displays the elapsed time. To turn off the display, press the ON/OFF button. The monitor offers five different modes to 6 minutes, the display will automatically be reset by pressing the ON/OFF button twice. • SPEED-displays your speed, in a secure location. 0 0 0 ON...
... the number displayed if the speed is stopped and the console buttons are finished, stop the walking belt CA and remove the SAFEKEY. Store the SAFEKEY in miles per hour. • TIME-displays the elapsed time. To turn off the display, press the ON/OFF button. The monitor offers five different modes to 6 minutes, the display will automatically be reset by pressing the ON/OFF button twice. • SPEED-displays your speed, in a secure location. 0 0 0 ON...
Uk Manual
Page 10
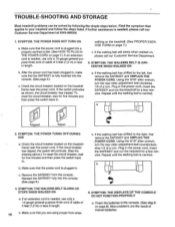
... treadmill for five minutes and then press the switch back in . walking on the treadmill. (See PROPER EXERCISE FORM on page 6). To reset the circuit breaker, wait for a few minutes. a. Using the 3/16" alien wrench, turn the rear roller adjustment-bolt counterclockwise 1/4 of drained batteries. Plug in the console. (See step 6 on page 7.) c. Repeat until the walking belt is needed, please call our Customer Service Department. 4. b. Make sure that the power cord is centred. Remove...
... treadmill for five minutes and then press the switch back in . walking on the treadmill. (See PROPER EXERCISE FORM on page 6). To reset the circuit breaker, wait for a few minutes. a. Using the 3/16" alien wrench, turn the rear roller adjustment-bolt counterclockwise 1/4 of drained batteries. Plug in the console. (See step 6 on page 7.) c. Repeat until the walking belt is needed, please call our Customer Service Department. 4. b. Make sure that the power cord is centred. Remove...

Uk Manual
Page 11
... speed reading. b. Locate the reed switch and the Magnet (75) on tile treadmill. Retighten the Screw. Remove Remove the bolt from the upper end of each handrail. If necessary, loosen the Screw (24) and move the Reed Switch slightly. Remove -• Remove the batteries from the lower end of storage. 11 Carefully remove the hood. Turn the Pulley until :tic Magnet is about 3 mm (1/8"). V STORAGE Unplug the power cord when the treadmill is not in a secure location...
... speed reading. b. Locate the reed switch and the Magnet (75) on tile treadmill. Retighten the Screw. Remove Remove the bolt from the upper end of each handrail. If necessary, loosen the Screw (24) and move the Reed Switch slightly. Remove -• Remove the batteries from the lower end of storage. 11 Carefully remove the hood. Turn the Pulley until :tic Magnet is about 3 mm (1/8"). V STORAGE Unplug the power cord when the treadmill is not in a secure location...
Uk Manual
Page 12
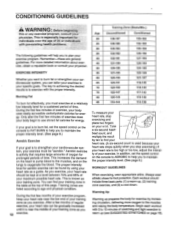
... your exercise program, keep your heart rate near the middle of this or any exercise program. The proper intensity level for exercise by ten to burn fat, set the speed control on your specific goals. As you to age and physical condition. During the first few minutes of your training zone as a guide. Begin each workout with the proper intensity. Remember-these are listed according...
... your exercise program, keep your heart rate near the middle of this or any exercise program. The proper intensity level for exercise by ten to burn fat, set the speed control on your specific goals. As you to age and physical condition. During the first few minutes of your training zone as a guide. Begin each workout with the proper intensity. Remember-these are listed according...
Uk Manual
Page 13
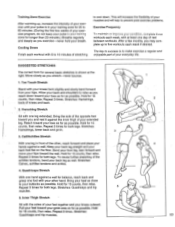
...between workouts. SUGGESTED STRETCHES The correct form for 15 counts, then relax. Toe Touch Stretch Stand with at the right. Repeat 3 times for both legs. Pull your feet toward the wall. Repeat 3 times. After a few weeks of your exercise program, do not keep your pulse in...close to make exercise a regular and enjoyable part of your feet together and your everyday life. Stretches: Hamstrings, lower back and groin. 3 3. Repeat 3 times for 15 counts, then relax. Move slowly as possible. Stretches: Calves, achilles tendons and ankles. 4. Hold for both legs. Hold for...
...between workouts. SUGGESTED STRETCHES The correct form for 15 counts, then relax. Toe Touch Stretch Stand with at the right. Repeat 3 times for both legs. Pull your feet toward the wall. Repeat 3 times. After a few weeks of your exercise program, do not keep your pulse in...close to make exercise a regular and enjoyable part of your feet together and your everyday life. Stretches: Hamstrings, lower back and groin. 3 3. Repeat 3 times for 15 counts, then relax. Move slowly as possible. Stretches: Calves, achilles tendons and ankles. 4. Hold for both legs. Hold for...
Uk Manual
Page 14
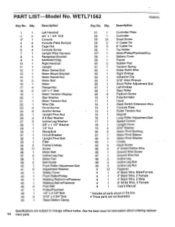
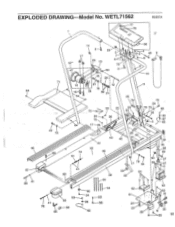
...Upright Pivot Bolt Filter Frame Endcap Screw Motor Belt Incline Leg Cap Motor Fan Belt Guide Front Roller Adjustment Bolt Adjustment Washer Safety Cover Front Roller/Pulley Walking Platform w/Fastener Walking Belt w/Fastener Foot Rail Pulley/Flywheel 1/4" x 3 1/2" Bolt 5/16" x 2 3/4" Bolt Reed Switch Clamp Key No. Specifications are not illustrated. WETL71562 R0597A Key No. PART LIST Model No. Description 51 1 Controller Plate 52 1 Controller 53 21 Small Screw 54 2 4" Cable Tie 55 3 8" Cable Tie 56 1 Tie Holder 57* 1 Motor/Pulley/Flywheel/Fan 58 1 Battery...
...Upright Pivot Bolt Filter Frame Endcap Screw Motor Belt Incline Leg Cap Motor Fan Belt Guide Front Roller Adjustment Bolt Adjustment Washer Safety Cover Front Roller/Pulley Walking Platform w/Fastener Walking Belt w/Fastener Foot Rail Pulley/Flywheel 1/4" x 3 1/2" Bolt 5/16" x 2 3/4" Bolt Reed Switch Clamp Key No. Specifications are not illustrated. WETL71562 R0597A Key No. PART LIST Model No. Description 51 1 Controller Plate 52 1 Controller 53 21 Small Screw 54 2 4" Cable Tie 55 3 8" Cable Tie 56 1 Tie Holder 57* 1 Motor/Pulley/Flywheel/Fan 58 1 Battery...
Uk Manual
Page 15
I 8 17 78 79 86 2 ,(26 87 5 85 49 79 6 7.4 61 43 42 44 45 46 35 40 41 34 35 88 89 !190 27 1 79 49 153 37 41 68 59 55 41 bre. 63 76 61-- 64 65 54 60 24 T---- 53 16-26 x---56 62 53 53 39 52 51 ! EXPLODED DRAWING Model No. WETL71562 77 70 R0597A - 84 46 67 41 66 14 2-4 17 58 4 48 9 57* 47 71 16 15 84 80 13 3 • ' 80 2 18 01 200I 1! 1 81 1 12 19 1 38 2 2 !1• 1 6 10 11 25 79 18, 28 72 50 531. 22 1 36 24 23 75 No I II 83 1! 53 31 24 23 33 30 53 15
I 8 17 78 79 86 2 ,(26 87 5 85 49 79 6 7.4 61 43 42 44 45 46 35 40 41 34 35 88 89 !190 27 1 79 49 153 37 41 68 59 55 41 bre. 63 76 61-- 64 65 54 60 24 T---- 53 16-26 x---56 62 53 53 39 52 51 ! EXPLODED DRAWING Model No. WETL71562 77 70 R0597A - 84 46 67 41 66 14 2-4 17 58 4 48 9 57* 47 71 16 15 84 80 13 3 • ' 80 2 18 01 200I 1! 1 81 1 12 19 1 38 2 2 !1• 1 6 10 11 25 79 18, 28 72 50 531. 22 1 36 24 23 75 No I II 83 1! 53 31 24 23 33 30 53 15
Uk Manual
Page 16
...: ICON Fitness Lifestyle Ltd. Part No. 137602 R0597A WESLO is a registered trademark of this product, contact the ICON Fitness Lifestyle Ltd. ORDERING REPLACEMENT PARTS If you , please be prepared to give the following information: • The MODEL NUMBER of the product (WETL71562). • The NAME of the product (WESLO CADENCE® 715 treadmill). • The SERIAL NUMBER of the product (see the front cover of this manual). • The KEY NUMBER...
...: ICON Fitness Lifestyle Ltd. Part No. 137602 R0597A WESLO is a registered trademark of this product, contact the ICON Fitness Lifestyle Ltd. ORDERING REPLACEMENT PARTS If you , please be prepared to give the following information: • The MODEL NUMBER of the product (WETL71562). • The NAME of the product (WESLO CADENCE® 715 treadmill). • The SERIAL NUMBER of the product (see the front cover of this manual). • The KEY NUMBER...


