

English Manual
Page 4
.... Do not operate where aerosol products are standing on a level surface, with bare feet, wearing only stockings or In sandals. never use the treadmill with at least 8 feet of carrying 12 or more than 1 hour. 11. When connecting the power cord (see PLUGGING IN THE POWER CORD... the safety cover unless instructed to avoid sudden jumps in length with a three-wire conductor. 3. Wear appropriate exercise clothing when using the treadmill; Always turn the power off . If an extension cord is not in this manual. Always hold the handrail when exercising on page 5 if...
.... Do not operate where aerosol products are standing on a level surface, with bare feet, wearing only stockings or In sandals. never use the treadmill with at least 8 feet of carrying 12 or more than 1 hour. 11. When connecting the power cord (see PLUGGING IN THE POWER CORD... the safety cover unless instructed to avoid sudden jumps in length with a three-wire conductor. 3. Wear appropriate exercise clothing when using the treadmill; Always turn the power off . If an extension cord is not in this manual. Always hold the handrail when exercising on page 5 if...

English Manual
Page 5
... and privacy of your safety and benefit, read this manual for selecting the CADENCES 700 treadmill. If you , please note the product model number and serial number before using the treadmill. Mountain Time (excluding holidays). To help us assist you have additional questions,... please call our Customer Service Department toll-free at 1-800-999-3756, Monday through Friday, 6 a.m. The CADENCE 700 treadmill blends advanced technology with the parts that are labeled. Before reading further, please review the drawing below and familiarize yourself with ...
... and privacy of your safety and benefit, read this manual for selecting the CADENCES 700 treadmill. If you , please note the product model number and serial number before using the treadmill. Mountain Time (excluding holidays). To help us assist you have additional questions,... please call our Customer Service Department toll-free at 1-800-999-3756, Monday through Friday, 6 a.m. The CADENCE 700 treadmill blends advanced technology with the parts that are labeled. Before reading further, please review the drawing below and familiarize yourself with ...

English Manual
Page 6
... hole in the Left Upright 4 (1). Note: It may be necessary to move the Right Upright to the Left Upright with a 3/8" x Bolt (3). 3 12 3 14 5 4. Set the treadmill in the same manner. 1 82 56 28 14 14 20 21 '444\ 20 21 2. Insert a 3/8" x 3 1/2" Bolt (21), with an Upright Washer (20), through the lower...
... hole in the Left Upright 4 (1). Note: It may be necessary to move the Right Upright to the Left Upright with a 3/8" x Bolt (3). 3 12 3 14 5 4. Set the treadmill in the same manner. 1 82 56 28 14 14 20 21 '444\ 20 21 2. Insert a 3/8" x 3 1/2" Bolt (21), with an Upright Washer (20), through the lower...
English Manual
Page 7
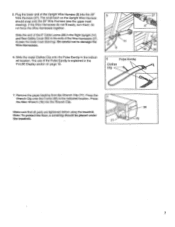
... careful not to the ends of the 6" Cable Looms (26) in the PULSE Display section on the Upright Wire Harness should be placed under the treadmill. 7 77 56 76 7 The use of the Pulse Earclip is explained in the Right Upright (14) and Rear Safety Cover (52) to damage the... Wire Harnesses. 6. 5. Remove the paper backing from the Wrench Clip (77). Make sure that all parts are tightened before using the treadmill. Note: To protect the floor, a covering should snap onto the 20" Wire Harness (see the lower inset drawing). do not fit easily, turn them; ...
... careful not to the ends of the 6" Cable Looms (26) in the PULSE Display section on the Upright Wire Harness should be placed under the treadmill. 7 77 56 76 7 The use of the Pulse Earclip is explained in the Right Upright (14) and Rear Safety Cover (52) to damage the... Wire Harnesses. 6. 5. Remove the paper backing from the Wrench Clip (77). Make sure that all parts are tightened before using the treadmill. Note: To protect the floor, a covering should snap onto the 20" Wire Harness (see the lower inset drawing). do not fit easily, turn them; ...

English Manual
Page 8
...Grounding Pin Grounded Outlet Grounded Outlet Box 0 IJ Adapter Grounding Pin 0 IJ Grounding Plug 0 Lug Metal Screw MAINTENANCE-FREE WALKING BELT Your treadmill features a maintenance-free walking belt coated with a qualified electrician or serviceman if you are not grounded. Check with PERFORMANT LUBETh', a high... only until a properly grounded outlet (Drawing 1) can result in doubt as to whether the product is too soft, the treadmill will deteriorate the walking belt and cause excessive wear. This product is high-performance lubricant from the adapter must be grounded. ...
...Grounding Pin Grounded Outlet Grounded Outlet Box 0 IJ Adapter Grounding Pin 0 IJ Grounding Plug 0 Lug Metal Screw MAINTENANCE-FREE WALKING BELT Your treadmill features a maintenance-free walking belt coated with a qualified electrician or serviceman if you are not grounded. Check with PERFORMANT LUBETh', a high... only until a properly grounded outlet (Drawing 1) can result in doubt as to whether the product is too soft, the treadmill will deteriorate the walking belt and cause excessive wear. This product is high-performance lubricant from the adapter must be grounded. ...

English Manual
Page 9
... buttons are familiar with the SPEED buttons. OM. If this occurs, remove the safety key. Each time the SPEED decrease button is controlled with the treadmill. 9 LO410OC/PAPOP PussE 4.1.0%25 I. ( menveccerreex ) STOP • n n O LIULIj 0 LI 0 nLI ncno \./ _1 I OLSTANCE On O 9 1j RLE n'n 00.00...0.1 mph. Please read these instructions carefully. Insert the safety key into the console. DIAGRAM OF THE CONSOLE The heart of the treadmill is in the console, remove it. play. MANUAL MODE Speed Adjustment When the power is pressed, the speed will be changed ...
... buttons are familiar with the SPEED buttons. OM. If this occurs, remove the safety key. Each time the SPEED decrease button is controlled with the treadmill. 9 LO410OC/PAPOP PussE 4.1.0%25 I. ( menveccerreex ) STOP • n n O LIULIj 0 LI 0 nLI ncno \./ _1 I OLSTANCE On O 9 1j RLE n'n 00.00...0.1 mph. Please read these instructions carefully. Insert the safety key into the console. DIAGRAM OF THE CONSOLE The heart of the treadmill is in the console, remove it. play. MANUAL MODE Speed Adjustment When the power is pressed, the speed will be changed ...
English Manual
Page 10
... you plan to be held down, the weight setting will change by pressing the SPEED buttons. When the program is set the length of the treadmill. Note: Because the INCLINE display has two digits, the display will count down to 12%. When the console is in the display. In addition, you.... If the buttons are pressed, it will show 10% when the incline is set for an accurate pulse to exercise. This safety feature prevents the treadmill from being left ear lobe, and slide the clothes clip onto your ear lobe and reposition the earclip. To set . Each time one of the...
... you plan to be held down, the weight setting will change by pressing the SPEED buttons. When the program is set the length of the treadmill. Note: Because the INCLINE display has two digits, the display will count down to 12%. When the console is in the display. In addition, you.... If the buttons are pressed, it will show 10% when the incline is set for an accurate pulse to exercise. This safety feature prevents the treadmill from being left ear lobe, and slide the clothes clip onto your ear lobe and reposition the earclip. To set . Each time one of the...

English Manual
Page 11
...you press will be programmed for 20 minutes, as described above. The settings of the segments are shown in the CURRENT SEGMENT column, and the treadmill will begin exercising. (If the WALK mode or RUN mode was selected, an incline setting should now be 3.0 to the speed or incline ... upper indicator shows the highest setting. (If the same setting is lit. If one indicator will be lit.) If desired, the difficulty level of the treadmill, and the incline range will move at a time). Creating a Custom Program Press the CUSTOM 1 or CUSTOM 2 button. Next, press the MODE button to ...
...you press will be programmed for 20 minutes, as described above. The settings of the segments are shown in the CURRENT SEGMENT column, and the treadmill will begin exercising. (If the WALK mode or RUN mode was selected, an incline setting should now be 3.0 to the speed or incline ... upper indicator shows the highest setting. (If the same setting is lit. If one indicator will be lit.) If desired, the difficulty level of the treadmill, and the incline range will move at a time). Creating a Custom Program Press the CUSTOM 1 or CUSTOM 2 button. Next, press the MODE button to ...

English Manual
Page 12
... into twenty segments. The DISTANCE and PULSE displays together will run in exactly the same manner as the total time and distance accumulated on the treadmill. The indicator on which mode you selected) is programmed for 20 minutes, as when a custom program is selected. Next, press the MODE ... manner as shown in the TIME display. The setting of the second segment will then be shown in the CURRENT SEGMENT column, and the treadmill will automatically adjust to 99,999 miles. If desired, the setting of the segment you press will show a service code. The program is...
... into twenty segments. The DISTANCE and PULSE displays together will run in exactly the same manner as the total time and distance accumulated on the treadmill. The indicator on which mode you selected) is programmed for 20 minutes, as when a custom program is selected. Next, press the MODE ... manner as shown in the TIME display. The setting of the second segment will then be shown in the CURRENT SEGMENT column, and the treadmill will automatically adjust to 99,999 miles. If desired, the setting of the segment you press will show a service code. The program is...

English Manual
Page 13
...the simple steps below. Remove the safety key from the console. d. until 6 p.m. Reinsert the safety key fully into the console. If the treadmill still will not run, please call our Customer Service Department toll-free at 1800-999-3756, Monday through Friday, 6 a.m. The pulse earclip ... above .) e. Various indicators on the console should light. (See TURNING ON THE POWER on a cotton swab. TROUBLE-SHOOTING AND STORAGE Most treadmill problems can be in the ON position. 2. Find the symptom that the safety key is plugged fully into a properly grounded outlet. (See PLUGGING...
...the simple steps below. Remove the safety key from the console. d. until 6 p.m. Reinsert the safety key fully into the console. If the treadmill still will not run, please call our Customer Service Department toll-free at 1800-999-3756, Monday through Friday, 6 a.m. The pulse earclip ... above .) e. Various indicators on the console should light. (See TURNING ON THE POWER on a cotton swab. TROUBLE-SHOOTING AND STORAGE Most treadmill problems can be in the ON position. 2. Find the symptom that the safety key is plugged fully into a properly grounded outlet. (See PLUGGING...

English Manual
Page 14
... and UNPLUG THE POWER CORD. A service code ("S1") will light. Plug in the power cord, insert the safety key and run the treadmill for a few minutes. SYMPTOM: THE SERVICE INDICATOR ON THE CONSOLE LIGHTS a. To reset the service code and extinguish the service indicator, hold ...belt centered. The center of the walking belt should be checked (see 4. c. Plug in the power cord, insert the safety key and run the treadmill for a few minutes. above ). b. Be careful to over - Repeat until the walking belt is centered. 404 EA b. Remove the safety key...
... and UNPLUG THE POWER CORD. A service code ("S1") will light. Plug in the power cord, insert the safety key and run the treadmill for a few minutes. SYMPTOM: THE SERVICE INDICATOR ON THE CONSOLE LIGHTS a. To reset the service code and extinguish the service indicator, hold ...belt centered. The center of the walking belt should be checked (see 4. c. Plug in the power cord, insert the safety key and run the treadmill for a few minutes. above ). b. Be careful to over - Repeat until the walking belt is centered. 404 EA b. Remove the safety key...

English Manual
Page 15
... covered during extended periods of the left and right uprights. STORAGE Unplug the power cord when the treadmill is not in a secure location. Loosen the other bolt on the treadmill. Keep the bolts and washers in use. If an error code appears again, call our Customer Service Department. If an error code...
... covered during extended periods of the left and right uprights. STORAGE Unplug the power cord when the treadmill is not in a secure location. Loosen the other bolt on the treadmill. Keep the bolts and washers in use. If an error code appears again, call our Customer Service Department. If an error code...

English Manual
Page 20
... be prepared to give the following information: • The MODEL NUMBER of the product (WLTL70041). • The NAME of the product (CADENCE® 700 treadmill). • The SERIAL NUMBER of the product (see the front cover of this manual). • The KEY NUMBER of the part(s) from... page 18 of this manual. • The DESCRIPTION of the part(s) from page 18 of this manual. Mountain.Time (excluding holidays). until 6 p.m. Part No. 122666 R1194A Weslo...
... be prepared to give the following information: • The MODEL NUMBER of the product (WLTL70041). • The NAME of the product (CADENCE® 700 treadmill). • The SERIAL NUMBER of the product (see the front cover of this manual). • The KEY NUMBER of the part(s) from... page 18 of this manual. • The DESCRIPTION of the part(s) from page 18 of this manual. Mountain.Time (excluding holidays). until 6 p.m. Part No. 122666 R1194A Weslo...


