

User Manual
Page 1
Class H Fitness Product Model No. Unit 4 Revie Road Industrial Estate Revie Road, Beeston Leeds, LS11 8JG UK [email protected] CAUTION Read all precautions and instructions in this manual before using this manual for future reference. WETL1614.2 Serial No. Save this equipment. Visit our website at www.iconeurope.com As a manufacturer, we are missing or damaged parts, please call: 08457 089 009 Or write: ICON Health & Fitness, Ltd. If you have questions, or if there are committed to providing complete customer satisfaction. Serial Number Decal USER'S MANUAL QUESTIONS?
Class H Fitness Product Model No. Unit 4 Revie Road Industrial Estate Revie Road, Beeston Leeds, LS11 8JG UK [email protected] CAUTION Read all precautions and instructions in this manual before using this manual for future reference. WETL1614.2 Serial No. Save this equipment. Visit our website at www.iconeurope.com As a manufacturer, we are missing or damaged parts, please call: 08457 089 009 Or write: ICON Health & Fitness, Ltd. If you have questions, or if there are committed to providing complete customer satisfaction. Serial Number Decal USER'S MANUAL QUESTIONS?

User Manual
Page 2
TABLE OF CONTENTS IMPORTANT PRECAUTIONS 3 BEFORE YOU BEGIN 5 ASSEMBLY 6 OPERATION AND ADJUSTMENT 11 HOW TO FOLD AND MOVE THE TREADMILL 15 MAINTENANCE AND TROUBLESHOOTING 17 CONDITIONING GUIDELINES 19 PART LIST 21 EXPLODED DRAWING 22 ORDERING REPLACEMENT PARTS Back Cover WESLO is a registered trademark of ICON IP, Inc. 2
TABLE OF CONTENTS IMPORTANT PRECAUTIONS 3 BEFORE YOU BEGIN 5 ASSEMBLY 6 OPERATION AND ADJUSTMENT 11 HOW TO FOLD AND MOVE THE TREADMILL 15 MAINTENANCE AND TROUBLESHOOTING 17 CONDITIONING GUIDELINES 19 PART LIST 21 EXPLODED DRAWING 22 ORDERING REPLACEMENT PARTS Back Cover WESLO is a registered trademark of ICON IP, Inc. 2

User Manual
Page 3
... lbs.). 8. Athletic support clothes are standing on /off switch.) 17. The treadmill should be used . 19. Do not wear loose clothes that the storage latch is no longer than 1.5 m (5 ft.). 2. Always remove the key, unplug the power cord, and move the walking belt whilst the power is turned off position when the treadmill is running. Do not put the treadmill in use the treadmill with at all parts of 12...
... lbs.). 8. Athletic support clothes are standing on /off switch.) 17. The treadmill should be used . 19. Do not wear loose clothes that the storage latch is no longer than 1.5 m (5 ft.). 2. Always remove the key, unplug the power cord, and move the walking belt whilst the power is turned off position when the treadmill is running. Do not put the treadmill in use the treadmill with at all parts of 12...

User Manual
Page 4
... health problems. Read all instructions before performing the main- The sensor is especially important for personal injury or property damage sustained by or through the use only. tenance and adjustment procedures de- Do not use , before cleaning the treadmill, and before using. 22. This is intended only as an exercise aid in determining heart rate trends in the location shown. Always unplug the power cord...
... health problems. Read all instructions before performing the main- The sensor is especially important for personal injury or property damage sustained by or through the use only. tenance and adjustment procedures de- Do not use , before cleaning the treadmill, and before using. 22. This is intended only as an exercise aid in determining heart rate trends in the location shown. Always unplug the power cord...

User Manual
Page 5
...) Console Key/Clip Storage Latch LEFT SIDE Foot Rail Walking Belt Handrail RIGHT SIDE Hood Circuit Breaker On/Off Switch Front Wheel Rear Roller Adjustment Bolts Incline Leg 5 BEFORE YOU BEGIN Thank you for the location of the decal). The CADENCE 65 treadmill combines advanced technology with the labelled parts. Before reading further, please review the drawing below and familiarise yourself with innovative design to the treadmill (see the front cover of...
...) Console Key/Clip Storage Latch LEFT SIDE Foot Rail Walking Belt Handrail RIGHT SIDE Hood Circuit Breaker On/Off Switch Front Wheel Rear Roller Adjustment Bolts Incline Leg 5 BEFORE YOU BEGIN Thank you for the location of the decal). The CADENCE 65 treadmill combines advanced technology with the labelled parts. Before reading further, please review the drawing below and familiarise yourself with innovative design to the treadmill (see the front cover of...

User Manual
Page 6
.... Set the treadmill in the power cord until assembly is a normal condition and does not affect treadmill performance. Do not overtighten the Bolts. For help identifying the assembly hardware, see the part identification chart below. 5/16" Star Washer (68)-4 3/8" Star Washer (39)-2 Wheel Nut (61)-2 1/2" Screw (92)-2 Silver Ground Screw (89)-1 3/4" Screw (77)-10 Crossbar/Spacer Screw (86)-4 1" Tek Screw (11)-4 Wheel Bolt (33)-2 Upright Bolt (28)-6 Frame Bolt...
.... Set the treadmill in the power cord until assembly is a normal condition and does not affect treadmill performance. Do not overtighten the Bolts. For help identifying the assembly hardware, see the part identification chart below. 5/16" Star Washer (68)-4 3/8" Star Washer (39)-2 Wheel Nut (61)-2 1/2" Screw (92)-2 Silver Ground Screw (89)-1 3/4" Screw (77)-10 Crossbar/Spacer Screw (86)-4 1" Tek Screw (11)-4 Wheel Bolt (33)-2 Upright Bolt (28)-6 Frame Bolt...
User Manual
Page 7
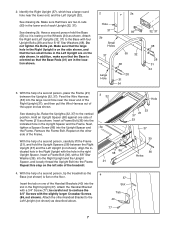
...Right Upright (37) and the Left Upright (not shown). Insert a Frame Bolt (36) into the Upright Spacer and the Frame. Next, tighten a Spacer Screw (86) into the indicated hole in the Right Upright with a 3/8" Star Washer (39), into the Right Upright and the Upright Spacer, and loosely thread the Upright Bolt into the Frame. Attach ... hole near the lower end of the Right Upright (37), and then pull the Wire Harness out of the treadmill. 3 32 3a 86 58 21 Hole 53 21 37 53 37 39 36 Holes 4. Insert the tab on the side shown. Attach the Handrail Bracket with four Upright Bolts (28) and ...
...Right Upright (37) and the Left Upright (not shown). Insert a Frame Bolt (36) into the Upright Spacer and the Frame. Next, tighten a Spacer Screw (86) into the indicated hole in the Right Upright with a 3/8" Star Washer (39), into the Right Upright and the Upright Spacer, and loosely thread the Upright Bolt into the Frame. Attach ... hole near the lower end of the Right Upright (37), and then pull the Wire Harness out of the treadmill. 3 32 3a 86 58 21 Hole 53 21 37 53 37 39 36 Holes 4. Insert the tab on the side shown. Attach the Handrail Bracket with four Upright Bolts (28) and ...

User Manual
Page 8
...Screws (86); Attach the Crossbar to confuse the Crossbar 6 Screws with the Silver Ground Screw (89). Press a Handrail Cap (87) onto the lower end of the hole. The Crossbar Screws are slightly larger than the 3/4" Screws...step 5. Do not tighten the Upright Bolt until step 6 is not a wire harness on the Wire Harness (53) to pull the Wire Harness out of the Right Handrail (5) as described above. Do not tighten the Crossbar Screws yet. 4 Attach the end of the ground wire on the left side. Attach the Right Handrail (5) with the two Crossbar Screws (86). be helpful to use...
...Screws (86); Attach the Crossbar to confuse the Crossbar 6 Screws with the Silver Ground Screw (89). Press a Handrail Cap (87) onto the lower end of the hole. The Crossbar Screws are slightly larger than the 3/4" Screws...step 5. Do not tighten the Upright Bolt until step 6 is not a wire harness on the Wire Harness (53) to pull the Wire Harness out of the Right Handrail (5) as described above. Do not tighten the Crossbar Screws yet. 4 Attach the end of the ground wire on the left side. Attach the Right Handrail (5) with the two Crossbar Screws (86). be helpful to use...

User Manual
Page 10
... of your exercise.) Next, fully insert an Incline Pin (46) into the large hole in assembly steps 3 through 7. 11 Knob 99 25 77 Large Hole 32 Spring Collar Pin 12. Position the Uprights so that both Incline Pins are properly tightened before tightening them; In addition, make sure that the frame is used in the side of the Console Base to adjust the walking belt (see page...
... of your exercise.) Next, fully insert an Incline Pin (46) into the large hole in assembly steps 3 through 7. 11 Knob 99 25 77 Large Hole 32 Spring Collar Pin 12. Position the Uprights so that both Incline Pins are properly tightened before tightening them; In addition, make sure that the frame is used in the side of the Console Base to adjust the walking belt (see page...
User Manual
Page 11
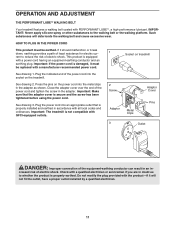
...-performance lubricant. creased risk of the power cord and tighten the screw in - Close the adapter cover over the end of electric shock. Plug the power cord into the metal clips in accordance with GFCI-equipped outlets. 2 Screw Adaptor Metal Clips Adaptor Cover Pins 3 Outlet DANGER: Improper connection of electric shock. See drawing 2. OPERATION AND ADJUSTMENT THE PERFORMANT LUBETM WALKING BELT Your treadmill features a walking belt coated with a power cord having an...
...-performance lubricant. creased risk of the power cord and tighten the screw in - Close the adapter cover over the end of electric shock. Plug the power cord into the metal clips in accordance with GFCI-equipped outlets. 2 Screw Adaptor Metal Clips Adaptor Cover Pins 3 Outlet DANGER: Improper connection of electric shock. See drawing 2. OPERATION AND ADJUSTMENT THE PERFORMANT LUBETM WALKING BELT Your treadmill features a walking belt coated with a power cord having an...

User Manual
Page 12
... clip onto the waistband of the walking belt as desired by pressing the Speed buttons. STEP-BY-STEP CONSOLE OPERATION Before operating the console, make sure that the power cord is properly plugged in this section refer to move. A moment after the key is inserted, the displays will change the speed of your clothes. For simplicity, all instructions in (see SPEED DISPLAY on the console and place only a sealed water bottle...
... clip onto the waistband of the walking belt as desired by pressing the Speed buttons. STEP-BY-STEP CONSOLE OPERATION Before operating the console, make sure that the power cord is properly plugged in this section refer to move. A moment after the key is inserted, the displays will change the speed of your clothes. For simplicity, all instructions in (see SPEED DISPLAY on the console and place only a sealed water bottle...

User Manual
Page 13
.... The Distance display- To reset the displays, press the Stop button, remove the key, and then reinsert the key. 4 Measure your thumb off the pulse sensor for a moment. Keep the key in the Time display. To measure your heart rate, stand on the foot rails and place your heart rate. 5 When you have walked or run. To stop the walking belt, press the Stop button. The number of laps that the treadmill is not displayed, lift your heart rate if...
.... The Distance display- To reset the displays, press the Stop button, remove the key, and then reinsert the key. 4 Measure your thumb off the pulse sensor for a moment. Keep the key in the Time display. To measure your heart rate, stand on the foot rails and place your heart rate. 5 When you have walked or run. To stop the walking belt, press the Stop button. The number of laps that the treadmill is not displayed, lift your heart rate if...
User Manual
Page 14
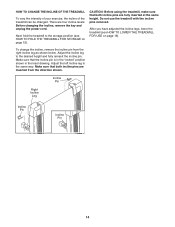
... the incline pin. To change the incline, remove the incline pin from the direction shown. Adjust the incline leg to the storage position (see HOW TO LOWER THE TREADMILL FOR USE on page 15). Make sure that both incline pins are inserted from the right incline leg as shown below. There are fully inserted at the same height. Do not use the treadmill with the incline pins removed. Before changing the incline, remove the key and unplug the power cord...
... the incline pin. To change the incline, remove the incline pin from the direction shown. Adjust the incline leg to the storage position (see HOW TO LOWER THE TREADMILL FOR USE on page 15). Make sure that both incline pins are inserted from the right incline leg as shown below. There are fully inserted at the same height. Do not use the treadmill with the incline pins removed. Before changing the incline, remove the key and unplug the power cord...

User Manual
Page 15
... the base as described above. 1. Using your back. Hold the treadmill with your legs rather than your left and hold the treadmill firmly. Slowly release the latch knob. Never move the treadmill over an uneven surface. 3. HOW TO FOLD AND MOVE THE TREADMILL HOW TO FOLD THE TREADMILL FOR STORAGE Unplug the power cord. Move your back straight. Make sure that the latch pin is securely held by the...
... the base as described above. 1. Using your back. Hold the treadmill with your legs rather than your left and hold the treadmill firmly. Slowly release the latch knob. Never move the treadmill over an uneven surface. 3. HOW TO FOLD AND MOVE THE TREADMILL HOW TO FOLD THE TREADMILL FOR STORAGE Unplug the power cord. Move your back straight. Make sure that the latch pin is securely held by the...

User Manual
Page 17
... near the power cord (see d. Remove the screws from the console. Make sure that the key is plugged in, unplug it, wait for a correct speed reading. 3 mm 56 8 17 14 Top View 17 Find the symptom that the power cord is no longer than 1.5 m (5 ft.). c. d. above ). c. Locate the Reed Switch (8) and the Magnet (14) on the frame near the power cord. MAINTENANCE AND TROUBLESHOOTING Most treadmill problems can be...
... near the power cord (see d. Remove the screws from the console. Make sure that the key is plugged in, unplug it, wait for a correct speed reading. 3 mm 56 8 17 14 Top View 17 Find the symptom that the power cord is no longer than 1.5 m (5 ft.). c. d. above ). c. Locate the Reed Switch (8) and the Magnet (14) on the frame near the power cord. MAINTENANCE AND TROUBLESHOOTING Most treadmill problems can be...

User Manual
Page 18
... when walked on SOLUTION: a. PROBLEM: The walking belt is off -centre, first remove the key a and UNPLUG THE POWER CORD. If the walking belt is overtightened, treadmill performance may decrease and the walking belt may become damaged. b. Be careful to keep the walking belt centred. Remove the key and UNPLUG THE POWER CORD. Plug in the power cord, insert the key and run the treadmill for a few minutes. Using the hex key, turn both rear roller bolts counterclockwise, 1/4 of the walking belt...
... when walked on SOLUTION: a. PROBLEM: The walking belt is off -centre, first remove the key a and UNPLUG THE POWER CORD. If the walking belt is overtightened, treadmill performance may decrease and the walking belt may become damaged. b. Be careful to keep the walking belt centred. Remove the key and UNPLUG THE POWER CORD. Plug in the power cord, insert the key and run the treadmill for a few minutes. Using the hex key, turn both rear roller bolts counterclockwise, 1/4 of the walking belt...
User Manual
Page 19
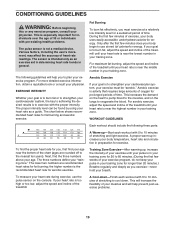
... console. For aerobic exercise, adjust the speed and incline of the treadmill until your heart rate is near the highest number in your training zone. Next, find your heart rate during exercise, use stored fat calories for 20 to exercise with pre-existing health problems. The pulse sensor is not a medical device. Training Zone Exercise-After warming up, increase the intensity of your exercise until your heart rate is near the bottom of the chart...
... console. For aerobic exercise, adjust the speed and incline of the treadmill until your heart rate is near the highest number in your training zone. Next, find your heart rate during exercise, use stored fat calories for 20 to exercise with pre-existing health problems. The pulse sensor is not a medical device. Training Zone Exercise-After warming up, increase the intensity of your exercise until your heart rate is near the bottom of the chart...
User Manual
Page 20
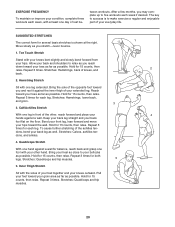
...foot toward you may complete up to make exercise a regular and enjoyable part of the achilles tendons, bend your back leg as well. Repeat 3 times for 15 counts, then relax. Hold for several basic stretches is to five workouts each week if desired. After a few ... at the right. Repeat 3 times. Stretches: Hamstrings, lower back, and groin. 3 3. Hold for each leg. Stretches: Quadriceps and hip muscles. 1 2 4 20 Hold for 15 counts, then relax. Bend your front leg, lean forward and move your hips toward your hips. Hamstring Stretch Sit with your...
...foot toward you may complete up to make exercise a regular and enjoyable part of the achilles tendons, bend your back leg as well. Repeat 3 times for 15 counts, then relax. Hold for several basic stretches is to five workouts each week if desired. After a few ... at the right. Repeat 3 times. Stretches: Hamstrings, lower back, and groin. 3 3. Hold for each leg. Stretches: Quadriceps and hip muscles. 1 2 4 20 Hold for 15 counts, then relax. Bend your front leg, lean forward and move your hips toward your hips. Hamstring Stretch Sit with your...

User Manual
Page 21
... Platform Screw Motor Tension Nut Front Roller/Pulley Motor Tension Bolt Circuit Breaker Reed Switch Bracket Frame Receptical Controller Motor Pivot Bolt Latch Housing Transformer Electronics Bracket Upright Bolt Motor Bracket Power Cord Base Pad Left Upright Wheel Bolt Wheel Allen Wrench Frame Bolt Right Upright Storage Latch 3/8" Star Washer Handrail Bracket Ferrite Box Key/Clip Latch Decal Filter Console Base Incline Pin Incline Leg Console Cover Book Rack Wire Cover Power Switch Belt Guide Screw Wire Harness Grommet 55 1 56 13 57 1 58 2 59 1 60 1 61 3 62 2 63 2 64 1 65...
... Platform Screw Motor Tension Nut Front Roller/Pulley Motor Tension Bolt Circuit Breaker Reed Switch Bracket Frame Receptical Controller Motor Pivot Bolt Latch Housing Transformer Electronics Bracket Upright Bolt Motor Bracket Power Cord Base Pad Left Upright Wheel Bolt Wheel Allen Wrench Frame Bolt Right Upright Storage Latch 3/8" Star Washer Handrail Bracket Ferrite Box Key/Clip Latch Decal Filter Console Base Incline Pin Incline Leg Console Cover Book Rack Wire Cover Power Switch Belt Guide Screw Wire Harness Grommet 55 1 56 13 57 1 58 2 59 1 60 1 61 3 62 2 63 2 64 1 65...

User Manual
Page 24
... following information: • the MODEL NUMBER of the product (WETL1614.2) • the NAME of the product (WESLO CADENCE 65 treadmill) • the SERIAL NUMBER of the product (see the front cover of this product, or if you encounter any problems with this manual) • the KEY NUMBER and DESCRIPTION of the part(s) (see the PART LIST and the EXPLODED DRAWING on pages 21 to order replacement parts, contact the ICON Health & Fitness...
... following information: • the MODEL NUMBER of the product (WETL1614.2) • the NAME of the product (WESLO CADENCE 65 treadmill) • the SERIAL NUMBER of the product (see the front cover of this product, or if you encounter any problems with this manual) • the KEY NUMBER and DESCRIPTION of the part(s) (see the PART LIST and the EXPLODED DRAWING on pages 21 to order replacement parts, contact the ICON Health & Fitness...


