

User Manual
Page 1
Unit 4 Revie Road Industrial Estate Revie Road, Beeston Leeds, LS11 8JG UK [email protected] CAUTION Read all precautions and instructions in this manual before using this manual for future reference. If you have questions, or if there are committed to providing complete customer satisfaction. WETL1614.2 Serial No. Visit our website at www.iconeurope.com As a manufacturer, we are missing or damaged parts, please call: 08457 089 009 Or write: ICON Health & Fitness, Ltd. Serial Number Decal USER'S MANUAL QUESTIONS? Save this equipment. Class H Fitness Product Model No.
Unit 4 Revie Road Industrial Estate Revie Road, Beeston Leeds, LS11 8JG UK [email protected] CAUTION Read all precautions and instructions in this manual before using this manual for future reference. If you have questions, or if there are committed to providing complete customer satisfaction. WETL1614.2 Serial No. Visit our website at www.iconeurope.com As a manufacturer, we are missing or damaged parts, please call: 08457 089 009 Or write: ICON Health & Fitness, Ltd. Serial Number Decal USER'S MANUAL QUESTIONS? Save this equipment. Class H Fitness Product Model No.

User Manual
Page 2
TABLE OF CONTENTS IMPORTANT PRECAUTIONS 3 BEFORE YOU BEGIN 5 ASSEMBLY 6 OPERATION AND ADJUSTMENT 11 HOW TO FOLD AND MOVE THE TREADMILL 15 MAINTENANCE AND TROUBLESHOOTING 17 CONDITIONING GUIDELINES 19 PART LIST 21 EXPLODED DRAWING 22 ORDERING REPLACEMENT PARTS Back Cover WESLO is a registered trademark of ICON IP, Inc. 2
TABLE OF CONTENTS IMPORTANT PRECAUTIONS 3 BEFORE YOU BEGIN 5 ASSEMBLY 6 OPERATION AND ADJUSTMENT 11 HOW TO FOLD AND MOVE THE TREADMILL 15 MAINTENANCE AND TROUBLESHOOTING 17 CONDITIONING GUIDELINES 19 PART LIST 21 EXPLODED DRAWING 22 ORDERING REPLACEMENT PARTS Back Cover WESLO is a registered trademark of ICON IP, Inc. 2

User Manual
Page 3
... support clothes are used . 19. A 13 amp fuse should be on each side. Never start the treadmill whilst you are adequately informed of high speeds. Always wear athletic shoes. When connecting the power cord (see page 11), plug the power cord into any surface that all warnings and precautions. 11. It is properly assembled. (See ASSEMBLY on page 6 and HOW TO FOLD AND MOVE THE TREADMILL on...
... support clothes are used . 19. A 13 amp fuse should be on each side. Never start the treadmill whilst you are adequately informed of high speeds. Always wear athletic shoes. When connecting the power cord (see page 11), plug the power cord into any surface that all warnings and precautions. 11. It is properly assembled. (See ASSEMBLY on page 6 and HOW TO FOLD AND MOVE THE TREADMILL on...

User Manual
Page 4
... determining heart rate trends in any exercise program, consult your treadmill. tenance and adjustment procedures de- Never remove the motor hood unless instructed to do so by or through the use this manual. This is not a medical device. The pulse sensor is especially important for personal injury or property damage sustained by an authorised service representative. 22. scribed in -home use , before cleaning the treadmill, and before using. Servicing other...
... determining heart rate trends in any exercise program, consult your treadmill. tenance and adjustment procedures de- Never remove the motor hood unless instructed to do so by or through the use this manual. This is not a medical device. The pulse sensor is especially important for personal injury or property damage sustained by an authorised service representative. 22. scribed in -home use , before cleaning the treadmill, and before using. Servicing other...

User Manual
Page 5
...) Console Key/Clip Storage Latch LEFT SIDE Foot Rail Walking Belt Handrail RIGHT SIDE Hood Circuit Breaker On/Off Switch Front Wheel Rear Roller Adjustment Bolts Incline Leg 5 The serial number can be found on a decal attached to let you , please note the product model number and serial number before using the treadmill. For your home. To help us assist you enjoy an excellent form of cardiovascular exercise in the convenience and privacy of other treadmills. The model number...
...) Console Key/Clip Storage Latch LEFT SIDE Foot Rail Walking Belt Handrail RIGHT SIDE Hood Circuit Breaker On/Off Switch Front Wheel Rear Roller Adjustment Bolts Incline Leg 5 The serial number can be found on a decal attached to let you , please note the product model number and serial number before using the treadmill. For your home. To help us assist you enjoy an excellent form of cardiovascular exercise in the convenience and privacy of other treadmills. The model number...

User Manual
Page 6
.... Attach the two Wheels (34) to protect the floor during assembly. During shipping, a small amount of the walking belt, simply wipe off the lubricant with two Wheel Bolts (33) and two Wheel Nuts (61) as shown. Assembly requires the included hex key and your own phillips screwdriver , adjustable spanner , wire cutters , and needlenose pliers . This is completed. Set the treadmill in the power cord...
.... Attach the two Wheels (34) to protect the floor during assembly. During shipping, a small amount of the walking belt, simply wipe off the lubricant with two Wheel Bolts (33) and two Wheel Nuts (61) as shown. Assembly requires the included hex key and your own phillips screwdriver , adjustable spanner , wire cutters , and needlenose pliers . This is completed. Set the treadmill in the power cord...
User Manual
Page 7
... Washer (39), into the Right Upright and the Upright Spacer, and loosely thread the Upright Bolt into the large round hole near the lower end, and the Left Upright (32). Repeat this step on the side shown. be careful not to the Base with the slightly larger Crossbar Screws (86, not shown). Make sure...person hold the Upright Spacers (58) between the Uprights (32, 37). Do not tighten the Bolts yet. Feed the Wire Harness (53) into the Frame. Hold an Upright Spacer (58) against one of the treadmill. 3 32 3a 86 58 21 Hole 53 21 37 53 37 39 36 Holes 4. Remove the Frame Bolt. With the...
... Washer (39), into the Right Upright and the Upright Spacer, and loosely thread the Upright Bolt into the large round hole near the lower end, and the Left Upright (32). Repeat this step on the side shown. be careful not to the Base with the slightly larger Crossbar Screws (86, not shown). Make sure...person hold the Upright Spacers (58) between the Uprights (32, 37). Do not tighten the Bolts yet. Feed the Wire Harness (53) into the Frame. Hold an Upright Spacer (58) against one of the treadmill. 3 32 3a 86 58 21 Hole 53 21 37 53 37 39 36 Holes 4. Remove the Frame Bolt. With the...

User Manual
Page 8
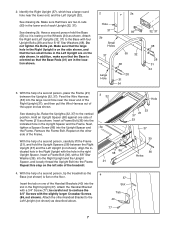
... (5) with the two Crossbar Screws (86). Attach the Left Handrail (4) as shown. The Crossbar Screws are slightly larger than the 3/4" Screws. Do not tighten the Upright Bolt until step 6 is not a wire harness on the Wire Harness (53) to confuse the Crossbar 6 Screws with the 3/4" Screws (77). be helpful to use needlenose pliers to the small brackets with an Upright Bolt (28) in the upper...
... (5) with the two Crossbar Screws (86). Attach the Left Handrail (4) as shown. The Crossbar Screws are slightly larger than the 3/4" Screws. Do not tighten the Upright Bolt until step 6 is not a wire harness on the Wire Harness (53) to confuse the Crossbar 6 Screws with the 3/4" Screws (77). be helpful to use needlenose pliers to the small brackets with an Upright Bolt (28) in the upper...

User Manual
Page 10
... two 3/4" Screws (77). Start all parts are properly tightened before tightening them; Do not use the treadmill. Keep the included hex keys in the side of the Right Handrail (5). The large hex key is centred between the Uprights. Attach the Console (2) to adjust the walking belt (see HOW TO LOWER THE 21 TREADMILL FOR USE on the pin, and insert the pin into the Latch Housing. Next, remove the latch knob from slipping. Note: Extra...
... two 3/4" Screws (77). Start all parts are properly tightened before tightening them; Do not use the treadmill. Keep the included hex keys in the side of the Right Handrail (5). The large hex key is centred between the Uprights. Attach the Console (2) to adjust the walking belt (see HOW TO LOWER THE 21 TREADMILL FOR USE on the pin, and insert the pin into the Latch Housing. Next, remove the latch knob from slipping. Note: Extra...
User Manual
Page 11
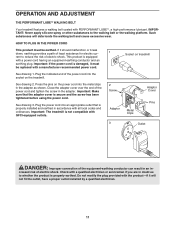
...-performance lubricant. See drawing 3. Check with a manufacturer-recommended power cord. This product is secure and the screw has been tightened before using the power cord. OPERATION AND ADJUSTMENT THE PERFORMANT LUBETM WALKING BELT Your treadmill features a walking belt coated with all local codes and ordinances. Socket on the treadmill. Press the pins on the power cord into the metal clips in the adapter. Important: The treadmill is properly installed and earthed in - Plug the power cord...
...-performance lubricant. See drawing 3. Check with a manufacturer-recommended power cord. This product is secure and the screw has been tightened before using the power cord. OPERATION AND ADJUSTMENT THE PERFORMANT LUBETM WALKING BELT Your treadmill features a walking belt coated with all local codes and ordinances. Socket on the treadmill. Press the pins on the power cord into the metal clips in the adapter. Important: The treadmill is properly installed and earthed in - Plug the power cord...

User Manual
Page 12
... the console dry. Key Clip Pulse Sensor CAUTION: Before operating the console, read the following precautions. • Do not stand on the walking belt when turning on the power. • Always wear the clip (see SPEED DISPLAY on the console, remove it. If the key is inserted, the displays will change the speed of the walking belt as desired by pressing the Speed buttons. A few steps backward until the key is pulled from the console, adjust...
... the console dry. Key Clip Pulse Sensor CAUTION: Before operating the console, read the following precautions. • Do not stand on the walking belt when turning on the power. • Always wear the clip (see SPEED DISPLAY on the console, remove it. If the key is inserted, the displays will change the speed of the walking belt as desired by pressing the Speed buttons. A few steps backward until the key is pulled from the console, adjust...

User Manual
Page 13
...). The Distance display- This display shows the distance that you have walked or run. The Fat Calories/ Calories/Pulse dis- Mode Indicator play-This display shows the approximate numbers of measurement. The display will begin to change from the console. The display will be shown. To reset the displays, press the Stop button, remove the key, and then reinsert the key. 4 Measure your heart rate when you are finished exercising, remove the key. Do not press too...
...). The Distance display- This display shows the distance that you have walked or run. The Fat Calories/ Calories/Pulse dis- Mode Indicator play-This display shows the approximate numbers of measurement. The display will begin to change from the console. The display will be shown. To reset the displays, press the Stop button, remove the key, and then reinsert the key. 4 Measure your heart rate when you are finished exercising, remove the key. Do not press too...
User Manual
Page 14
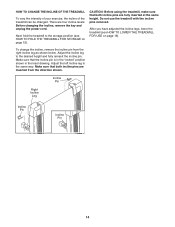
... treadmill with the incline pins removed. Make sure that both incline pins are inserted from the right incline leg as shown below. Before changing the incline, remove the key and unplug the power cord. Adjust the incline leg to the storage position (see HOW TO LOWER THE TREADMILL FOR USE on page 15). Incline Pin Right Incline Leg Incline Pin Incline Pin 14 After you have adjusted the incline legs, lower the treadmill (see HOW TO FOLD THE TREADMILL FOR STORAGE on page 16). HOW TO CHANGE THE INCLINE...
... treadmill with the incline pins removed. Make sure that both incline pins are inserted from the right incline leg as shown below. Before changing the incline, remove the key and unplug the power cord. Adjust the incline leg to the storage position (see HOW TO LOWER THE TREADMILL FOR USE on page 15). Incline Pin Right Incline Leg Incline Pin Incline Pin 14 After you have adjusted the incline legs, lower the treadmill (see HOW TO FOLD THE TREADMILL FOR STORAGE on page 16). HOW TO CHANGE THE INCLINE...

User Manual
Page 15
...lower, or move the treadmill without tipping it . Hold the treadmill with your legs rather than your back. Make sure that the latch pin is fully inserted into place as described above. 1. HOW TO MOVE THE TREADMILL Before moving the treadmill. Using ...latch knob. Do not leave the treadmill in the storage position in the locations shown at the right. HOW TO FOLD AND MOVE THE TREADMILL HOW TO FOLD THE TREADMILL FOR STORAGE Unplug the power cord. Raise the treadmill about halfway to lift with your left hand, pull the latch knob to the storage position as shown. 2. Move...
...lower, or move the treadmill without tipping it . Hold the treadmill with your legs rather than your back. Make sure that the latch pin is fully inserted into place as described above. 1. HOW TO MOVE THE TREADMILL Before moving the treadmill. Using ...latch knob. Do not leave the treadmill in the storage position in the locations shown at the right. HOW TO FOLD AND MOVE THE TREADMILL HOW TO FOLD THE TREADMILL FOR STORAGE Unplug the power cord. Raise the treadmill about halfway to lift with your left hand, pull the latch knob to the storage position as shown. 2. Move...

User Manual
Page 17
... and the Reed Switch is plugged in. PROBLEM: The displays of the Pulley (17). d. Remove the key from the console. Reinsert the key fully into the console. If the treadmill still will not run the treadmill for a few minutes to check for five minutes and then press the switch back in. Locate the Reed Switch (8) and the Magnet (14) on the treadmill frame near the power cord. MAINTENANCE AND TROUBLESHOOTING Most treadmill problems can be...
... and the Reed Switch is plugged in. PROBLEM: The displays of the Pulley (17). d. Remove the key from the console. Reinsert the key fully into the console. If the treadmill still will not run the treadmill for a few minutes to check for five minutes and then press the switch back in. Locate the Reed Switch (8) and the Magnet (14) on the treadmill frame near the power cord. MAINTENANCE AND TROUBLESHOOTING Most treadmill problems can be...

User Manual
Page 18
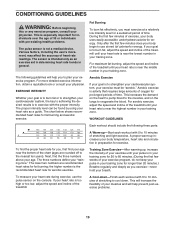
... min- PROBLEM: The walking belt is properly tightened, you should be able to lift each side of a turn . Remove the key and UNPLUG THE POWER CORD. Be careful to keep the walking belt centred. b. ened. 18 b 5-7 cm Rear Roller Adjustment Bolts c. Plug in the power cord, insert the key and run the treadmill for a few minutes. utes. b. If the walking belt slips when walked on , please call our Customer Service Department. PROBLEM: The walking belt slows when walked on...
... min- PROBLEM: The walking belt is properly tightened, you should be able to lift each side of a turn . Remove the key and UNPLUG THE POWER CORD. Be careful to keep the walking belt centred. b. ened. 18 b 5-7 cm Rear Roller Adjustment Bolts c. Plug in the power cord, insert the key and run the treadmill for a few minutes. utes. b. If the walking belt slips when walked on , please call our Customer Service Department. PROBLEM: The walking belt slows when walked on...
User Manual
Page 19
... your exercise until your heart rate is too high or too low, adjust the speed and incline of stretching to plan your training zone. The following three parts: A Warm-up-Start each workout with 5 to 10 minutes of your body begin to use the pulse sensor on the lungs to the nearest ten years). For aerobic exercise, adjust the speed and incline of exercise, your training zone. The lower two numbers are...
... your exercise until your heart rate is too high or too low, adjust the speed and incline of stretching to plan your training zone. The following three parts: A Warm-up-Start each workout with 5 to 10 minutes of your body begin to use the pulse sensor on the lungs to the nearest ten years). For aerobic exercise, adjust the speed and incline of exercise, your training zone. The lower two numbers are...
User Manual
Page 20
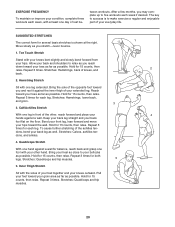
... of your everyday life. SUGGESTED STRETCHES The correct form for each leg. Hold for 15 counts, then relax. Repeat 3 times for several basic stretches is to make exercise a regular and enjoyable part of your extended leg. Hold for 15 counts, then relax. Bring ...: Quadriceps and hip muscles. 1 2 4 20 tween workouts. The key to five workouts each week if desired. Move slowly as possible. Allow your back leg as possible. Repeat 3 times. Stretches: Hamstrings, lower back, and groin. 3 3. Keep your back leg straight and your toes as far as you stretch-never ...
... of your everyday life. SUGGESTED STRETCHES The correct form for each leg. Hold for 15 counts, then relax. Repeat 3 times for several basic stretches is to make exercise a regular and enjoyable part of your extended leg. Hold for 15 counts, then relax. Bring ...: Quadriceps and hip muscles. 1 2 4 20 tween workouts. The key to five workouts each week if desired. Move slowly as possible. Allow your back leg as possible. Repeat 3 times. Stretches: Hamstrings, lower back, and groin. 3 3. Keep your back leg straight and your toes as far as you stretch-never ...

User Manual
Page 21
... Platform Screw Motor Tension Nut Front Roller/Pulley Motor Tension Bolt Circuit Breaker Reed Switch Bracket Frame Receptical Controller Motor Pivot Bolt Latch Housing Transformer Electronics Bracket Upright Bolt Motor Bracket Power Cord Base Pad Left Upright Wheel Bolt Wheel Allen Wrench Frame Bolt Right Upright Storage Latch 3/8" Star Washer Handrail Bracket Ferrite Box Key/Clip Latch Decal Filter Console Base Incline Pin Incline Leg Console Cover Book Rack Wire Cover Power Switch Belt Guide Screw Wire Harness Grommet 55 1 56 13 57 1 58 2 59 1 60 1 61 3 62 2 63 2 64 1 65...
... Platform Screw Motor Tension Nut Front Roller/Pulley Motor Tension Bolt Circuit Breaker Reed Switch Bracket Frame Receptical Controller Motor Pivot Bolt Latch Housing Transformer Electronics Bracket Upright Bolt Motor Bracket Power Cord Base Pad Left Upright Wheel Bolt Wheel Allen Wrench Frame Bolt Right Upright Storage Latch 3/8" Star Washer Handrail Bracket Ferrite Box Key/Clip Latch Decal Filter Console Base Incline Pin Incline Leg Console Cover Book Rack Wire Cover Power Switch Belt Guide Screw Wire Harness Grommet 55 1 56 13 57 1 58 2 59 1 60 1 61 3 62 2 63 2 64 1 65...

User Manual
Page 24
... following information: • the MODEL NUMBER of the product (WETL1614.2) • the NAME of the product (WESLO CADENCE 65 treadmill) • the SERIAL NUMBER of the product (see the front cover of this product, or if you encounter any problems with this manual) • the KEY NUMBER and DESCRIPTION of the part(s) (see the PART LIST and the EXPLODED DRAWING on pages 21 to order replacement parts, contact the ICON Health & Fitness...
... following information: • the MODEL NUMBER of the product (WETL1614.2) • the NAME of the product (WESLO CADENCE 65 treadmill) • the SERIAL NUMBER of the product (see the front cover of this product, or if you encounter any problems with this manual) • the KEY NUMBER and DESCRIPTION of the part(s) (see the PART LIST and the EXPLODED DRAWING on pages 21 to order replacement parts, contact the ICON Health & Fitness...


