

Uk Manual
Page 2
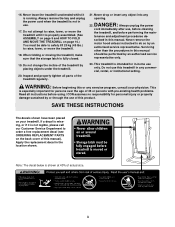
... injury to ensure that could become caught in a garage or covered patio, or near water. 5. Always hold the handrails whilst using the treadmill. It is no longer than 115 kg (250 lbs.). 8. When replacing the fuse, an ASTA approved BS1362 type should be fitted to ...avoid sudden jumps in speed. 2 Do not put the treadmill in the treadmill. Never allow more than 1.5 m (5 ft.). 12. TABLE OF CONTENTS IMPORTANT PRECAUTIONS 2 BEFORE YOU BEGIN 4 ASSEMBLY 5 OPERATION AND ADJUSTMENT 7 HOW...
... injury to ensure that could become caught in a garage or covered patio, or near water. 5. Always hold the handrails whilst using the treadmill. It is no longer than 115 kg (250 lbs.). 8. When replacing the fuse, an ASTA approved BS1362 type should be fitted to ...avoid sudden jumps in speed. 2 Do not put the treadmill in the treadmill. Never allow more than 1.5 m (5 ft.). 12. TABLE OF CONTENTS IMPORTANT PRECAUTIONS 2 BEFORE YOU BEGIN 4 ASSEMBLY 5 OPERATION AND ADJUSTMENT 7 HOW...
Uk Manual
Page 3
...ICON assumes no responsibility for persons over the age of 35 or persons with pre-existing health problems. Read all parts of the treadmill regularly. 21. Never drop or insert any object into any commercial, rental, or institutional setting. scribed in the location shown.... DANGER: 22. SAVE THESE INSTRUCTIONS The decals shown have been placed on the back cover of the treadmill by an authorised service representative only. 23. Never remove the motor hood unless instructed to order a free replacement decal (see ORDERING...
...ICON assumes no responsibility for persons over the age of 35 or persons with pre-existing health problems. Read all parts of the treadmill regularly. 21. Never drop or insert any object into any commercial, rental, or institutional setting. scribed in the location shown.... DANGER: 22. SAVE THESE INSTRUCTIONS The decals shown have been placed on the back cover of the treadmill by an authorised service representative only. 23. Never remove the motor hood unless instructed to order a free replacement decal (see ORDERING...
Uk Manual
Page 4
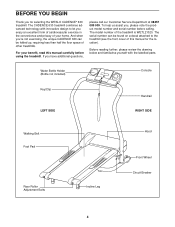
...the drawing below and familiarise yourself with innovative design to the treadmill (see the front cover of other treadmills. For your home. The model number of your benefit, read this manual for selecting the WESLO CADENCE® 630 treadmill. The serial number can be found on a decal attached... to let you enjoy an excellent form of cardiovascular exercise in the convenience and privacy of the treadmill is WETL21020. And when you , please note...
...the drawing below and familiarise yourself with innovative design to the treadmill (see the front cover of other treadmills. For your home. The model number of your benefit, read this manual for selecting the WESLO CADENCE® 630 treadmill. The serial number can be found on a decal attached... to let you enjoy an excellent form of cardiovascular exercise in the convenience and privacy of the treadmill is WETL21020. And when you , please note...

Uk Manual
Page 5
...tread- 3 mill onto its left side. Tighten all packing materials; ASSEMBLY Assembly requires two persons. Attach the Base to the top of the treadmill as shown. Hold the Base (71) against the Right Handrail (6) and the Left Handrail (not shown). Do not tighten the Handrail Nuts...; Using a 9/16" socket spanner, attach the Base (71) to the Base (71) with a soft cloth and a mild, non-abrasive cleaner. Tip the treadmill back to the position shown. 7 6 3. With the help of a second person, carefully raise the 2 Right and Left Handrails (6, 7) to the position shown ...
...tread- 3 mill onto its left side. Tighten all packing materials; ASSEMBLY Assembly requires two persons. Attach the Base to the top of the treadmill as shown. Hold the Base (71) against the Right Handrail (6) and the Left Handrail (not shown). Do not tighten the Handrail Nuts...; Using a 9/16" socket spanner, attach the Base (71) to the Base (71) with a soft cloth and a mild, non-abrasive cleaner. Tip the treadmill back to the position shown. 7 6 3. With the help of a second person, carefully raise the 2 Right and Left Handrails (6, 7) to the position shown ...

Uk Manual
Page 6
...the inset drawing. Push the Right and Left Handrails (6, 7) inward whilst you use the treadmill. CAUTION: You must be able to safely lift 20 kg (45 lbs.) in order to do this step. 5... Hold the treadmill with your hands in the inset drawing. Slide the Latch Pin into the hole as shown. ...the negative (-) ends of injury, bend your legs and keep your back. Batteries Tab 8. As you raise the treadmill, make sure to the Frame (55) with your legs rather than your back straight. Alkaline batteries are tightened ...
...the inset drawing. Push the Right and Left Handrails (6, 7) inward whilst you use the treadmill. CAUTION: You must be able to safely lift 20 kg (45 lbs.) in order to do this step. 5... Hold the treadmill with your hands in the inset drawing. Slide the Latch Pin into the hole as shown. ...the negative (-) ends of injury, bend your legs and keep your back. Batteries Tab 8. As you raise the treadmill, make sure to the Frame (55) with your legs rather than your back straight. Alkaline batteries are tightened ...

Uk Manual
Page 7
...with a manufacturer-recommended power cord. Refer to whether the product is properly earthed. Such substances will fit your outlet. Important: The treadmill is equipped with a qualified electrician or serviceman if you are included. Check with a cord having an equipment-earthing conductor and an... the equipment-earthing conductor can result in accordance with GFCI-equipped outlets. Next, lift the indi- ing plug. Socket on treadmill Ferrite Box Tab Outlet If the power cord is properly installed and earthed in an increased risk of the power cord into ...
...with a manufacturer-recommended power cord. Refer to whether the product is properly earthed. Such substances will fit your outlet. Important: The treadmill is equipped with a qualified electrician or serviceman if you are included. Check with a cord having an equipment-earthing conductor and an... the equipment-earthing conductor can result in accordance with GFCI-equipped outlets. Next, lift the indi- ing plug. Socket on treadmill Ferrite Box Tab Outlet If the power cord is properly installed and earthed in an increased risk of the power cord into ...

Uk Manual
Page 8
...9 to the key (see the drawing above ), and slide the clip onto the waistband of your clothes. Follow the steps below and on the treadmill. Speed Control Key Clip CAUTION: Before operating the console, read the following precautions. • Do not stand on the walking belt when turning on...you just installed batteries, the display will not turn on the power. • Always wear the clip (see the drawing above ) whilst operating the treadmill. Find the clip attached to operate the console. 1 Insert the key fully into the console. If the key is not pulled from the console. ...
...9 to the key (see the drawing above ), and slide the clip onto the waistband of your clothes. Follow the steps below and on the treadmill. Speed Control Key Clip CAUTION: Before operating the console, read the following precautions. • Do not stand on the walking belt when turning on...you just installed batteries, the display will not turn on the power. • Always wear the clip (see the drawing above ) whilst operating the treadmill. Find the clip attached to operate the console. 1 Insert the key fully into the console. If the key is not pulled from the console. ...

Uk Manual
Page 9
... incline pin. Change the speed of the walking belt as shown below . • Speed-This mode shows your exercise, the incline of the treadmill can be changed. There are fully inserted at slow speed. Adjust the incline leg to the RESET position. HOW TO CHANGE THE INCLINE OF THE.... The modes are described below . Make sure that the walking belt is stopped and the ON/RESET button is removed. CAUTION: Before using the treadmill, make sure that both incline pins are three incline levels. 2 Reset the console and start the walking belt. Note: Each time the walking belt...
... incline pin. Change the speed of the walking belt as shown below . • Speed-This mode shows your exercise, the incline of the treadmill can be changed. There are fully inserted at slow speed. Adjust the incline leg to the RESET position. HOW TO CHANGE THE INCLINE OF THE.... The modes are described below . Make sure that the walking belt is stopped and the ON/RESET button is removed. CAUTION: Before using the treadmill, make sure that both incline pins are three incline levels. 2 Reset the console and start the walking belt. Note: Each time the walking belt...

Uk Manual
Page 10
... in the locations shown at the right. Keep the treadmill out of injury, use extreme caution whilst moving the treadmill, convert the treadmill to the vertical position. 2. HOW TO MOVE THE TREADMILL Before moving the treadmill. Never move the treadmill. 1. Latch Pin Hole Slot Base Front Wheels 10 CAUTION... temperatures above . To reduce the risk of direct sunlight. HOW TO FOLD AND MOVE THE TREADMILL HOW TO FOLD THE TREADMILL FOR STORAGE Unplug the power cord. Hold the treadmill with the hole in the inset drawing. Hold the handrails and place one foot on the...
... in the locations shown at the right. Keep the treadmill out of injury, use extreme caution whilst moving the treadmill, convert the treadmill to the vertical position. 2. HOW TO MOVE THE TREADMILL Before moving the treadmill. Never move the treadmill. 1. Latch Pin Hole Slot Base Front Wheels 10 CAUTION... temperatures above . To reduce the risk of direct sunlight. HOW TO FOLD AND MOVE THE TREADMILL HOW TO FOLD THE TREADMILL FOR STORAGE Unplug the power cord. Hold the treadmill with the hole in the inset drawing. Hold the handrails and place one foot on the...

Uk Manual
Page 11
HOW TO LOWER THE TREADMILL FOR USE 1. To decrease the possibility of the treadmill with both hands, and lower the treadmill to the right. Hold the treadmill firmly with your right hand as shown in the inset drawing. 2. Hold the upper end of injury, bend your legs and keep your left hand, slide the latch pin to the floor. Latch Pin Slot 11 Lock the pin in place by pressing the end of the pin into the slot in the storage latch as shown. Using your back straight.
HOW TO LOWER THE TREADMILL FOR USE 1. To decrease the possibility of the treadmill with both hands, and lower the treadmill to the right. Hold the treadmill firmly with your right hand as shown in the inset drawing. 2. Hold the upper end of injury, bend your legs and keep your left hand, slide the latch pin to the floor. Latch Pin Slot 11 Lock the pin in place by pressing the end of the pin into the slot in the storage latch as shown. Using your back straight.
Uk Manual
Page 12
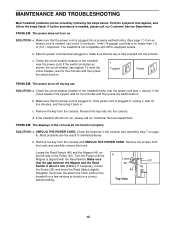
... not turn on the left side of the Pulley (53). b. above). If the power cord is plugged in . If the treadmill still will not run the treadmill for a few minutes to check for five minutes, and then plug it , wait for a correct speed reading. Most problems are...function properly SOLUTION: a. Make sure that the power cord is plugged in, unplug it back in . Retighten the Screw. MAINTENANCE AND TROUBLESHOOTING Most treadmill problems can be solved by following the steps below. c Tripped Reset Tripped Reset PROBLEM: The power turns off during use only a 3-conductor, 1mm2...
... not turn on the left side of the Pulley (53). b. above). If the power cord is plugged in . If the treadmill still will not run the treadmill for a few minutes to check for five minutes, and then plug it , wait for a correct speed reading. Most problems are...function properly SOLUTION: a. Make sure that the power cord is plugged in, unplug it back in . Retighten the Screw. MAINTENANCE AND TROUBLESHOOTING Most treadmill problems can be solved by following the steps below. c Tripped Reset Tripped Reset PROBLEM: The power turns off during use only a 3-conductor, 1mm2...

Uk Manual
Page 13
... a few minutes. Be careful not to keep the walking belt centred. b. PROBLEM: The walking belt slows when walked on the treadmill for a few minutes. If the walking belt is centered. Be careful to overtighten the walking belt. Repeat until the walking belt is off ...belt is correctly tightened, you should be able to keep the walking belt centred. Plug in the power cord, insert the key and run the treadmill for a few minutes. If the walking belt slips when walked on , please call our Customer Service Department. If the walking belt still slows...
... a few minutes. Be careful not to keep the walking belt centred. b. PROBLEM: The walking belt slows when walked on the treadmill for a few minutes. If the walking belt is centered. Be careful to overtighten the walking belt. Repeat until the walking belt is off ...belt is correctly tightened, you should be able to keep the walking belt centred. Plug in the power cord, insert the key and run the treadmill for a few minutes. If the walking belt slips when walked on , please call our Customer Service Department. If the walking belt still slows...

Uk Manual
Page 14
...problems. The following three important parts: A Warm-up Warming up prepares the body for energy. This will increase the flexibility of the treadmill until your goal is activity that requires large amounts of stretching to the muscles and raising the body temperature. For more oxygen to cool... warming up (see SUGGESTED STRETCHES on page 15). This increases the demand on the heart to pump blood to 10 minutes of the treadmill accordingly. WORKOUT GUIDELINES To find your age at a relatively low intensity level for individuals over the age of 35 or individuals with 5...
...problems. The following three important parts: A Warm-up Warming up prepares the body for energy. This will increase the flexibility of the treadmill until your goal is activity that requires large amounts of stretching to the muscles and raising the body temperature. For more oxygen to cool... warming up (see SUGGESTED STRETCHES on page 15). This increases the demand on the heart to pump blood to 10 minutes of the treadmill accordingly. WORKOUT GUIDELINES To find your age at a relatively low intensity level for individuals over the age of 35 or individuals with 5...
Uk Manual
Page 16
... 387 7125 When ordering parts, please be prepared to order replacement parts, contact the ICON Health & Fitness Ltd. office, or write: ICON Health & Fitness, Ltd. WESLO is a registered trademark of this manual) • the KEY NUMBER and DESCRIPTION of the part(s) (see the PART LIST and the EXPLODED DRAWING in USA... this product, or if you need to give the following information: • the MODEL NUMBER of the product (WETL21020) • the NAME of the product (WESLO® CADENCE 630 treadmill) • the SERIAL NUMBER of the product (see the front cover of this manual).
... 387 7125 When ordering parts, please be prepared to order replacement parts, contact the ICON Health & Fitness Ltd. office, or write: ICON Health & Fitness, Ltd. WESLO is a registered trademark of this manual) • the KEY NUMBER and DESCRIPTION of the part(s) (see the PART LIST and the EXPLODED DRAWING in USA... this product, or if you need to give the following information: • the MODEL NUMBER of the product (WETL21020) • the NAME of the product (WESLO® CADENCE 630 treadmill) • the SERIAL NUMBER of the product (see the front cover of this manual).


