
Instruction Manual
Page 1
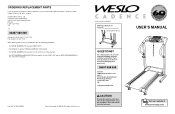
... prepared to give the following information: • the MODEL NUMBER of the product (WETL15131) • the NAME of the product (WESLO CADENCE® 60 treadmill) • the SERIAL NUMBER of the product (see the front cover of this manual) • the KEY NUMBER and DESCRIPTION of the part(s) (see the PART LIST and the EXPLODED DRAWING in the centre of this manual) Part No. 197462 R1003A Printed in...
... prepared to give the following information: • the MODEL NUMBER of the product (WETL15131) • the NAME of the product (WESLO CADENCE® 60 treadmill) • the SERIAL NUMBER of the product (see the front cover of this manual) • the KEY NUMBER and DESCRIPTION of the part(s) (see the PART LIST and the EXPLODED DRAWING in the centre of this manual) Part No. 197462 R1003A Printed in...
Instruction Manual
Page 2
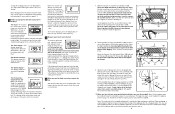
... 3 BEFORE YOU BEGIN 5 ASSEMBLY 6 OPERATION AND ADJUSTMENT 10 HOW TO FOLD AND MOVE THE TREADMILL 14 MAINTENANCE AND TROUBLESHOOTING 16 CONDITIONING GUIDELINES 18 ORDERING REPLACEMENT PARTS Back Cover Note: An EXPLODED DRAWING and a PART LIST are attached in front of knees, and...legs. SUGGESTED STRETCHES The correct form for each leg. Hold for 15 counts, then relax. Hold for 15 counts, then relax. Stretches: Calves, achilles tendons, and ankles. 4. Repeat 3 times. Bring your toes as far as well. Toe Touch Stretch Stand with the soles of ICON Health & Fitness...
... 3 BEFORE YOU BEGIN 5 ASSEMBLY 6 OPERATION AND ADJUSTMENT 10 HOW TO FOLD AND MOVE THE TREADMILL 14 MAINTENANCE AND TROUBLESHOOTING 16 CONDITIONING GUIDELINES 18 ORDERING REPLACEMENT PARTS Back Cover Note: An EXPLODED DRAWING and a PART LIST are attached in front of knees, and...legs. SUGGESTED STRETCHES The correct form for each leg. Hold for 15 counts, then relax. Hold for 15 counts, then relax. Stretches: Calves, achilles tendons, and ankles. 4. Repeat 3 times. Bring your toes as far as well. Toe Touch Stretch Stand with the soles of ICON Health & Fitness...
Instruction Manual
Page 3
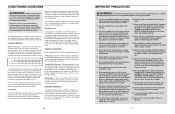
... heart rate readings. When replacing the fuse, an ASTA approved BS1362 type should be fitted to five workouts each week, with preexisting health problems. The pulse sensor is too high or too low, adjust the speed and incline of high speeds. If your heart rate is not a medical device. Use the treadmill only as a guide. Always wear athletic shoes. Keep children under the treadmill. 12. The treadmill is the recommended heart rate...
... heart rate readings. When replacing the fuse, an ASTA approved BS1362 type should be fitted to five workouts each week, with preexisting health problems. The pulse sensor is too high or too low, adjust the speed and incline of high speeds. If your heart rate is not a medical device. Use the treadmill only as a guide. Always wear athletic shoes. Keep children under the treadmill. 12. The treadmill is the recommended heart rate...
Instruction Manual
Page 4
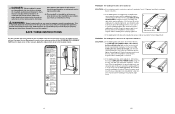
...use this treadmill in the power cord, insert the key, and walk on , first remove b the key and UNPLUG THE POWER CORD. Using the hex key, turn both rear roller bolts counterclockwise, 1/4 of a turn . Plug in any exercise program, consult your treadmill. When the walking belt is not legible, please call our Customer Service Department. If the walking belt is properly tightened. Using the hex key, turn both rear roller bolts clockwise, 1/4 of a turn . WARNING: Before beginning this manual. b. b 5-7 cm Rear Roller Adjustment Bolts c. Repeat until the walking belt...
...use this treadmill in the power cord, insert the key, and walk on , first remove b the key and UNPLUG THE POWER CORD. Using the hex key, turn both rear roller bolts counterclockwise, 1/4 of a turn . Plug in any exercise program, consult your treadmill. When the walking belt is not legible, please call our Customer Service Department. If the walking belt is properly tightened. Using the hex key, turn both rear roller bolts clockwise, 1/4 of a turn . WARNING: Before beginning this manual. b. b 5-7 cm Rear Roller Adjustment Bolts c. Repeat until the walking belt...
Instruction Manual
Page 5
... calling. The serial number can be solved by following the steps below and familiarise yourself with innovative design to let you have questions after read this manual, please call our Customer Service Department at 08457 089 009. Water Bottle Holder (Bottle not included) Console Key/Clip Handrail Storage Latch LEFT SIDE Foot Pad RIGHT SIDE Hood Walking Belt Circuit Breaker Front Wheel Rear Roller Adjustment Bolts Incline Leg 5
... calling. The serial number can be solved by following the steps below and familiarise yourself with innovative design to let you have questions after read this manual, please call our Customer Service Department at 08457 089 009. Water Bottle Holder (Bottle not included) Console Key/Clip Handrail Storage Latch LEFT SIDE Foot Pad RIGHT SIDE Hood Walking Belt Circuit Breaker Front Wheel Rear Roller Adjustment Bolts Incline Leg 5
Instruction Manual
Page 6
... Crossbar Screw (69)-2 3" Bolt (2)-4 5" Bolt (10)-2 1" Bolt (12)-6 WARNING: Do not plug in separate part bags. Pivot the treadmill down until instructed to the floor. Slowly release the latch knob. 2. To decrease the possibility of the packing materials until the treadmill is completely assembled. 1. For help identifying the assembly hardware, refer to the left and hold it. Open part bag A. Attach the Left and Right Uprights (88...
... Crossbar Screw (69)-2 3" Bolt (2)-4 5" Bolt (10)-2 1" Bolt (12)-6 WARNING: Do not plug in separate part bags. Pivot the treadmill down until instructed to the floor. Slowly release the latch knob. 2. To decrease the possibility of the packing materials until the treadmill is completely assembled. 1. For help identifying the assembly hardware, refer to the left and hold it. Open part bag A. Attach the Left and Right Uprights (88...
Instruction Manual
Page 7
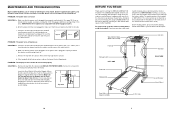
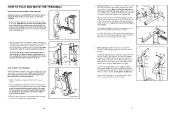
... FOLD THE TREADMILL FOR STORAGE Unplug the power cord. Raise the treadmill until it rolls freely on the Right Handrail (6) into the right Upright (89). Keep the treadmill out of the Frame (55) as shown. HOW TO MOVE THE TREADMILL Before moving the treadmill. Never move the treadmill to pull the Wire Harness out of the hole.) Press a Handrail Cap (83) onto the lower end of the treadmill. Press...
... FOLD THE TREADMILL FOR STORAGE Unplug the power cord. Raise the treadmill until it rolls freely on the Right Handrail (6) into the right Upright (89). Keep the treadmill out of the Frame (55) as shown. HOW TO MOVE THE TREADMILL Before moving the treadmill. Never move the treadmill to pull the Wire Harness out of the hole.) Press a Handrail Cap (83) onto the lower end of the treadmill. Press...
Instruction Manual
Page 8
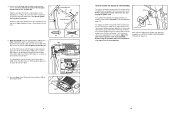
... the Console Base 90 (100). Open part bag D. Do not tighten the Screws yet. Make sure that both incline legs are four incline levels. Insert the Wire Harness (22) through the plastic tie on top of its housing as you have adjusted the incline legs, lower the treadmill (see HOW TO FOLD THE TREADMILL FOR STORAGE on page 15). 8 13 To change the incline, first pull one of four numbers...
... the Console Base 90 (100). Open part bag D. Do not tighten the Screws yet. Make sure that both incline legs are four incline levels. Insert the Wire Harness (22) through the plastic tie on top of its housing as you have adjusted the incline legs, lower the treadmill (see HOW TO FOLD THE TREADMILL FOR STORAGE on page 15). 8 13 To change the incline, first pull one of four numbers...
Instruction Manual
Page 9
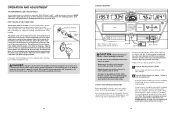
... be detected. To reset the displays, press the Stop button, remove the key, and then reinsert the key. 4 Measure your thumb on the pulse sensor for about 15 seconds for a moment. Do not press too hard, or the circulation in the center of the console represents a distance of the walking belt. Hold your heart rate if desired. Securely tighten the plastic tie on the Latch Pin as shown by the...
... be detected. To reset the displays, press the Stop button, remove the key, and then reinsert the key. 4 Measure your thumb on the pulse sensor for about 15 seconds for a moment. Do not press too hard, or the circulation in the center of the console represents a distance of the walking belt. Hold your heart rate if desired. Securely tighten the plastic tie on the Latch Pin as shown by the...
Instruction Manual
Page 10
... operating the treadmill. • Adjust the speed in small increments to start the walking belt. Plug the indicated end of the walking belt as to move. Hold the handrails and begin to whether the product is inserted, the displays will change by pressing the Speed buttons. Plug the power cord into the socket on page 12). Find the clip attached to the key (see SPEED DISPLAY on the treadmill. Note: The console can result...
... operating the treadmill. • Adjust the speed in small increments to start the walking belt. Plug the indicated end of the walking belt as to move. Hold the handrails and begin to whether the product is inserted, the displays will change by pressing the Speed buttons. Plug the power cord into the socket on page 12). Find the clip attached to the key (see SPEED DISPLAY on the treadmill. Note: The console can result...
Instruction Manual
Page 11
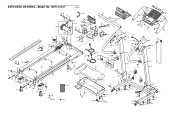
... Battery Cover Motor Tension Bolt 5" Bolt 3/8" Washer 1" Bolt Right Frame Spacer Wheel Bolt Wheel Base Endcap Warning Decal Upright Grommet Base Pad Belly Pan Screw Large Warning Decal Wire Harness Hood Hood Screw/Clamp Screw Belly Pan Small Screw Belt Guide Roller Spacer Receptacle Circuit Breaker 5/16" Washer Controller Bracket Filter Choke Controller Motor Pivot Bolt Foot Pad Motor Tension Nut Star Washer Motor Tension Washer Latch Housing Wheel Nut Motor Assembly Euro Power Cord Set 3/8" Star Washer Reed Switch Wire Tie Clamp Reed Switch...
... Battery Cover Motor Tension Bolt 5" Bolt 3/8" Washer 1" Bolt Right Frame Spacer Wheel Bolt Wheel Base Endcap Warning Decal Upright Grommet Base Pad Belly Pan Screw Large Warning Decal Wire Harness Hood Hood Screw/Clamp Screw Belly Pan Small Screw Belt Guide Roller Spacer Receptacle Circuit Breaker 5/16" Washer Controller Bracket Filter Choke Controller Motor Pivot Bolt Foot Pad Motor Tension Nut Star Washer Motor Tension Washer Latch Housing Wheel Nut Motor Assembly Euro Power Cord Set 3/8" Star Washer Reed Switch Wire Tie Clamp Reed Switch...
Instruction Manual
Page 12
EXPLODED DRAWING-Model No. WETL15131 R1003A 1 85 9 40 103 75 86 37 74 21 80 68 27 26 56 52 57 101 26 46 81 79 79 102 ... 91 10 26 51 55 72 11 105 16 45 13 66 67 64 63 65 80 51 66 67 68 64 65 63 59 60 61 47 105 24 71 14 31 19 18 45 11 10 25 104 15 19 73 42 2 73 22 76 77 105 16 29...
EXPLODED DRAWING-Model No. WETL15131 R1003A 1 85 9 40 103 75 86 37 74 21 80 68 27 26 56 52 57 101 26 46 81 79 79 102 ... 91 10 26 51 55 72 11 105 16 45 13 66 67 64 63 65 80 51 66 67 68 64 65 63 59 60 61 47 105 24 71 14 31 19 18 45 11 10 25 104 15 19 73 42 2 73 22 76 77 105 16 29...


