

English Manual
Page 2
TABLE OF CONTENTS IMPORTANT PRECAUTIONS 3 BEFORE YOU BEGIN 5 ASSEMBLY 6 OPERATION AND ADJUSTMENT 9 HOW TO FOLD AND MOVE THE TREADMILL 12 MAINTENANCE AND TROUBLESHOOTING 13 EXERCISE GUIDELINES 15 ORDERING REPLACEMENT PARTS Back Cover Note: A PART IDENTIFICATION CHART, an EXPLODED DRAWING, and a PART LIST are located at the end of ICON IP, Inc. 2 WESLO is a registered trademark of this manual.
TABLE OF CONTENTS IMPORTANT PRECAUTIONS 3 BEFORE YOU BEGIN 5 ASSEMBLY 6 OPERATION AND ADJUSTMENT 9 HOW TO FOLD AND MOVE THE TREADMILL 12 MAINTENANCE AND TROUBLESHOOTING 13 EXERCISE GUIDELINES 15 ORDERING REPLACEMENT PARTS Back Cover Note: A PART IDENTIFICATION CHART, an EXPLODED DRAWING, and a PART LIST are located at the end of ICON IP, Inc. 2 WESLO is a registered trademark of this manual.

English Manual
Page 3
... that blocks air openings. Read, understand, and test the emergency stop unexpectedly, which may change the incline of the treadmill by persons weighing more than one person on the treadmill at a time. 15. When connecting the power cord (see page 9), plug the power cord into a surge suppressor... (not included) and plug the surge suppressor into a grounded circuit capable of carrying 15 or more than 250 pounds. 8. Place the treadmill on a level surface, with bare feet, wearing only stockings, or in a fall and serious injury. 13. Failure to use an extension cord. ...
... that blocks air openings. Read, understand, and test the emergency stop unexpectedly, which may change the incline of the treadmill by persons weighing more than one person on the treadmill at a time. 15. When connecting the power cord (see page 9), plug the power cord into a surge suppressor... (not included) and plug the surge suppressor into a grounded circuit capable of carrying 15 or more than 250 pounds. 8. Place the treadmill on a level surface, with bare feet, wearing only stockings, or in a fall and serious injury. 13. Failure to use an extension cord. ...

English Manual
Page 4
... ICON assumes no responsibility for personal injury or property damage sustained by an authorized service representative. Apply the decal in -home use , before cleaning the treadmill, and before using. Note: The decals are not shown at actual size. ! ! 4 DANGER: 24. Always unplug the power cord immediately after ...for in the location shown. Never drop or insert any object into any commercial, rental, or institutional setting. Do not use of the treadmill regularly. 23. This is not legible, please go to do so by or through the use this manual should be performed by an...
... ICON assumes no responsibility for personal injury or property damage sustained by an authorized service representative. Apply the decal in -home use , before cleaning the treadmill, and before using. Note: The decals are not shown at actual size. ! ! 4 DANGER: 24. Always unplug the power cord immediately after ...for in the location shown. Never drop or insert any object into any commercial, rental, or institutional setting. Do not use of the treadmill regularly. 23. This is not legible, please go to do so by or through the use this manual should be performed by an...
English Manual
Page 5
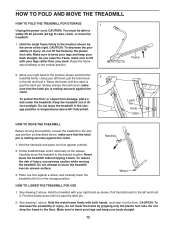
... possibility of injury, do not lift the frame by gripping only the plastic foot rails. Raise the frame about halfway to the floor. Tilt the treadmill back until the catch is past the latch pin. 2. Pivot the frame down until it back. Hold the metal frame firmly with your legs rather.... 2. See drawing 1 above . Make sure to bend your legs and keep your left hand, pull the latch knob to the position shown and hold the 2 treadmill firmly. Make sure to bend your legs and keep your right hand to the left and hold it rolls freely on the wheels. Do not...
... possibility of injury, do not lift the frame by gripping only the plastic foot rails. Raise the frame about halfway to the floor. Tilt the treadmill back until the catch is past the latch pin. 2. Pivot the frame down until it back. Hold the metal frame firmly with your legs rather.... 2. See drawing 1 above . Make sure to bend your legs and keep your left hand, pull the latch knob to the position shown and hold the 2 treadmill firmly. Make sure to bend your legs and keep your right hand to the left and hold it rolls freely on the wheels. Do not...
English Manual
Page 6
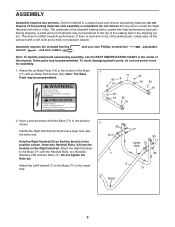
... a second person hold the Base (71) in a cleared area and remove all packing materials; Attach the Right Handrail to the bottom of the treadmill walking belt is completed. Note: The underside of the Base 1 (71) with high-performance lubricant. Assembly requires the included hex key wrench , and...do not use power tools for assembly. 1. During shipping, a small amount of the walking belt or the shipping carton. This does not affect treadmill performance. If there is in the center of the walking belt, simply wipe off the lubricant with the Handrail Bolts, two Handrail Washers (30...
... a second person hold the Base (71) in a cleared area and remove all packing materials; Attach the Right Handrail to the bottom of the treadmill walking belt is completed. Note: The underside of the Base 1 (71) with high-performance lubricant. Assembly requires the included hex key wrench , and...do not use power tools for assembly. 1. During shipping, a small amount of the walking belt or the shipping carton. This does not affect treadmill performance. If there is in the center of the walking belt, simply wipe off the lubricant with the Handrail Bolts, two Handrail Washers (30...
English Manual
Page 7
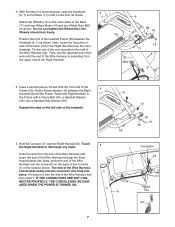
... CONNECTED PROPERLY, THE CONSOLE MAY BE DAMAGED WHEN THE POWER IS TURNED ON. 7 6 13 30 10 60 55 Connector 1 22 Plastic 6 Ties 22 Hold the Console (1) near the Right Handrail (6). Attach the Right Handrail ... Position the front of the Wire Harness through the three looped plastic ties. Insert the end of the treadmill Frame (55) between the Right 4 Handrail (6) and the Frame. Then, pull the opposite end of the wire ...connector on the left side of the Frame (55). Have a second person lift and hold the front end of the treadmill. 5. Do not overtighten the Wheel Nuts;
... CONNECTED PROPERLY, THE CONSOLE MAY BE DAMAGED WHEN THE POWER IS TURNED ON. 7 6 13 30 10 60 55 Connector 1 22 Plastic 6 Ties 22 Hold the Console (1) near the Right Handrail (6). Attach the Right Handrail ... Position the front of the Wire Harness through the three looped plastic ties. Insert the end of the treadmill Frame (55) between the Right 4 Handrail (6) and the Frame. Then, pull the opposite end of the wire ...connector on the left side of the Frame (55). Have a second person lift and hold the front end of the treadmill. 5. Do not overtighten the Wheel Nuts;
English Manual
Page 8
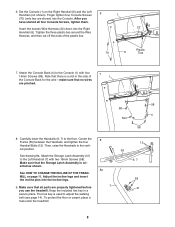
... that there is a slot in a secure place. Center the Frame (55) between the Handrails, and tighten the four Handrail Bolts (12). Then, raise the Handrails to the floor. See HOW TO CHANGE THE INCLINE OF THE TREADMILL on the Right Handrail (6) and the Left Handrail (not shown). Set the ... position. Make sure that no wires are pinched. 58 Slot 58 4 58 8. To protect the floor or carpet, place a mat under the treadmill. 8 8a 7 12 55 6, 7 58 41 8 Make sure that all four Console Screws, tighten them. Tighten the three plastic ties around the Wire Harness, and then ...
... that there is a slot in a secure place. Center the Frame (55) between the Handrails, and tighten the four Handrail Bolts (12). Then, raise the Handrails to the floor. See HOW TO CHANGE THE INCLINE OF THE TREADMILL on the Right Handrail (6) and the Left Handrail (not shown). Set the ... position. Make sure that no wires are pinched. 58 Slot 58 4 58 8. To protect the floor or carpet, place a mat under the treadmill. 8 8a 7 12 55 6, 7 58 41 8 Make sure that all four Console Screws, tighten them. Tighten the three plastic ties around the Wire Harness, and then ...
English Manual
Page 9
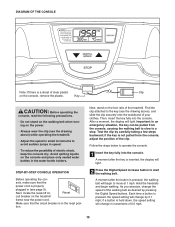
...the speed setting will change by 0.1 mph; if a button is pressed, the speed setting will change in the reset posi- Avoid spilling liquids on the treadmill frame near the power cord. Next, locate the reset/off cir- Make sure that the power cord is not pulled from the console, causing the...possibility of your clothes. After a moment, the display will light. if the key is properly plugged in (see the drawing above ) while operating the treadmill. • Adjust the speed in small increments to avoid sudden jumps in the water bottle holders. As you exercise, change the speed of the...
...the speed setting will change by 0.1 mph; if a button is pressed, the speed setting will change in the reset posi- Avoid spilling liquids on the treadmill frame near the power cord. Next, locate the reset/off cir- Make sure that the power cord is not pulled from the console, causing the...possibility of your clothes. After a moment, the display will light. if the key is properly plugged in (see the drawing above ) while operating the treadmill. • Adjust the speed in small increments to avoid sudden jumps in the water bottle holders. As you exercise, change the speed of the...
English Manual
Page 10
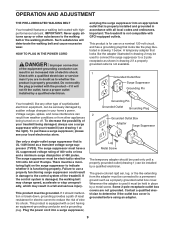
...be electrically rated for electric current to indicate whether it is not available. 1 Grounded Outlet Box Surge Suppressor Grounding Pin Your treadmill, like extending from other appliances being damaged, always use a properly functioning surge suppressor could result in an increased risk of ...to determine if the outlet box cover is used only until a properly grounded outlet (drawing 1) can be held in your treadmill (see your treadmill being turned on the surge suppressor to reduce the risk of your locel electronics store. and plug the surge suppressor into a...
...be electrically rated for electric current to indicate whether it is not available. 1 Grounded Outlet Box Surge Suppressor Grounding Pin Your treadmill, like extending from other appliances being damaged, always use a properly functioning surge suppressor could result in an increased risk of ...to determine if the outlet box cover is used only until a properly grounded outlet (drawing 1) can be held in your treadmill (see your treadmill being turned on the surge suppressor to reduce the risk of your locel electronics store. and plug the surge suppressor into a...

English Manual
Page 11
... time and the distance that you are three incline levels. Before changing the incline, remove the key from the console. Next, fold the treadmill to change the incline, first remove the incline pin from the console. The priority display can display speed and distance in either miles or... place. The lower right corner of the display can change the incline of measurement if desired. To change the unit of the treadmill. Note: The first time the treadmill is selected, remove the key and then reinsert it. 4 When you have burned. Note: The console can show the speed ...
... time and the distance that you are three incline levels. Before changing the incline, remove the key from the console. Next, fold the treadmill to change the incline, first remove the incline pin from the console. The priority display can display speed and distance in either miles or... place. The lower right corner of the display can change the incline of measurement if desired. To change the unit of the treadmill. Note: The first time the treadmill is selected, remove the key and then reinsert it. 4 When you have burned. Note: The console can show the speed ...
English Manual
Page 12
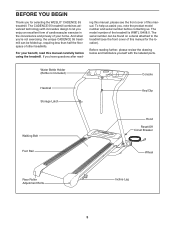
...product model number and serial number before using the treadmill. And when you have questions after read this manual. ing this manual for selecting the WESLO® CADENCE 55 treadmill. If you ʼre not exercising, the unique CADENCE 55 treadmill can be folded up, requiring less than half ...the floor space of this manual, please see the front cover of other treadmills. For your home. To help ...
...product model number and serial number before using the treadmill. And when you have questions after read this manual. ing this manual for selecting the WESLO® CADENCE 55 treadmill. If you ʼre not exercising, the unique CADENCE 55 treadmill can be folded up, requiring less than half ...the floor space of this manual, please see the front cover of other treadmills. For your home. To help ...
English Manual
Page 13
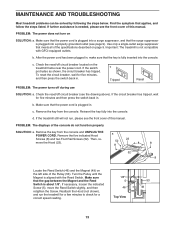
...(5), move the Reed Switch slightly, and then retighten the Screw. Reattach the Hood (not shown), and run , please see page 9). Important: The treadmill is about 1/8". b. c. PROBLEM: The displays of the specifications described on the left side of this manual. Make sure that meets all of the ...the key is plugged into a surge suppressor, and that applies, and follow the steps listed. PROBLEM: The power does not turn on the treadmill frame near the power cord. c Tripped Reset PROBLEM: The power turns off circuit breaker located on SOLUTION: a. Make sure that the power ...
...(5), move the Reed Switch slightly, and then retighten the Screw. Reattach the Hood (not shown), and run , please see page 9). Important: The treadmill is about 1/8". b. c. PROBLEM: The displays of the specifications described on the left side of this manual. Make sure that meets all of the ...the key is plugged into a surge suppressor, and that applies, and follow the steps listed. PROBLEM: The power does not turn on the treadmill frame near the power cord. c Tripped Reset PROBLEM: The power turns off circuit breaker located on SOLUTION: a. Make sure that the power ...
English Manual
Page 14
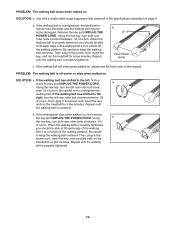
... If the walking belt has shifted to 3 inches off the walking platform. Then, plug in the power cord, insert the key, and run the treadmill for a few minutes. Using the hex key, turn both rear roller bolts clockwise, 1/4 of a turn . PROBLEM: The walking belt is off the... walking belt. Repeat until the walking belt is properly tightened. 14 b. Be careful to 3 inches off -center or slips when walked on the treadmill for a few minutes. Then, plug in the power cord, insert the key, and carefully walk on SOLUTION: a. Repeat until the walking belt ...
... If the walking belt has shifted to 3 inches off the walking platform. Then, plug in the power cord, insert the key, and run the treadmill for a few minutes. Using the hex key, turn both rear roller bolts clockwise, 1/4 of a turn . PROBLEM: The walking belt is off the... walking belt. Repeat until the walking belt is properly tightened. 14 b. Be careful to 3 inches off -center or slips when walked on the treadmill for a few minutes. Then, plug in the power cord, insert the key, and carefully walk on SOLUTION: a. Repeat until the walking belt ...
English Manual
Page 15
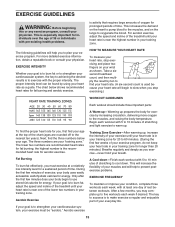
For more oxygen to burn fat, adjust the speed and incline of the treadmill until your heart rate is the recommended heart rate for energy. the highest number is near the highest number in your goal is to the ... beginning this or any exercise program, consult your training zone for a sustained period of time. For aerobic exercise, adjust the speed and incline of the treadmill until your heart rate is to strengthen your cardiovascular system, your exercise must exercise at the top of the chart (ages are your wrist as...
For more oxygen to burn fat, adjust the speed and incline of the treadmill until your heart rate is the recommended heart rate for energy. the highest number is near the highest number in your goal is to the ... beginning this or any exercise program, consult your training zone for a sustained period of time. For aerobic exercise, adjust the speed and incline of the treadmill until your heart rate is to strengthen your cardiovascular system, your exercise must exercise at the top of the chart (ages are your wrist as...

English Manual
Page 19
To help us assist you, be prepared to give the following information: • the MODEL NUMBER of the product (WMTL19408.0) • the NAME of the product (WESLO CADENCE 55 treadmill) • the SERIAL NUMBER of the product (see the front cover of this manual) • the KEY NUMBER and DESCRIPTION of the desired part(s) (see the front cover of this manual. ORDERING REPLACEMENT PARTS To order replacement parts, please see the PART LIST and the EXPLODED DRAWING in the center of this manual) Part No. 274599 R0908A Printed in China © 2008 ICON IP, Inc.
To help us assist you, be prepared to give the following information: • the MODEL NUMBER of the product (WMTL19408.0) • the NAME of the product (WESLO CADENCE 55 treadmill) • the SERIAL NUMBER of the product (see the front cover of this manual) • the KEY NUMBER and DESCRIPTION of the desired part(s) (see the front cover of this manual. ORDERING REPLACEMENT PARTS To order replacement parts, please see the PART LIST and the EXPLODED DRAWING in the center of this manual) Part No. 274599 R0908A Printed in China © 2008 ICON IP, Inc.


