

Uk Manual
Page 1
... and instructions in the space above for future reference. USER'S MANUAL If you have questions, or if there are committed to providing complete customer satisfaction. Write the serial number in this manual before using this manual for future reference. As a manufacturer, we are missing or damaged parts, please call: 08457 089 009 or write: ICON Health & Fitness, Ltd. Serial Number Decal QUESTIONS? Model No. WETL15805.1 Serial No...
... and instructions in the space above for future reference. USER'S MANUAL If you have questions, or if there are committed to providing complete customer satisfaction. Write the serial number in this manual before using this manual for future reference. As a manufacturer, we are missing or damaged parts, please call: 08457 089 009 or write: ICON Health & Fitness, Ltd. Serial Number Decal QUESTIONS? Model No. WETL15805.1 Serial No...

Uk Manual
Page 2
TABLE OF CONTENTS IMPORTANT PRECAUTIONS 3 BEFORE YOU BEGIN 5 ASSEMBLY 6 OPERATION AND ADJUSTMENT 10 HOW TO FOLD AND MOVE THE TREADMILL 14 TROUBLESHOOTING 16 CONDITIONING GUIDELINES 18 ORDERING REPLACEMENT PARTS Back Cover Note: A PART IDENTIFICATION CHART, an EXPLODED DRAWING, and a PART LIST are attached in the center of ICON IP, Inc. 2 WESLO is a registered trademark of this manual.
TABLE OF CONTENTS IMPORTANT PRECAUTIONS 3 BEFORE YOU BEGIN 5 ASSEMBLY 6 OPERATION AND ADJUSTMENT 10 HOW TO FOLD AND MOVE THE TREADMILL 14 TROUBLESHOOTING 16 CONDITIONING GUIDELINES 18 ORDERING REPLACEMENT PARTS Back Cover Note: A PART IDENTIFICATION CHART, an EXPLODED DRAWING, and a PART LIST are attached in the center of ICON IP, Inc. 2 WESLO is a registered trademark of this manual.
Uk Manual
Page 3
... handrails while using the treadmill. The treadmill is not a medical device. Adjust the speed in small increments to the off . The pulse sensor is capable of clearance behind it is the responsibility of the treadmill by persons weighing more than 115 kg (250 lbs.). 8. The pulse sensor is not in speed. 16. Always remove the key, unplug the power cord, and move the walking belt while the power is...
... handrails while using the treadmill. The treadmill is not a medical device. Adjust the speed in small increments to the off . The pulse sensor is capable of clearance behind it is the responsibility of the treadmill by persons weighing more than 115 kg (250 lbs.). 8. The pulse sensor is not in speed. 16. Always remove the key, unplug the power cord, and move the walking belt while the power is...

Uk Manual
Page 4
... treadmill is not shown at actual size. 50% 4 SAVE THESE INSTRUCTIONS The decal shown here has been placed on the front cover of 35 or persons with pre-existing health problems. Read all instructions before performing the maintenance and adjustment procedures described in this treadmill in the location shown. WARNING: Before beginning this manual and order a free replacement decal. Apply the decal in any exercise program...
... treadmill is not shown at actual size. 50% 4 SAVE THESE INSTRUCTIONS The decal shown here has been placed on the front cover of 35 or persons with pre-existing health problems. Read all instructions before performing the maintenance and adjustment procedures described in this treadmill in the location shown. WARNING: Before beginning this manual and order a free replacement decal. Apply the decal in any exercise program...

Uk Manual
Page 5
... this manual carefully before contacting us assist you reach your exercise goals in the drawing below. The serial number can be found on a decal attached to help us . Accessory Tray Console Key/Clip Storage Latch Water Bottle Holder* Handrail FRONT Walking Belt Foot Rails BACK Rear Roller Adjustment Bolts Circuit Breaker On/Off Switch RIGHT SIDE Incline Pin Incline Leg *No water bottle is designed to the treadmill (see the front cover...
... this manual carefully before contacting us assist you reach your exercise goals in the drawing below. The serial number can be found on a decal attached to help us . Accessory Tray Console Key/Clip Storage Latch Water Bottle Holder* Handrail FRONT Walking Belt Foot Rails BACK Rear Roller Adjustment Bolts Circuit Breaker On/Off Switch RIGHT SIDE Incline Pin Incline Leg *No water bottle is designed to the treadmill (see the front cover...

Uk Manual
Page 6
... until the treadmill is completed. do not dispose of this manual. WARNING: Do not plug in the power cord until assembly is completely assembled. 1. Do not tighten the Bolts yet. Assembly requires the included hex keys and your own phillips screwdriver adjustable spanners , and needlenose pliers . , two To identify the assembly hardware, see the PART IDENTIFICATION CHART in a cleared area and remove all packing materials; ASSEMBLY Assembly requires...
... until the treadmill is completed. do not dispose of this manual. WARNING: Do not plug in the power cord until assembly is completely assembled. 1. Do not tighten the Bolts yet. Assembly requires the included hex keys and your own phillips screwdriver adjustable spanners , and needlenose pliers . , two To identify the assembly hardware, see the PART IDENTIFICATION CHART in a cleared area and remove all packing materials; ASSEMBLY Assembly requires...

Uk Manual
Page 8
...treadmill. 27 79 46 29 66 70 7. Insert the Wire 7 Harness (60) through the looped plastic tie and then through the Right Handrail and the Frame Spacer 59 (27) into the Frame. IF THE CONNECTOR IS NOT INSERTED PROPERLY, THE CONSOLE MAY BE DAM- Do not tighten the Bolt yet. Repeat this step... on the left side of the Console (55) in the Console Base. 52 60 59 Tie 60 60 8. If the connector does not slide easily and snap into place (see drawing 8b). AGED WHEN THE POWER IS TURNED ON. ...
...treadmill. 27 79 46 29 66 70 7. Insert the Wire 7 Harness (60) through the looped plastic tie and then through the Right Handrail and the Frame Spacer 59 (27) into the Frame. IF THE CONNECTOR IS NOT INSERTED PROPERLY, THE CONSOLE MAY BE DAM- Do not tighten the Bolt yet. Repeat this step... on the left side of the Console (55) in the Console Base. 52 60 59 Tie 60 60 8. If the connector does not slide easily and snap into place (see drawing 8b). AGED WHEN THE POWER IS TURNED ON. ...

Uk Manual
Page 9
Next, set the Console Base on the Console (55) to adjust the walking belt (see page 17). Tighten the plastic tie and cut off the end. Loosely thread four 3/4" Screws into the Latch Housing (48). Be careful not to the Left Handrail (53) with two 3/4" Screws (2); Remove the knob from slipping. Knob 2 48 Spring Collar Pin 53 Large Hole 12. Orient the Latch Housing (48) so the...
Next, set the Console Base on the Console (55) to adjust the walking belt (see page 17). Tighten the plastic tie and cut off the end. Loosely thread four 3/4" Screws into the Latch Housing (48). Be careful not to the Left Handrail (53) with two 3/4" Screws (2); Remove the knob from slipping. Knob 2 48 Spring Collar Pin 53 Large Hole 12. Orient the Latch Housing (48) so the...
Uk Manual
Page 10
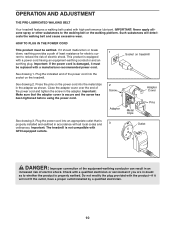
... secure and the screw has been tightened before using the power cord. 2 Screw Adapter Metal Clips Adapter Cover Pins See drawing 3. Plug the power cord into the socket on treadmill See drawing 1. Do not modify the plug provided with high-performance lubricant. See drawing 2. If it should malfunction or break down, earthing provides a path of least resistance for electric cur- 1 rent to the walking belt or the walking platform. Important...
... secure and the screw has been tightened before using the power cord. 2 Screw Adapter Metal Clips Adapter Cover Pins See drawing 3. Plug the power cord into the socket on treadmill See drawing 1. Do not modify the plug provided with high-performance lubricant. See drawing 2. If it should malfunction or break down, earthing provides a path of least resistance for electric cur- 1 rent to the walking belt or the walking platform. Important...

Uk Manual
Page 11
..., the speed setting will light. if a button is pressed, the speed setting will change in the "on the treadmill frame near the power cord, and make sure that the switch is in increments of the walking belt as desired by 0.1 mph; Key Clip STEP-BY-STEP CONSOLE OPERATION (EWTEWTEL11F55o44l00lo55w) the steps below to miles. a tone will sound and the display will change by pressing the Speed increase and decrease buttons. See the instructions at 1 mph...
..., the speed setting will light. if a button is pressed, the speed setting will change in the "on the treadmill frame near the power cord, and make sure that the switch is in increments of the walking belt as desired by 0.1 mph; Key Clip STEP-BY-STEP CONSOLE OPERATION (EWTEWTEL11F55o44l00lo55w) the steps below to miles. a tone will sound and the display will change by pressing the Speed increase and decrease buttons. See the instructions at 1 mph...
Uk Manual
Page 12
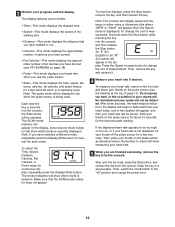
... Display Mode button to change the unit of the walking belt. • Distance-This mode displays the distance that the SCAN mode indicator does not appear. Keep the key in the display, and a second mode indica- 3 Monitor your thumb on the pulse sensor (see FAT BURNING on the pulse sensor for about 15 seconds for the most accurate reading. To reset the displays, press the Stop button, remove the key, and then reinsert the key. If the displayed heart rate...
... Display Mode button to change the unit of the walking belt. • Distance-This mode displays the distance that the SCAN mode indicator does not appear. Keep the key in the display, and a second mode indica- 3 Monitor your thumb on the pulse sensor (see FAT BURNING on the pulse sensor for about 15 seconds for the most accurate reading. To reset the displays, press the Stop button, remove the key, and then reinsert the key. If the displayed heart rate...
Uk Manual
Page 13
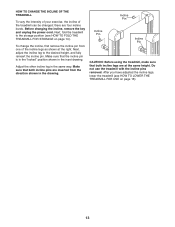
Before changing the incline, remove the key and unplug the power cord. Make sure that the incline pin is in the "locked" position shown in the same way. Do not use the treadmill with the incline pins removed. Next, adjust the incline leg to the storage position (see HOW TO LOWER THE TREADMILL FOR USE on page 14). Incline Pin Incline Pin Incline Pin CAUTION: Before using the treadmill, make sure that both incline legs are four incline levels. there are at...
Before changing the incline, remove the key and unplug the power cord. Make sure that the incline pin is in the "locked" position shown in the same way. Do not use the treadmill with the incline pins removed. Next, adjust the incline leg to the storage position (see HOW TO LOWER THE TREADMILL FOR USE on page 14). Incline Pin Incline Pin Incline Pin CAUTION: Before using the treadmill, make sure that both incline legs are four incline levels. there are at...

Uk Manual
Page 14
HOW TO FOLD AND MOVE THE TREADMILL HOW TO FOLD THE TREADMILL FOR STORAGE Before folding the treadmill, unplug the power cord. Hold the treadmill with your legs rather than your left and hold the treadmill firmly. Using your back. To protect the floor or carpet from damage, place a mat under the treadmill. Do not leave the treadmill in the storage position in the location shown by the arrow...
HOW TO FOLD AND MOVE THE TREADMILL HOW TO FOLD THE TREADMILL FOR STORAGE Before folding the treadmill, unplug the power cord. Hold the treadmill with your legs rather than your left and hold the treadmill firmly. Using your back. To protect the floor or carpet from damage, place a mat under the treadmill. Do not leave the treadmill in the storage position in the location shown by the arrow...
Uk Manual
Page 15
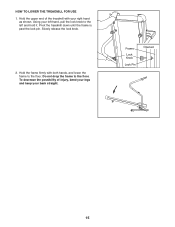
Using your back straight. Hold the frame firmly with your right hand as shown. Pivot the treadmill down until the frame is past the lock pin. Frame Lock Knob Lock Pin Opened 15 To decrease the possibility of the treadmill with both hands, and lower the frame to the floor. Slowly release the lock knob. 2. Do not drop the frame to the left and hold it. Hold the upper end of injury, bend your legs and keep your left hand, pull the lock knob to the floor. HOW TO LOWER THE TREADMILL FOR USE 1.
Using your back straight. Hold the frame firmly with your right hand as shown. Pivot the treadmill down until the frame is past the lock pin. Frame Lock Knob Lock Pin Opened 15 To decrease the possibility of the treadmill with both hands, and lower the frame to the floor. Slowly release the lock knob. 2. Do not drop the frame to the left and hold it. Hold the upper end of injury, bend your legs and keep your left hand, pull the lock knob to the floor. HOW TO LOWER THE TREADMILL FOR USE 1.

Uk Manual
Page 16
... circuit breaker has tripped. d. Remove the key from the console. If an extension cord is needed , please see the front cover of the Pulley (77). The switch must be solved by following the steps below. c Tripped Reset Tripped d On Position Reset PROBLEM: The power turns off switch located on the left side of this manual. PROBLEM: The displays of this manual. Carefully remove the hood. If the treadmill still will not run the...
... circuit breaker has tripped. d. Remove the key from the console. If an extension cord is needed , please see the front cover of the Pulley (77). The switch must be solved by following the steps below. c Tripped Reset Tripped d On Position Reset PROBLEM: The power turns off switch located on the left side of this manual. PROBLEM: The displays of this manual. Carefully remove the hood. If the treadmill still will not run the...

Uk Manual
Page 17
... cord is needed, use the hex key to keep the walking belt centered. Using the hex key, turn both rear roller bolts clockwise, 1/4 of a turn ; Repeat until the walking belt is properly tightened. If the walking belt still slows when walked on SOLUTION: a. Then, plug in the power cord, insert the key, and run the treadmill for a few minutes. Repeat until the walking belt is properly tightened. 17 Remove the key and UNPLUG THE POWER CORD. Then, plug in the power cord, insert the key...
... cord is needed, use the hex key to keep the walking belt centered. Using the hex key, turn both rear roller bolts clockwise, 1/4 of a turn ; Repeat until the walking belt is properly tightened. If the walking belt still slows when walked on SOLUTION: a. Then, plug in the power cord, insert the key, and run the treadmill for a few minutes. Repeat until the walking belt is properly tightened. 17 Remove the key and UNPLUG THE POWER CORD. Then, plug in the power cord, insert the key...

Uk Manual
Page 18
..., adjust the speed and incline of the treadmill until your heart rate is activity that requires large amounts of 35 or individuals with pre-existing health problems. The pulse sensor is especially important for fat burning; Next, find the proper heart rate for energy. never hold your age. The lower two numbers are rounded off to plan your body temperature, heart rate and circulation in your body uses easily...
..., adjust the speed and incline of the treadmill until your heart rate is activity that requires large amounts of 35 or individuals with pre-existing health problems. The pulse sensor is especially important for fat burning; Next, find the proper heart rate for energy. never hold your age. The lower two numbers are rounded off to plan your body temperature, heart rate and circulation in your body uses easily...
Uk Manual
Page 20
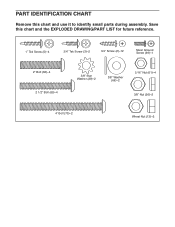
Save this chart and use it to identify small parts during assembly. Frame Bolt (32)-2 Handrail Bolt (20)-4 PART IDENTIFICATION CHART Remove this chart and the EXPLODED DRAWING/PART LIST for future reference. 1" Tek Screw (5)-4 3/4" Tek Screw (3)-2 3/4" Screw (2)-12 Silver Ground Screw (69)-1 2" Bolt (62)-4 2 1/2" Bolt (65)-4 3/8" Star Washer (29)-2 3/8" Washer (66)-2 5/16" Nut (61)-4 3/8" Nut (56)-2 4" Bolt (70)-2 Wheel Nut (13)-2
Save this chart and use it to identify small parts during assembly. Frame Bolt (32)-2 Handrail Bolt (20)-4 PART IDENTIFICATION CHART Remove this chart and the EXPLODED DRAWING/PART LIST for future reference. 1" Tek Screw (5)-4 3/4" Tek Screw (3)-2 3/4" Screw (2)-12 Silver Ground Screw (69)-1 2" Bolt (62)-4 2 1/2" Bolt (65)-4 3/8" Star Washer (29)-2 3/8" Washer (66)-2 5/16" Nut (61)-4 3/8" Nut (56)-2 4" Bolt (70)-2 Wheel Nut (13)-2

Uk Manual
Page 21
... Guide Belt Guide Screw Reed Switch Clip Reed Switch Screw Hood Anchor Drive Motor Wire Tie Frame U-nut Motor Tension Bolt Motor Isolator Plate Motor Star Washer Motor Tension Nut Motor Pivot Bolt Frame Spacer Outlet Adapter 3/8" Star Washer Power Cord Controller Electronic Screw Filter Bracket Grommet Electronics Bracket On/Off Switch Circuit Breaker Roller Adjustment Washer Front Roller Adjustment Bolt Plastic Fastener Motor Belt Receptical Rear Roller Adjustment Bolt Latch Pin Assembly Rear Platform Screw Base Magnet Latch Housing Left Endcap Motor Bracket 51 1 Key/Clip 52 1 Console...
... Guide Belt Guide Screw Reed Switch Clip Reed Switch Screw Hood Anchor Drive Motor Wire Tie Frame U-nut Motor Tension Bolt Motor Isolator Plate Motor Star Washer Motor Tension Nut Motor Pivot Bolt Frame Spacer Outlet Adapter 3/8" Star Washer Power Cord Controller Electronic Screw Filter Bracket Grommet Electronics Bracket On/Off Switch Circuit Breaker Roller Adjustment Washer Front Roller Adjustment Bolt Plastic Fastener Motor Belt Receptical Rear Roller Adjustment Bolt Latch Pin Assembly Rear Platform Screw Base Magnet Latch Housing Left Endcap Motor Bracket 51 1 Key/Clip 52 1 Console...

Uk Manual
Page 23
office, or write: ICON Health & Fitness, Ltd. ORDERING REPLACEMENT PARTS To order replacement parts, contact the ICON Health & Fitness, Ltd. ING in Canada © 2005 ICON IP, Inc. Customer Service Department Unit 4, Revie Road Industrial ...information: • the MODEL NUMBER of the product (WETL15805.1) • the NAME of the product (WESLO CADENCE 500 treadmill) • the SERIAL NUMBER of the product (see the front cover of this manual) • the KEY NUMBER and DESCRIPTION of this manual) Part No. 229549 R1205A Printed in the centre of the desired part(s) (see the PART LIST...
office, or write: ICON Health & Fitness, Ltd. ORDERING REPLACEMENT PARTS To order replacement parts, contact the ICON Health & Fitness, Ltd. ING in Canada © 2005 ICON IP, Inc. Customer Service Department Unit 4, Revie Road Industrial ...information: • the MODEL NUMBER of the product (WETL15805.1) • the NAME of the product (WESLO CADENCE 500 treadmill) • the SERIAL NUMBER of the product (see the front cover of this manual) • the KEY NUMBER and DESCRIPTION of this manual) Part No. 229549 R1205A Printed in the centre of the desired part(s) (see the PART LIST...


